


How to Use a Laser Rotary Attachment: Setup, Focus & Test Engraving
 2026-09-25
WHAT ARE YOU LOOKING FOR?
Search Across Products, Blog Posts, Support Content, And Resources.

How to Use a Laser Rotary Attachment: Setup, Focus & Test Engraving
2026-09-25

Using a laser rotary attachment successfully is mostly about setup. The rotary needs to be aligned with the machine, the workpiece must rotate without slipping or wobbling, the correct diameter and rotary calibration must be entered in the software, and the engraving area has to be focused and framed before the final job begins.
This guide walks through that workflow from start to finish. It covers roller and chuck rotary installation principles, workpiece leveling, diameter measurement, LaserMaker, RDWorks, and LightBurn setup, focusing, framing, low-power testing, full-wrap engraving, and the most common setup problems.
If you are still deciding which rotary attachment fits your products, first read our Laser Rotary Attachment Guide: Roller vs Chuck, Compatibility & Buying Tips. If you want to understand how a rotary axis works, see the Laser Rotary Attachment Wiki.
Last reviewed: September 2026.
Quick Answer: Rotary Engraving Workflow
Before installing anything, confirm that the laser machine, controller, rotary attachment, and software are compatible. Similar-looking rotary devices are not necessarily interchangeable because motor configuration, connectors, rotary calibration, and machine control can differ.
You should also inspect the actual product you plan to engrave. A straight tumbler is relatively simple, while a tapered cup, long bottle, handled mug, or heavy cylindrical part may require additional leveling, support, or clearance.
Before installation, confirm:
For current Thunder Roller Rotary hardware limits and machine-specific installation information, use the Thunder Laser Roller Rotary Support Guide.
Rotary alignment affects the angle of the finished engraving. If the rotary is installed at an angle to the machine axis, a straight design can appear tilted on the product even when the artwork itself is correct.
Lower the worktable enough to create safe clearance for both the rotary fixture and the workpiece. Place the rotary on the table and align its rotational axis parallel to the machine's X-axis.
On machines with a honeycomb table, the honeycomb grid can provide a convenient visual reference for alignment. The important principle is that the rotary itself should sit squarely and should not move during processing.
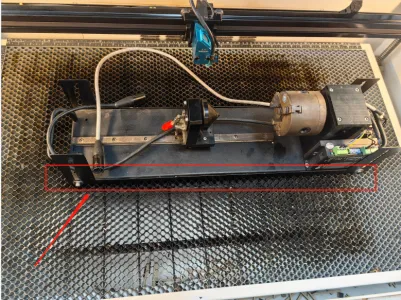
Align the rotary axis with the laser machine before mounting the workpiece. This original example shows a chuck-style rotary fixture.
Connect the rotary attachment to the machine's designated rotary-axis connection according to the instructions for your Thunder Laser model. Make sure the connector is fully seated and secured before powering or operating the rotary.
Do not assume that a connector with the same physical shape uses the same pinout, motor, or control settings. Use a rotary attachment confirmed for the specific machine or controller.
The workpiece should rotate around a stable axis without slipping, wobbling, drifting sideways, or pulling the rotary out of position.
Place the product on the rollers and adjust the roller spacing so the workpiece sits securely. Make sure there is enough surface contact to rotate the product without slipping.
If the product is long, use the available support system to prevent the unsupported end from sagging or moving off-axis. If it is tapered, level the engraving area before continuing.
Place the object between the chuck or clamp points and tighten the fixture enough to hold it securely without deforming or damaging the product.
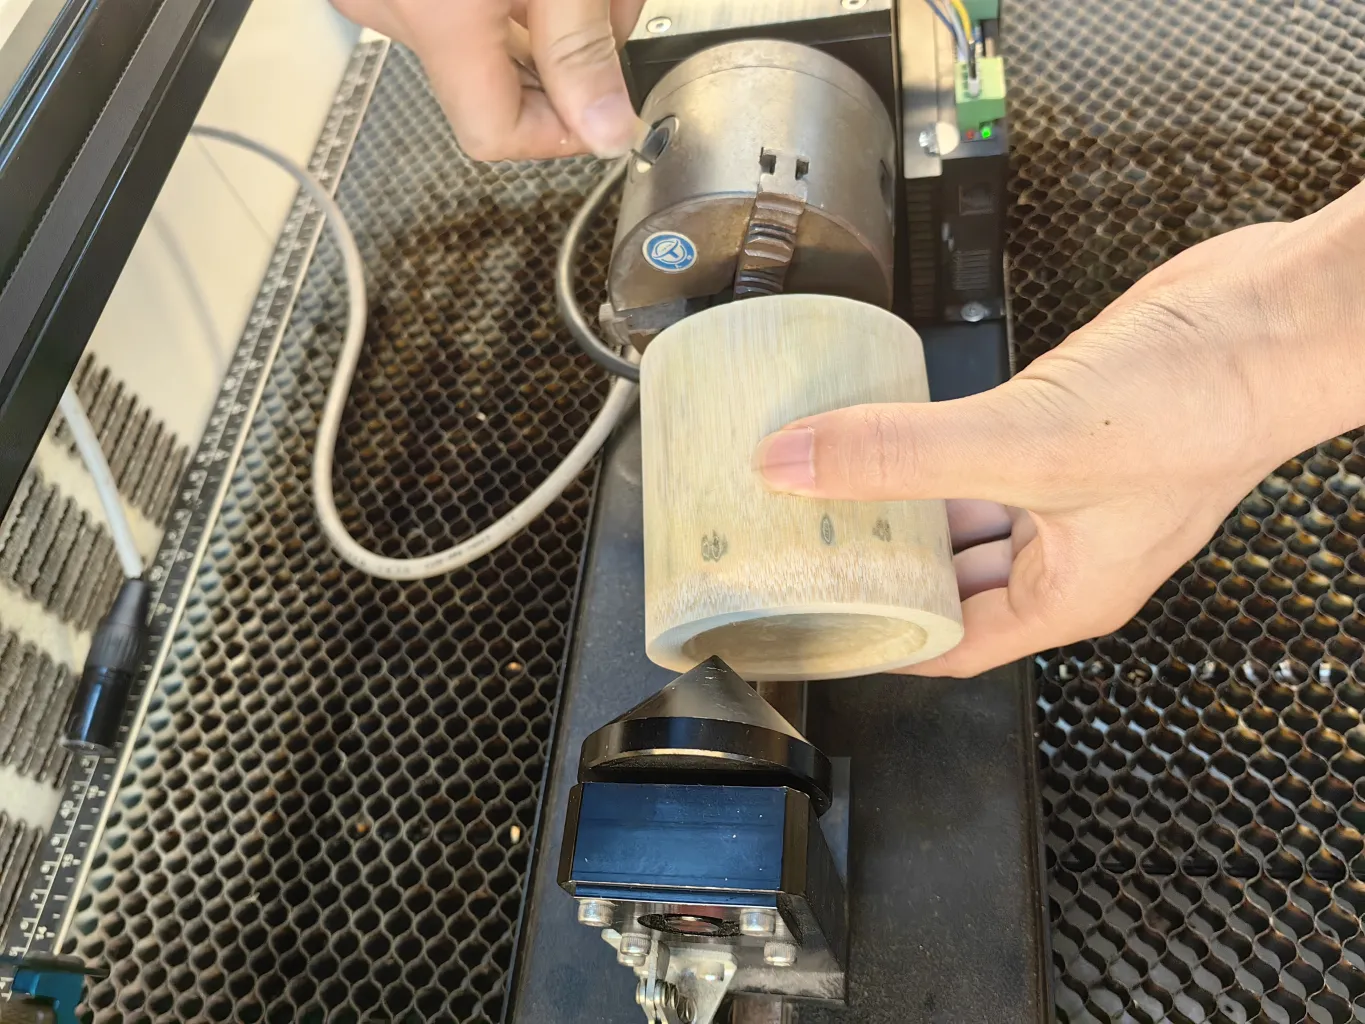
Secure the cylindrical workpiece so it remains stable throughout the full rotation.
Smooth cylindrical objects can be difficult to grip. The original Thunder workflow used additional friction material where appropriate to reduce slipping. Whatever method you use, avoid creating a new high point, uneven pressure, or unstable contact that changes the rotation.
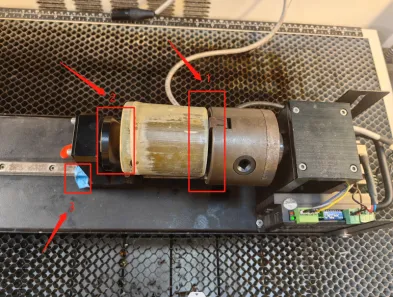
Confirm that the rotary fixture and workpiece are fully secured before continuing.
Straight cylinders are relatively simple because the diameter remains consistent through the engraving area. Tapered cups and bottles are more difficult because one end sits higher than the other.
The goal is to make the planned engraving area as level as practical relative to the laser. Current Thunder Roller Rotary hardware provides an adjustable right-side height mechanism for this purpose. Raise or lower the supported end until the engraving surface is positioned appropriately, then lock the adjustment before processing.
Strongly tapered products may still limit the usable engraving width because the effective diameter and focal distance change across the design. A narrower design is usually easier to keep consistent than a wide wrap on a steep taper.
Rotary software needs the correct relationship between motor rotation and workpiece surface movement. That is why workpiece diameter matters.
On a straight cylinder, measure the diameter accurately with calipers or another suitable measuring tool. On a tapered product, measure the diameter at or near the actual engraving zone rather than automatically using the widest base or narrowest top.
Circumference = π × Diameter
Incorrect diameter or rotary calibration can make artwork appear stretched, compressed, or fail to close correctly in a wraparound design.
The exact rotary configuration depends on the machine, controller, software, and rotary hardware. Do not copy a pulse or steps-per-rotation value from an unrelated rotary attachment simply because the software interface looks similar.
Current Thunder Laser workflows support LaserMaker, RDWorks, and compatible LightBurn configurations. Use only the section for the software you actually run.
For the current Thunder Roller Rotary, use the current model-specific values provided in the official setup documentation for your machine and rotary.
If you also need to install or reconnect RDWorks, see the RDWorks V8 Download & Installation Guide.
The old version of this article used one fixed rotary configuration. The current workflow should instead use the calibration value specified for the actual rotary attachment. Different rotary designs, gear ratios, and motor configurations can require different pulse or steps-per-rotation values.
Once the rotary and software are configured, position the laser over the center of the planned engraving area and set focus using the normal focusing method for your machine.
On a straight cylinder, the upper engraving line is normally the most practical reference because it is closest to the laser. For tapered or irregular products, focus should be considered together with the actual design position and engraving width rather than using a distant part of the object as the reference.
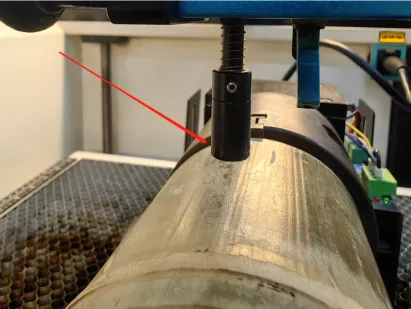
Set focus at the planned engraving area after the workpiece is mounted and leveled.
Current Thunder Roller Rotary workflows can use machine autofocus where supported. Always confirm that the autofocus hardware itself has enough clearance around the rotary and workpiece before activating it.
Do not begin the final engraving immediately after focusing. First use the software and machine's Frame, Border, or positioning function to confirm where the design will run.
During framing, verify:
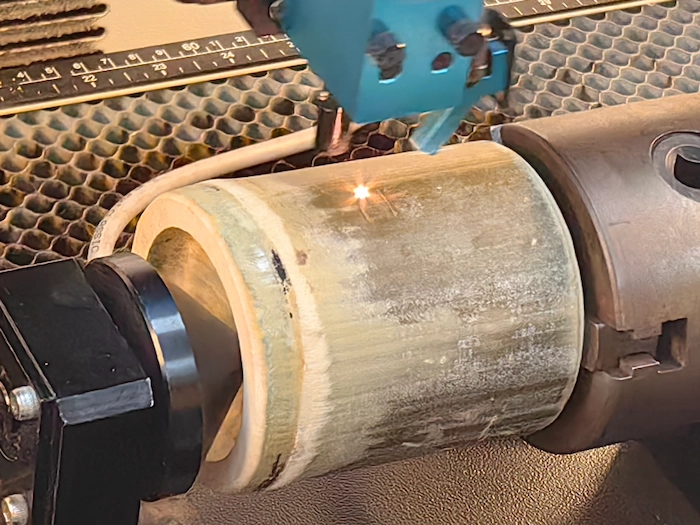
Run Frame or Border before engraving to verify the design position and usable engraving range.
A Frame test confirms the movement envelope, but a low-power test can reveal problems that are harder to see from framing alone, including incorrect scale, mirrored artwork, wrong rotation direction, and poor wrap alignment.
A practical test method for drinkware is to cover the engraving area with masking tape or paper, reduce laser power to a minimal test level, and run the complete job over the protective layer.
This step is particularly valuable when processing a finished tumbler, bottle, or other product where an incorrect first pass would waste the entire item.
Once alignment, focus, software configuration, framing, and test movement are confirmed, load the final engraving parameters for the material and begin processing.
Monitor the first part of the job carefully. The product should rotate smoothly without slipping, rocking, or shifting sideways. Stop the job if the rotary begins making abnormal movement or if the workpiece changes position.
For a tested example, see the Coated Stainless Steel Tumbler project, which uses a Thunder Bolt, rotary attachment, and LaserMaker.
Full-wrap engraving requires more calibration than a small one-sided logo because the start and end of the design need to align around the circumference.
Before attempting a full wrap:
On a mug with a handle, the usable circumference may be substantially smaller than a full 360° rotation because the handle can enter the laser head or enclosure clearance zone.
| Problem | Likely Cause | What to Check |
|---|---|---|
| Artwork is stretched or compressed | Incorrect diameter or rotary calibration | Recheck actual diameter and hardware-specific cycle pulse / steps |
| Design appears tilted | Rotary is not aligned with machine axis | Realign the rotary parallel to the X-axis |
| One end of the engraving is less sharp | Taper or uneven workpiece height | Level the engraving area and reduce design width if necessary |
| Workpiece slips | Insufficient roller traction or clamping | Workpiece support, roller spacing, grip, weight, and balance |
| Workpiece moves sideways | Poor support or misalignment | Rotary alignment, end support, and workpiece centering |
| Artwork is mirrored or upside down | Artwork orientation or rotary direction | Run a low-power orientation test before the final job |
| Full-wrap seam does not meet | Diameter, calibration, or artwork circumference mismatch | Test actual rotation and verify design width against usable circumference |
| Handle or protrusion hits the machine | Insufficient rotation clearance | Reduce rotation range or reposition the product before engraving |
| Rotary does not move | Cable, rotary mode, controller, or configuration issue | Connection, rotary enable setting, and machine-specific support instructions |
The original Thunder Laser rotary tutorial below demonstrates the physical installation, chuck-style workpiece setup, focusing, border checking, and engraving workflow. The hardware shown is an earlier rotary configuration, so use the current Thunder Support instructions for model-specific software parameters and current Roller Rotary hardware.
Thunder Laser rotary device operation tutorial.
You can find additional machine and software tutorials in the Thunder Laser Video Academy and LaserMaker Tutorial Library.
A reliable rotary workflow follows the same order each time: secure the hardware first, confirm the workpiece geometry, configure the software, then verify the engraving position before applying normal processing power.
For your next project, explore the Thunder Laser Inspiration Library, review tested Laser Settings, or submit a specific cylindrical product through Material Testing.
Ready to Try a Rotary Engraving Project?
Start with a simple cylindrical workpiece, confirm the rotary setup with a low-power test, and then build toward wider graphics and full-wrap designs as you verify your machine and material workflow.
Explore Rotary ProjectsTalk To Our Experts Now!
Please leave your contact information so that we can serve you better.
FAQS
Install the rotary securely and align its rotational axis parallel to the machine's intended movement axis, typically the X-axis in the current Thunder Roller Rotary workflow. Poor alignment can make otherwise straight artwork appear tilted on the finished product.
Focus at the planned engraving zone after the workpiece has been mounted and leveled. On a straight cylinder, the upper engraving area is normally the practical reference. On tapered or irregular products, focus should be evaluated together with the actual design position and width.
Measure at or near the area where the artwork will actually be engraved rather than automatically using the widest or narrowest part of the tumbler. A tapered product changes diameter along its length, so the engraving position matters.
Check roller spacing, surface contact, workpiece balance, leveling, and any available end support. A very smooth, tapered, heavy, or unbalanced product may require additional support or a different fixture strategy.
The most common causes are an incorrect object diameter or incorrect rotary calibration, such as cycle pulse, circle pulse, or steps per rotation. Verify the actual workpiece diameter and use the hardware-specific calibration value for your rotary attachment.
First check whether the rotary attachment is aligned parallel to the machine axis. Also confirm that the workpiece itself is not sitting at an angle or shifting sideways during rotation.
Yes. Frame or Border lets you verify artwork position, orientation, available rotation, and physical clearance before the laser applies the final engraving settings.
A useful method is to cover the engraving area with masking tape or paper and run the job at a very low test power. This lets you check design size, orientation, position, and rotary movement before engraving the finished surface.
Yes. Current Thunder Laser rotary workflows support LaserMaker rotary configuration. Applicable Thunder systems can also use RDWorks and compatible LightBurn configurations. Use the exact calibration values specified for your rotary hardware.
No. Rotary hardware can use different motors, gearing, and mechanical designs. Use the value specified for the actual rotary attachment and machine rather than copying a number from another tutorial or rotary model.
Verify the real diameter at the engraving position, correct rotary calibration, usable circumference, artwork width, and start/end seam position. Run a full low-power wrap test before processing the final surface.
Possibly, but you must check the complete rotation path first. The handle can collide with the laser head, table, enclosure, or rotary frame, so it may reduce the usable engraving range or prevent a complete 360-degree wrap.
FIND THE RIGHT LASER FOR YOUR NEXT PROJECT
Explore Thunder Laser solutions designed for different materials, workflows, and production needs.


 Stable & Consistent MachinesUnlimited ApplicationsRobust After-sales SupportFactory Direct Supply


