Keeping your laser optics clean is essential for maintaining the quality of your work and extending the lifespan of your equipment. Whether you’re working with wood, acrylic, or other materials, the laser lens and mirrors are exposed to dust, debris, and residue, which can affect performance and precision.
In this guide, we’ll discover the steps for cleaning your laser lens and mirrors, ensuring your machine runs at its best while avoiding potential damage to the optics.
1. When to Clean the Laser Lens and Mirrors?
How often you should clean your optics depends on your environment and the materials you’re working with. As a general rule, it’s ought to inspect and clean your laser lens, the second and third laser mirrors daily. These parts are closer to the materials, so they get dirty faster.
If you work all the time with wood and acrylic deep engraving, you might need to check and clean the lens twice a day. Besides, once a week, be sure to give all the laser mirrors, the laser lens, the beam combiner, and the tube dust cover a thorough cleaning to keep everything clean.
2. What to Prepare Before Cleaning?
Ensuring that you’re properly prepared is key to a successful cleaning process. From safety precautions to the right tools, taking the necessary steps beforehand will help protect both your optics and your machine. Let’s go over what you’ll need to get started.
2.1. Safety Precautions Before Cleaning
Before your cleaning, make sure the laser button is completely turned off and the optics have cooled down. The optical components will be hot after the machine has been running, and you definitely don’t want to burn yourself. Never clean the laser lens or other laser optics while the cutter is on—it’s just asking for trouble.
2.2. Essential Tools for Cleaning the Optical Components
Using the right tools is key to maintaining your laser lens and laser mirrors. Here’s what you’ll need.
- Dust free cloth
- Cotton swabs
- Lens cleaning solution
- A blowing ball
And don’t forget to wear protective gloves to keep fingerprints and oils from getting on the optics while you’re cleaning.
3. Steps to Clean the Optical Components
Once you’ve gathered the necessary tools and ensured the laser machine is safely powered off, it’s time to begin cleaning the optical components. Follow these steps carefully to ensure that your laser lens and mirrors are thoroughly cleaned without causing damage.
3.1. Disassemble the Laser Lens and Mirrors
Use the included kit to take apart the optics for thoroughly cleaning. Be very careful during disassembly to avoid breaking the lens or scratching the mirror, and you can put a cloth on the honeycomb directly under the laser head, so that even if you miss, the parts will fall on the cloth, avoiding injuries and making it easier to find the parts.
Read More: Inspecting and Cleaning Nova Series Optics

3.2. Gently Remove the Dust with a Blowing Ball
Start by using the blowing ball to gently blow any dust or particles off the surface of the optics. Avoid using your mouth to blow on them, as saliva can cause more contamination. Using the blowing ball is a safe way to remove dust without touching the laser lens and mirrors.
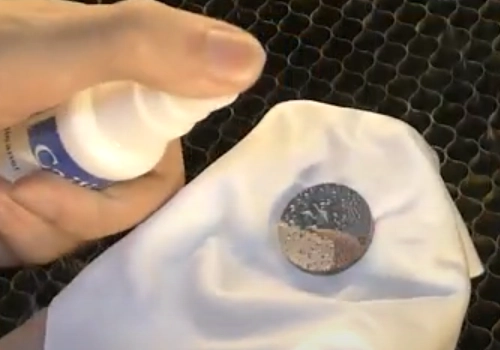
3.3. Wipe the Optics with Cleaning Solution
If there are any stubborn smudges or spots, apply a bit of laser lens cleaning solution to your dust free cloth or cotton swab. You have two ways to do this: wipe the laser lens and the laser mirror with a dust free cloth or cotton swabs dipped in the cleaning solution; or spray the cleaning solution directly onto the laser lens and laser mirror and then wipe them.
Gently wipe the laser lenses and mirrors in a circular motion or a Z-pattern, starting from the center and moving outward. Be careful not to press too hard—you don’t want to scratch the surface, especially if the optics have anti-reflective coatings.
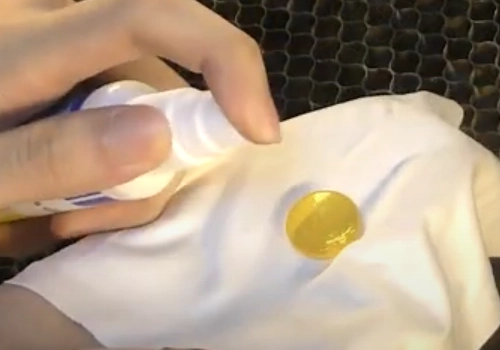
Clean the Laser Lens
Clean a Laser Mirrors
3.4. Double Check After Cleaning
After cleaning, inspect the laser lens and mirrors under a bright light to make sure there’s no residue left. You can tilt the laser lens or the laser mirrors at an angle to check for any remaining smudges or spots. If you still see any dirt, repeat the cleaning process until everything is spotless. Then you can put them back in place and install them.
Conclusion
Regular maintenance, including proper cleaning of the laser lens and mirrors, is key to ensuring optimal laser performance. By following these steps and staying on top of your cleaning routine, you can avoid costly repairs and keep your machine running smoothly.
Remember, safety first—always power off the machine and allow the optics to cool down before you begin. With the right tools and techniques, you’ll be able to maintain your optics in top condition for precise and high-quality results every time.
FAQs About Clean the Laser Lens and Mirrors
Q1. Can I use regular tissues or cloths to clean the optics?
No. Regular tissues or cloths can leave fibers behind and may even scratch the optical surfaces. Stick with the dust-free cloths and it’s the right choice.
Q2. Can I clean the laser lens and mirrors with water?
Avoid using water, especially tap water, as it can leave mineral deposits on the laser lens and laser mirrors. Instead, use the specifical cleaning solution.
Q3. What should I do if the optics are damaged?
If you notice scratches or other damage on the laser lens and laser mirrors, it’s best to reach out to your manufacturer for replacements. Damaged optics can seriously affect laser performance and focus.
Q4. How long does it take to clean laser mirrors and lenses properly?
Cleaning laser mirrors and lenses properly typically takes about 10 to 20 minutes, depending on how dirty they are and your experience level. Taking the time ensures both safety and effectiveness.
Q5. Are there any signs that indicate dirty laser optics?
Yes, signs include a noticeable drop in cutting or engraving power, burn marks on the material, increased smoke or charring, and unusual sounds during operation. These are all clues that your optics may need cleaning.
.png "laser cutter Globle") International
International
 United States
 Brasil
 Canada
 Costa Rica
 Mexico
 Česká
Česká
 Romania
 Polska
 Ireland
 Italia
 Lietuva
 Россия
 Deutschland
 Britain
 Україна
 France
 Sverige
 Norway
 Denmark
 Ελλάδα
 Portugal
 한국
한국
 中国
中国
 中国香港
中国香港
 Israel
 中國臺灣
中國臺灣
 ジャパン
ジャパン India
India
 پاکستان
 پශ්රී ලංකා
 ประเทศไทย
 Australia
 New Zealand
 South Africa