Introduction
Finding the best laser parameters is one of the most important skills every beginner needs to learn. Instead of relying on fixed parameter tables, experienced users achieve consistent results through testing. Different materials, thicknesses, and machines all respond differently to the same settings, which is why guessing often leads to poor cuts or uneven engravings.
This guide introduces a simple, step-by-step testing process to help you identify the right laser parameters for your specific material and job. By using small test patterns and controlled adjustments, you’ll learn how to dial in clean cuts and precise engravings with confidence—without wasting time or material.
Content
What Are Laser Parameters?
Laser parameters are the settings that control how a laser interacts with a material during cutting or engraving. For beginners, laser parameters can be grouped into a few core controls: power, speed, focus, and DPI or frequency. Each parameter affects the material in a different way. For example, higher power delivers more energy, while slower speed increases the time the laser stays on one spot. Focus determines how concentrated the laser beam is, which directly impacts cutting ability and engraving sharpness.
There is no universal laser setting that works for every situation. Even two machines with the same rated power can produce completely different results when processing the same piece of wood using identical parameters. Because of this, finding the best laser parameters is not about copying numbers from a chart. It is about understanding how your machine and material behave and using systematic testing to adjust the settings until the desired result is achieved.
How to Find the Best Laser Parameters?
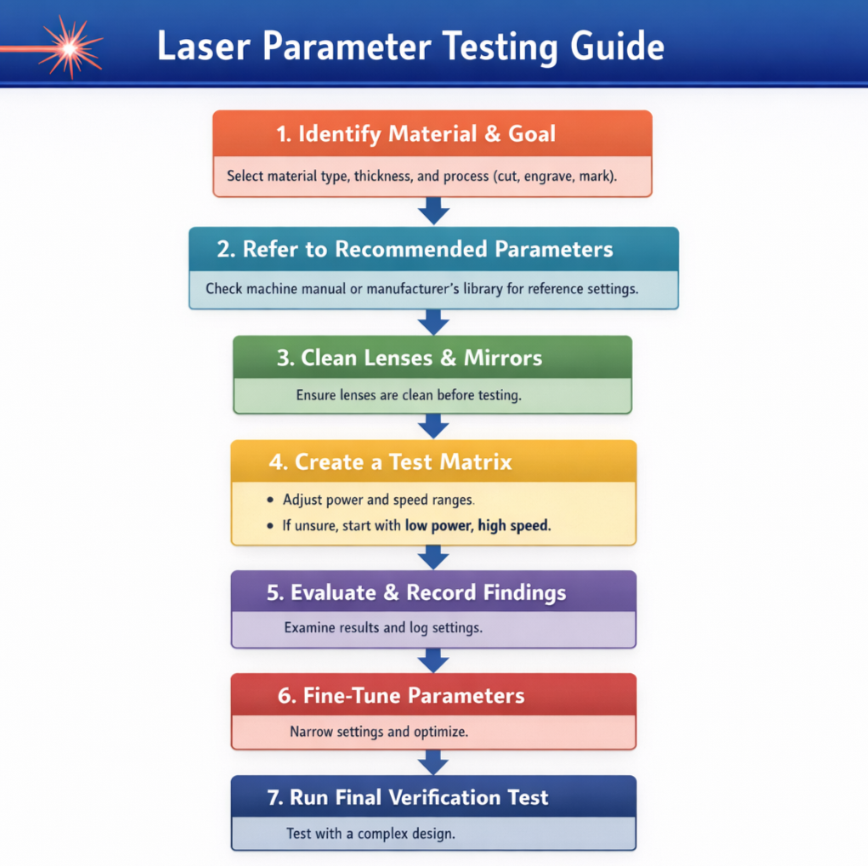
Finding the right laser parameters may seem daunting at first, but by following a systematic approach, beginners can achieve clean cuts and precise engravings without wasting material. Here’s a step-by-step process to guide you.
➤ Step 1: Identify Your Material and Goal
Start by clearly defining the specific material, its thickness, and your desired result:
● Material type: wood, acrylic, leather, etc. Different materials react differently to the same laser settings.
● Thickness: Thicker materials require more power or slower speeds.
Having these details upfront helps you choose the right parameters and sets a clear target for your testing process.
➤ Step 2: Refer to Recommended Parameters
Once you have confirmed your material, thickness, and desired outcome, consult authoritative sources for recommended settings. Typically, these include:
● Your laser machine’s manual – often provides tested power, speed, and frequency values tailored to your model and lens configuration.
● Manufacturer’s material library – many brands maintain a database of expert-tested parameters for common materials.
Using these recommended values gives you a reliable starting point. They are not final settings, but a foundation for your own testing and fine-tuning, helping you avoid guesswork and reduce material waste.
Note: If you need to work with less common materials, you can contact our after-sales support team. Our professional experts can test the material and provide a recommended range of parameters, helping you achieve optimal results without unnecessary trial and error.
➤ Step 3: Clean the Optical Lens and Mirrors
Before running any tests or adjustments, make sure your laser’s optical lens and mirrors are clean. Dust, residue, or smudges can reduce beam transmission efficiency, affecting cutting depth, engraving quality, and overall consistency. Regularly inspecting and cleaning these components ensures that the laser delivers maximum energy to the material, making your test results more reliable and helping you achieve consistent, high-quality cuts and engravings.
Learn more: How to Clean the Laser Lens and Mirrors?
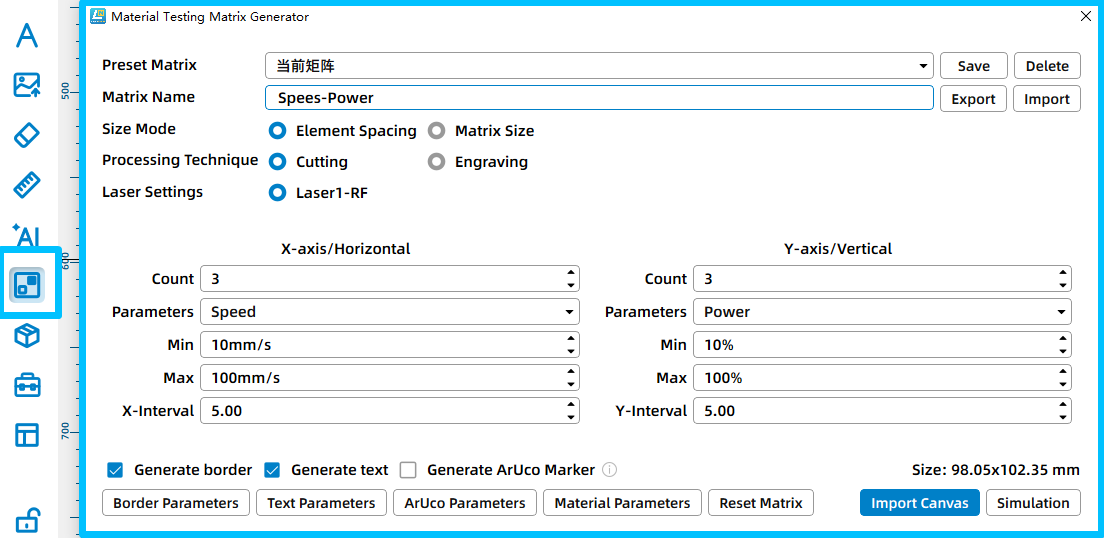
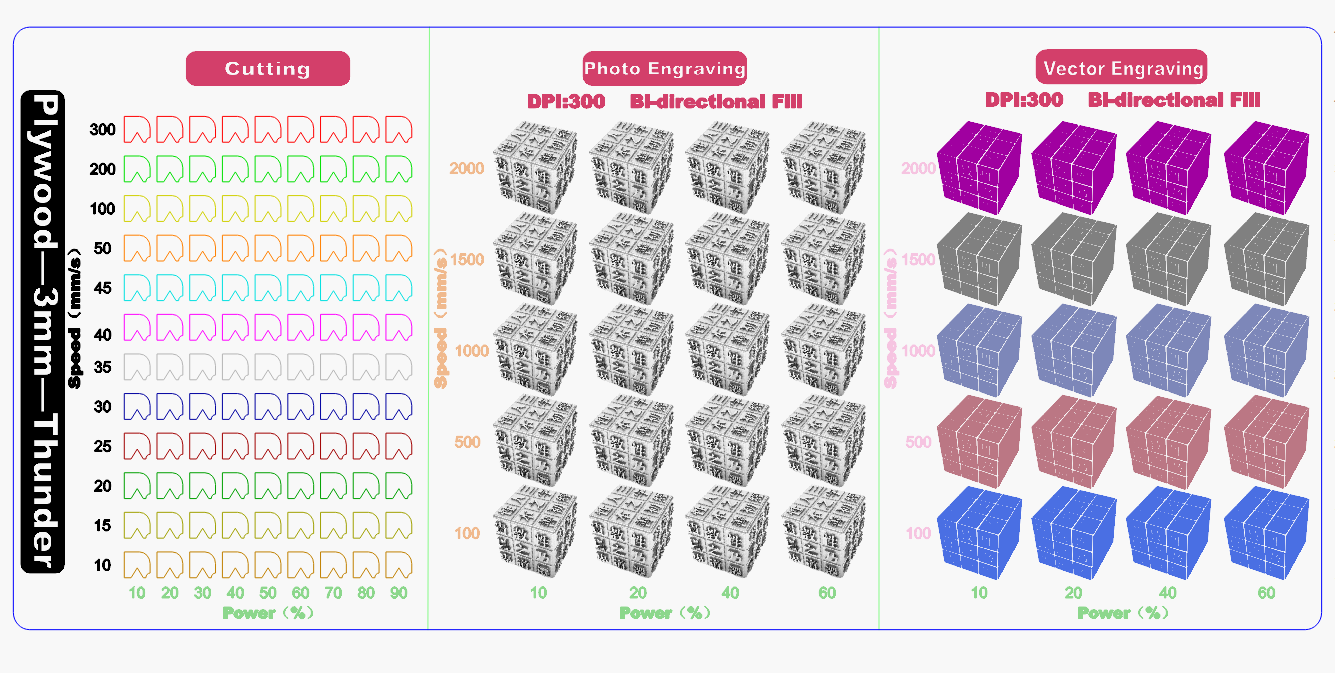
➤ Step 4: Create a Test Matrix
Based on the recommended parameters, create a test matrix to evaluate how different settings affect the material. A test matrix is a grid of different parameter combinations you will use. It allows you to find optimal settings in a controlled and efficient way.
The test matrix can be generated directly in your laser software, such as LaserMaker or LightBurn. For example, LightBurn has a built-in Material Test generator that creates a grid of boxes with varying power and speed values. Each row typically represents one variable (such as speed), and each column represents another (such as power), allowing you to see their combined effect on the material. You can adjust the number of rows and columns, minimum and maximum values, and other grid settings before generating the pattern. Alternatively, you can use the test files provided by us and modify the parameters according to your specific machine, material, and processing goals. Start with ranges around your reference settings. For example, if your recommended power is 50% and speed is 3000 mm/min, you might test 35–75% power and 2000–3500 mm/min speed.
➤ Step 5: Evaluate and Record Findings
After running the test matrix, carefully evaluate the results and compare each parameter combination against your original goal.
●For laser cutting, check whether the material is fully cut through, whether the edges are clean, and if there is excessive burning or charring.
●For laser engraving or marking, focus on engraving depth, contrast, line sharpness, and overall consistency.
Avoid judging results based on appearance alone. Gently remove the test piece if needed and inspect the underside, edge quality, and repeatability of the outcome. Once you identify promising results, record the corresponding parameters in detail, including:
· Material type and thickness
· Power, speed, and frequency (or DPI/PPI)
· Focus position and number of passes
· Notes on edge quality or engraving clarity
| Machine | Material | Process | Power | Speed | Frequency / DPI | Passes | Result | Notes |
|---|---|---|---|---|---|---|---|---|
| Thunder Bolt 30W | 3mm Plywood |
Cutting | Max: 35% Min:10% |
10 mm/s | 1 | Fully cut | Slight char on edges | |
| Cutting | Max: 25% Min:10% |
10 mm/s | 1 | Fully cut | Perfect | |||
| Engraving | 30% | 600 mm/s | 300 DPI | 1 | Good contrast | Clean surface |
An example of Laser Parameter Test Log
➤ Step 6: Narrow the Range and Fine-Tune Parameters
Once you have identified the most promising results from your test matrix, narrow the parameter range and focus on small, controlled adjustments. Instead of testing wide variations, fine-tune the settings around the best-performing combinations.
Adjust only one parameter at a time, such as slightly increasing or decreasing power or speed, while keeping other variables unchanged. This makes it easier to see how each adjustment affects the final result and helps you avoid confusion.
Run a second round of smaller tests to confirm consistency. Pay attention to subtle improvements in cut quality, edge smoothness, engraving depth, and contrast. When the results are stable and repeatable, finalize the parameters and add them to your parameter library.
This refinement process ensures that your final settings are not just acceptable, but optimized for your specific material, machine, and application.
➤ Step 7: Run a Final Verification Test
Before moving to full production, run a final verification test using a more complex design rather than a simple square or straight line. Designs with curves, sharp corners, fine details, and varying directions better reflect real-world processing conditions. This final test helps confirm that your selected parameters handle corners, curves, and detail transitions correctly without overburning, undercutting, or loss of detail. If issues appear, make small adjustments and repeat the test until the results remain clean and consistent across the entire design. Completing this step ensures that your settings are reliable not only in test patterns but also in actual projects.
Conclusion
Finding the best laser parameters is simple. By observing results carefully and making thoughtful adjustments, you can achieve consistent, high-quality cuts and engravings. Remember, every machine and material behaves differently, so ongoing testing and fine-tuning are key to maintaining optimal results. With patience and attention to detail, even beginners can achieve professional-quality outcomes while minimizing errors and material waste.
FAQs
How often should I test my laser parameters?
Whenever you use a new material, change thickness, switch laser machines, or notice inconsistent results. Regular testing ensures optimal quality and reduces material waste.
Can beginners find the best laser parameters? If I havn't used a laser machine before.
Yes, finding the optimal laser parameters is simpler than it may seem. Beginners can achieve excellent results without prior experience by following a systematic approach. With careful observation, step-by-step testing, and gradual adjustments, even first-time users can identify the right settings for their material and machine, ensuring clean cuts and precise engravings.
Can I use the recommended settings from other users for my own laser?
Recommended settings from other users can be a helpful starting point, but they may not deliver the best results on your own machine. Differences in laser tubes, power output, lenses, material batches, and environmental conditions all affect performance. Always use these recommendations as a reference and adjust through your own testing to achieve optimal results.
How do I know if I’ve achieved the best laser cutting or engraving results?
To determine if your settings are optimal, carefully evaluate the outcome of your cuts or engravings. Look for clean edges, consistent depth, clear contrast, and minimal burning or charring. If the material is fully processed without damage and the details match your design intent, your parameters are likely well-optimized. Regular observation and fine-tuning help maintain consistent, high-quality results.
.png "laser cutter Globle") International
International
 United States
 Brasil
 Canada
 Costa Rica
 Mexico
 Česká
Česká
 Romania
 Polska
 Ireland
 Italia
 Lietuva
 Россия
 Deutschland
 Britain
 Україна
 France
 Sverige
 Norway
 Denmark
 Ελλάδα
 Portugal
 한국
한국
 中国
中国
 中国香港
中国香港
 Israel
 中國臺灣
中國臺灣
 ジャパン
ジャパン India
India
 پاکستان
 پශ්රී ලංකා
 ประเทศไทย
 Australia
 New Zealand
 South Africa