How to Set the Best Laser Engraving DPI?
 2026-04-27
WHAT ARE YOU LOOKING FOR?
Search Across Products, Blog Posts, Support Content, And Resources.

How to Set the Best Laser Engraving DPI?
2026-04-27

In laser engraving, fine details and sharp contrast depend on more than laser power or speed. Laser engraving DPI and resolution are also key settings that define the final result. Whether you are engraving photos on wood or marking logos on acrylic, understanding how DPI works with materials and design complexity can save hours of testing and reduce wasted material.
This guide explains what DPI means in laser engraving, how it affects engraving quality and processing time, and how to choose a suitable DPI setting for different materials and projects.
Laser engraving DPI and resolution video.
In laser engraving, DPI stands for dots per inch. It describes how densely the engraving dots or scan lines are placed within one inch. In practical laser software, DPI is closely related to engraving resolution, line spacing, and how much detail the laser attempts to reproduce on the material surface.
A higher DPI places laser marks closer together, which can improve detail and smoother gradients. A lower DPI spaces the marks farther apart, which can make engraving faster and reduce heat buildup, but may show less detail on fine images.
To avoid confusion, it is helpful to understand how DPI differs from related terms such as PPI and resolution.
| Term | Meaning | Relation to Laser Engraving |
|---|---|---|
| DPI | Dots per inch, or engraving dot / line density | Controls how densely laser marks are placed on the material. |
| PPI | Pixels per inch in a digital image | Describes the pixel density of the source image. |
| Resolution | Overall image dimensions, usually width × height in pixels | Determines how much image detail is available before engraving. |
Comparison table: DPI, PPI, and resolution in laser engraving.
In short, the DPI setting controls dot or line spacing during engraving. Higher DPI can produce finer detail, but it also increases engraving time, heat input, and energy usage.
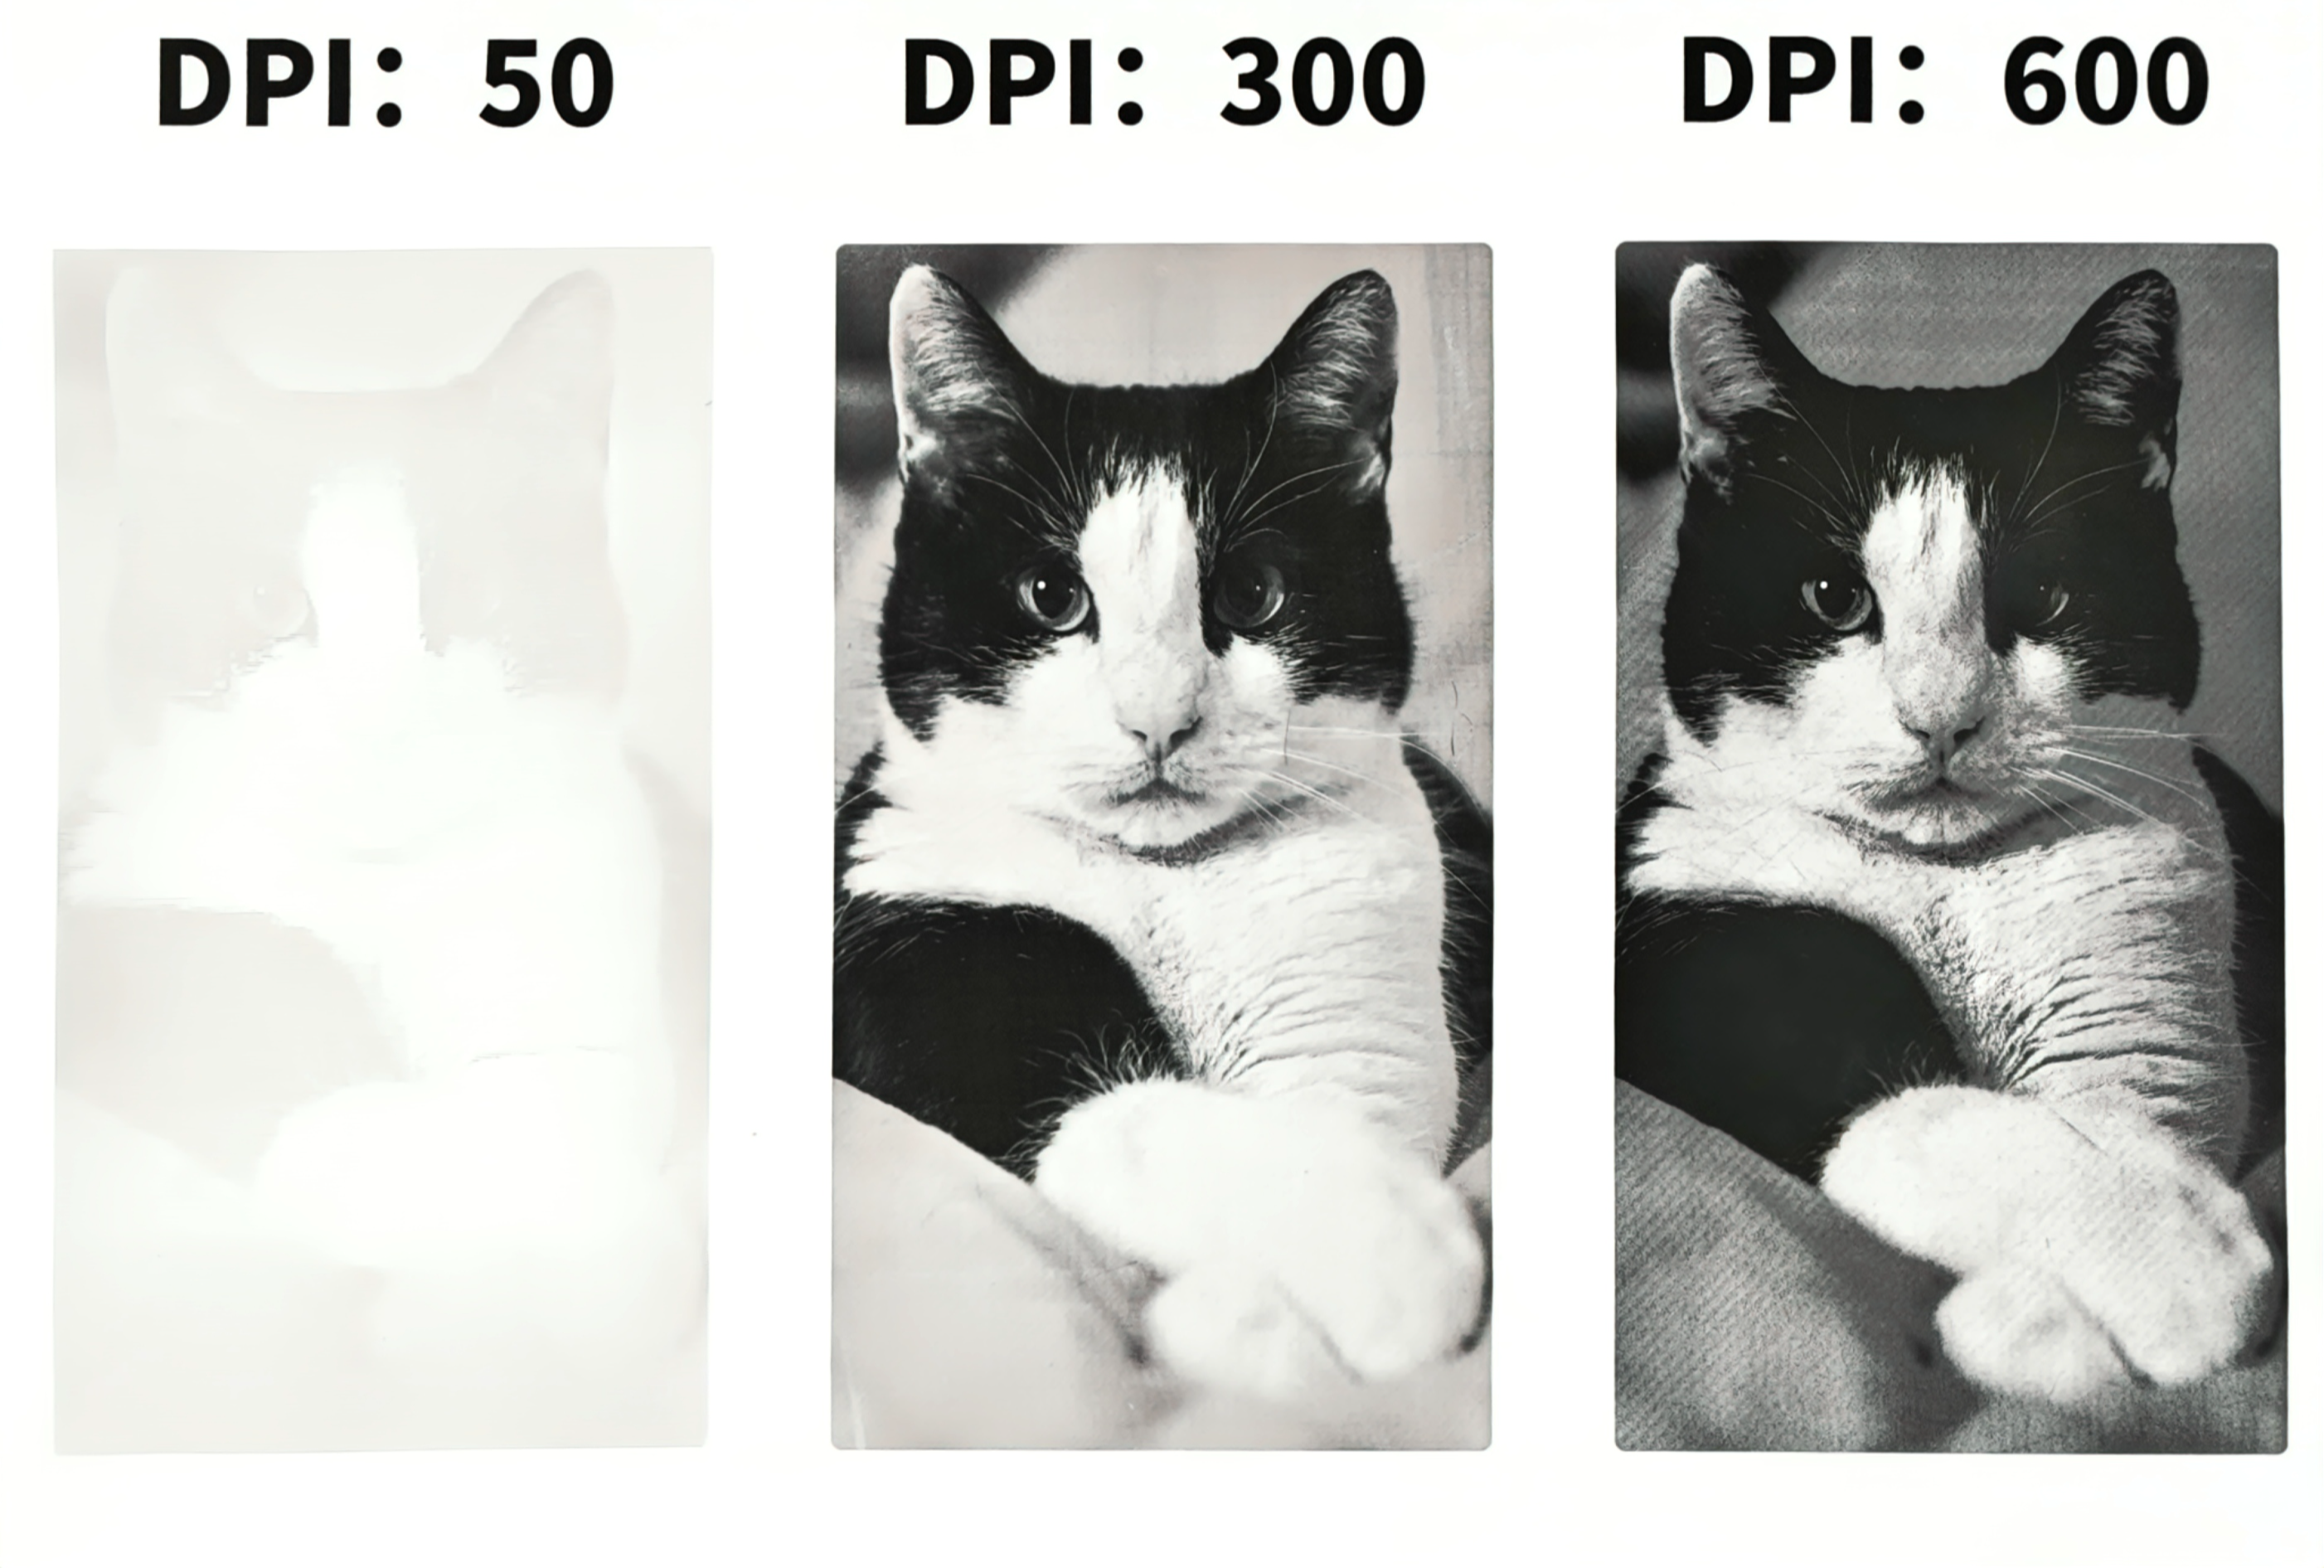
DPI directly affects how precisely a laser engraver reproduces details from the source image. A higher DPI means the laser places more dots or scan lines per inch, reducing gaps between marks and creating smoother gradients and sharper edges. A lower DPI increases spacing between dots, which may create visible banding, rough textures, or less detailed shading.
However, higher DPI is not always better. Engraving a photo at 600 DPI may take much longer than engraving the same image at 300 DPI. It can also increase heat exposure on the material and accelerate residue buildup on lenses and mirrors. The best DPI setting is usually the one that provides enough detail without unnecessary time, heat, or material damage.
| Aspect | Low DPI, 150–300 | High DPI, 600 or Above |
|---|---|---|
| Engraving Time | Faster, with fewer dots or scan lines. | Longer, with more laser marks and slower production speed. |
| Detail and Sharpness | Suitable for text, logos, and large patterns. | Better for fine lines, photo engraving, and grayscale images. |
| Energy Consumption | Lower and more efficient. | Higher because more marks are produced per inch. |
| Material Response | Lower risk of scorching on heat-sensitive materials. | May cause over-burning on wood, leather, or some plastics. |
| Best Use Cases | Text, vector logos, deep engraving, and production jobs. | Photo engraving, high-detail graphics, and fine acrylic work. |
Comparison table: low DPI vs. high DPI in laser engraving.
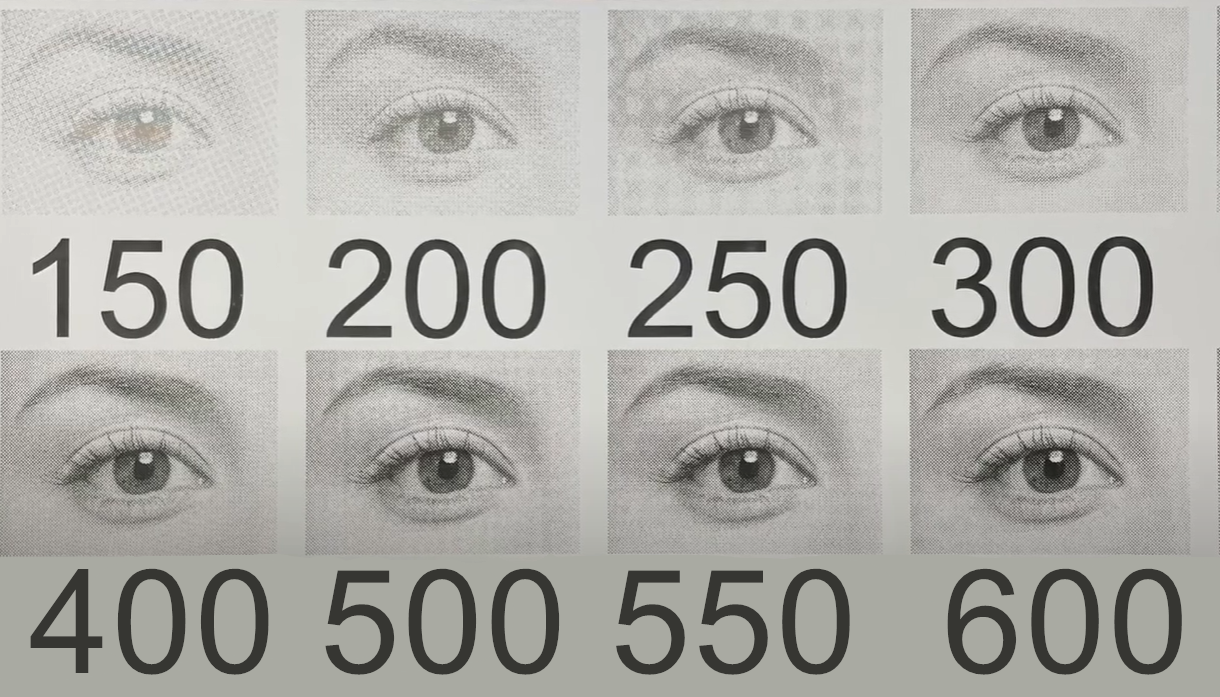
Choosing laser engraving DPI is about balancing engraving quality, material response, and processing time. The most practical method is controlled testing. Instead of guessing one setting, test several DPI values on the actual material you plan to use.
Create a small test grid directly on the material you plan to engrave. Use three to five different DPI values, such as 150, 300, 350, and 400, while keeping other parameters such as power and speed constant. Compare the samples for clarity, contrast, heat marks, and surface finish. Then choose the setting that provides the best balance between detail and efficiency.
Higher DPI means more laser marks per inch, which can significantly increase engraving time. In many cases, the visual improvement from 300 DPI to 600 DPI may be limited, especially on textured materials like wood. For large-scale or batch production, using the lowest acceptable DPI can reduce processing time and machine wear while still delivering good results.
Different materials react differently to high dot density. Soft or heat-sensitive materials, such as wood, leather, and some plastics, may over-burn at high DPI. Harder surfaces, such as stone, coated metals, or selected acrylics, may benefit from higher dot density when fine detail is required.
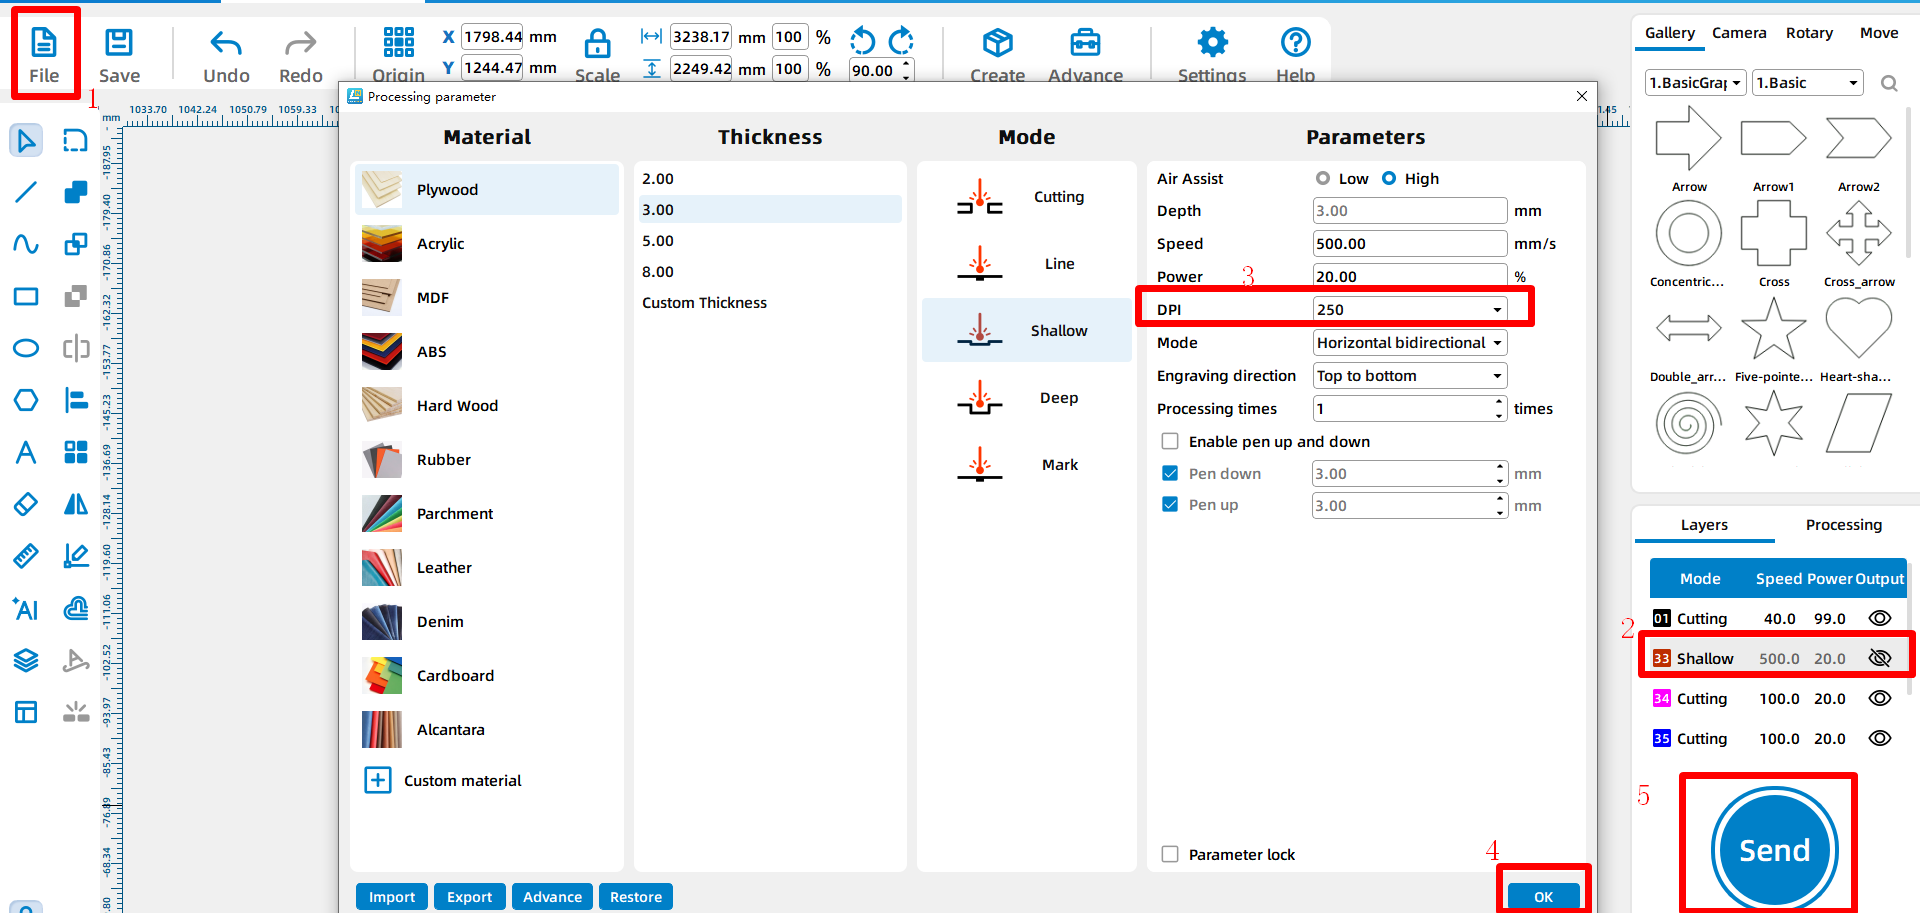
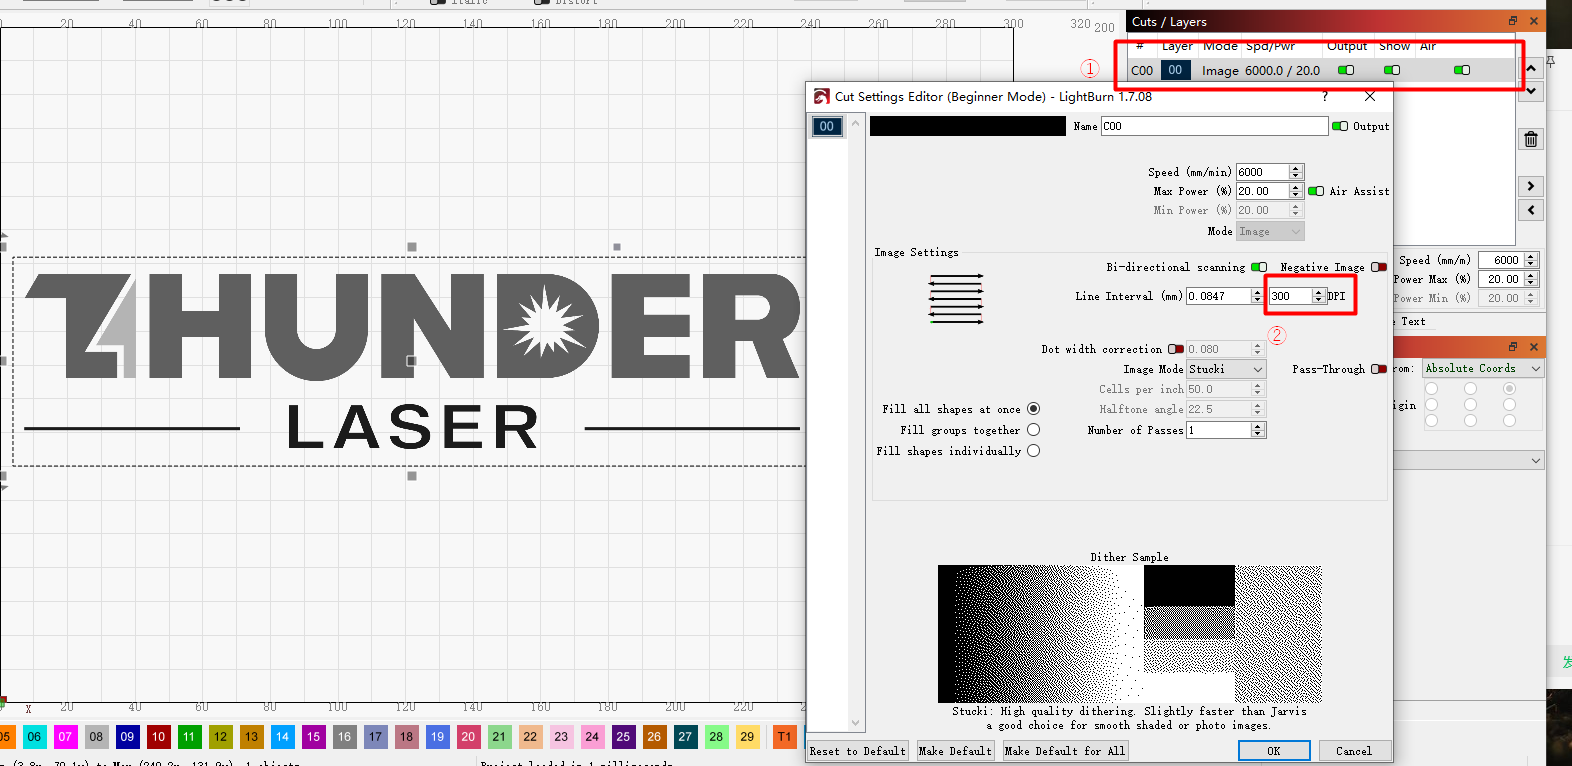
Setting the correct DPI in laser software ensures that your chosen engraving resolution is applied accurately during processing. Below are step-by-step instructions for LaserMaker and LightBurn.
Learn more: Meet LaserMaker: The Best Laser Engraving Software - Thunder Laser
DPI is a key laser engraving setting that directly affects quality, speed, heat input, and detail. Understanding laser engraving DPI helps you find the right balance between sharpness and efficiency. Whether you are engraving fine portraits, bold logos, or simple text, choosing the optimal DPI for each material and design can significantly improve your final results.
Good DPI settings start in the software, but great results come from testing and tuning on the actual machine. Always test your material, compare results, and choose the lowest DPI that still meets your quality requirement.
Need Help Choosing the Right Laser Engraving DPI?
Contact Thunder Laser to discuss your material, image type, engraving quality goal, and laser parameter setup.
Contact UsTalk To Our Experts Now!
Please leave your contact information so that we can serve you better.
FAQS
NEED HELP FINDING THE RIGHT SOLUTION?
Talk to our team for machine recommendations, application advice, and support based on your needs.

 Stable & Consistent MachinesUnlimited ApplicationRobust After-sales SupportFactory Direct Supply