Find the Best Laser Material Settings Step by Step Guide
 2026-04-27
WHAT ARE YOU LOOKING FOR?
Search Across Products, Blog Posts, Support Content, And Resources.

Find the Best Laser Material Settings Step by Step Guide
2026-04-27

Finding the best laser parameters is one of the most important skills every beginner needs to learn. Instead of relying only on fixed parameter tables, experienced users achieve consistent results through testing. Different materials, thicknesses, and machines can respond differently to the same settings, which is why guessing often leads to poor cuts or uneven engravings.
This guide introduces a simple step-by-step testing process to help you identify the right laser parameters for your specific material and job. By using small test patterns and controlled adjustments, you can learn how to dial in clean cuts and precise engravings with confidence while reducing wasted time and material.
Laser parameter testing video.
Laser parameters are the settings that control how a laser interacts with a material during cutting or engraving. For beginners, laser parameters can be grouped into a few core controls: power, speed, focus, and DPI or frequency. Each parameter affects the material in a different way. Higher power delivers more energy, slower speed increases how long the laser stays on one area, and focus determines how concentrated the laser beam is, which directly affects cutting ability and engraving sharpness.
There is no universal laser setting that works for every situation. Even two machines with the same rated power can produce different results when processing the same piece of wood using identical parameters. Because of this, finding the best laser parameters is not just about copying numbers from a chart. It is about understanding how your machine and material behave, then using systematic testing to adjust the settings until the desired result is achieved.
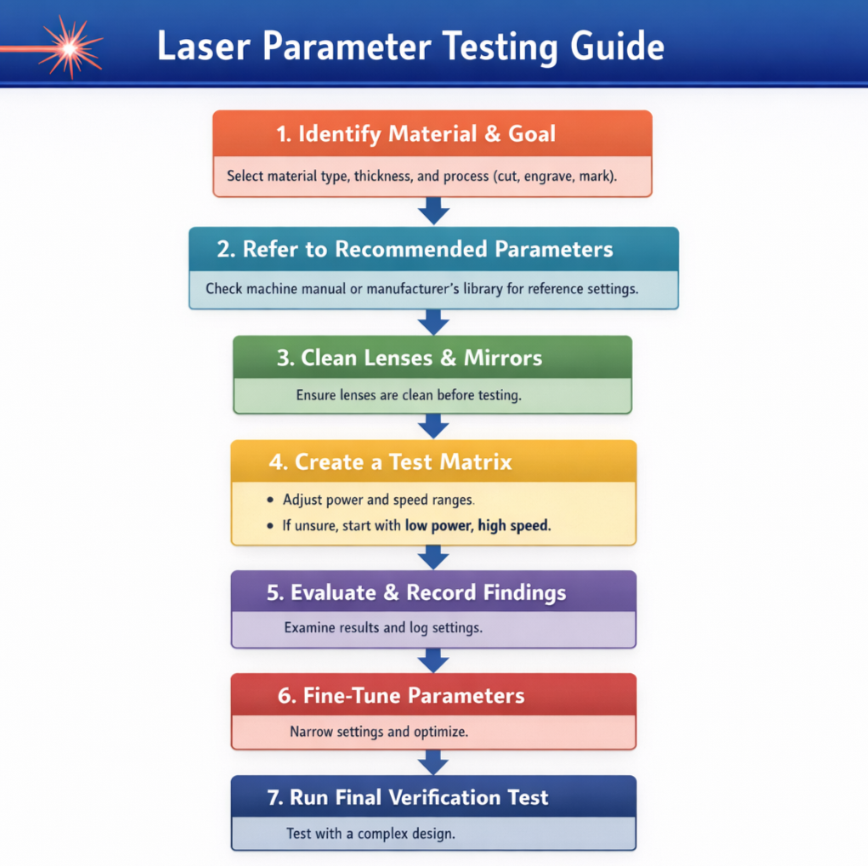
Finding the right laser parameters may seem difficult at first, but a systematic approach helps beginners achieve clean cuts and precise engravings without wasting material. Use the following process as a practical workflow.
Start by clearly defining the specific material, its thickness, and your desired result. These details help you choose a reasonable starting point and set a clear target for the testing process.
Once you have confirmed your material, thickness, and desired outcome, consult authoritative sources for recommended settings. These values are not final settings, but they provide a useful foundation for testing and fine-tuning.
Note: If you need to work with less common materials, you can contact our after-sales support team. Our experts can test the material and provide a recommended parameter range to help reduce unnecessary trial and error.
Before running any tests or adjustments, make sure your laser’s optical lens and mirrors are clean. Dust, residue, or smudges can reduce beam transmission efficiency, affecting cutting depth, engraving quality, and overall consistency. Regular inspection and cleaning help ensure that the laser delivers maximum energy to the material, making your test results more reliable.
Learn more: How to Clean the Laser Lens and Mirrors?
Inspecting and Cleaning Nova Series Optics
Cleaning laser lens and mirrors video.
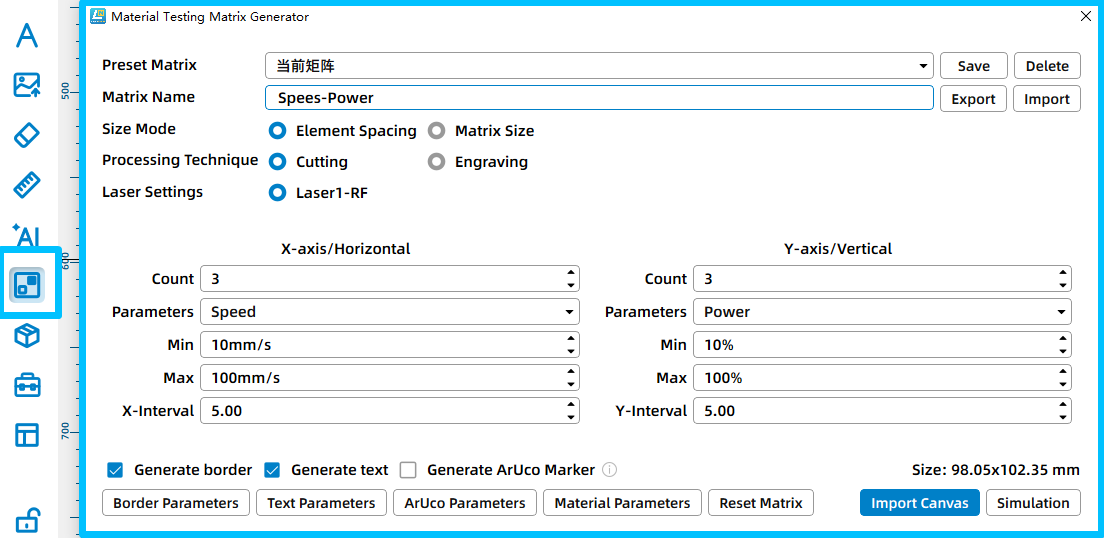
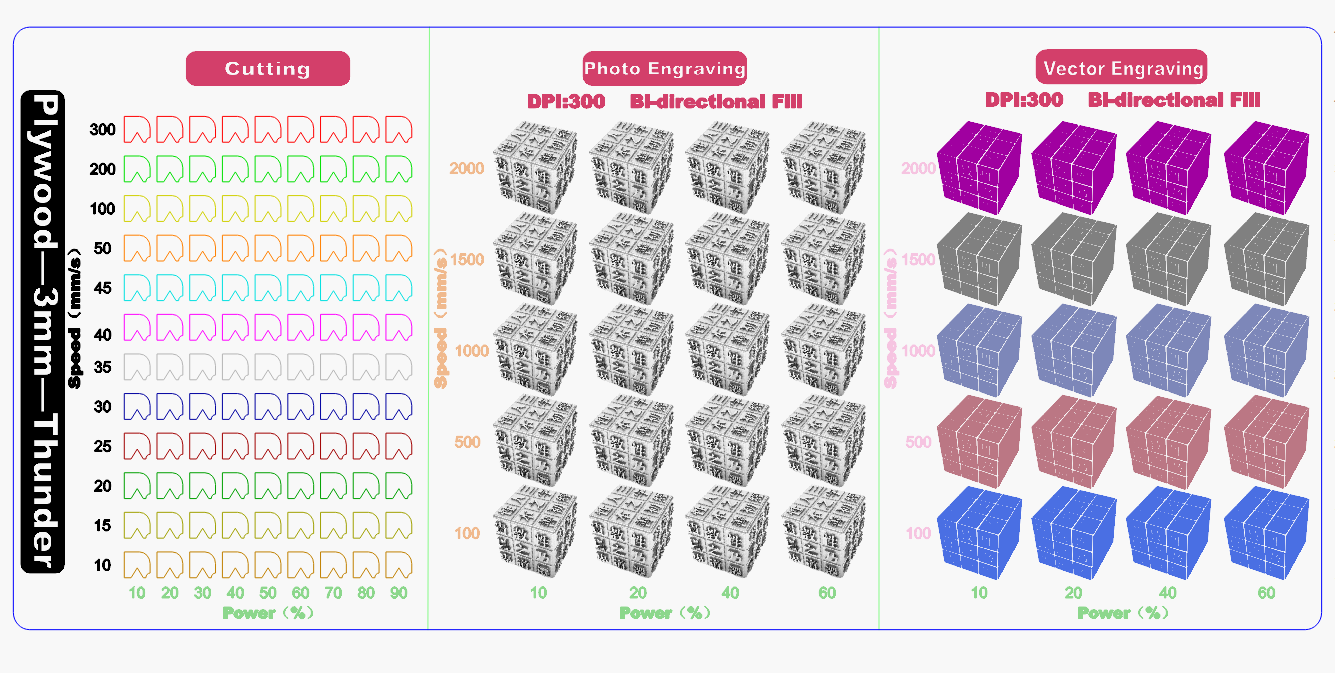
Based on the recommended parameters, create a test matrix to evaluate how different settings affect the material. A test matrix is a grid of different parameter combinations that allows you to find optimal settings in a controlled and efficient way.
The test matrix can be generated directly in laser software such as LaserMaker or LightBurn. For example, LightBurn has a built-in Material Test generator that creates a grid of boxes with varying power and speed values. Each row typically represents one variable, such as speed, while each column represents another, such as power. This makes it easier to see how different combinations affect the material.
You can adjust the number of rows and columns, minimum and maximum values, and other grid settings before generating the pattern. You can also use test files provided by Thunder Laser and modify the parameters according to your machine, material, and processing goal. Start with ranges around your reference settings. For example, if your recommended power is 50% and speed is 3000 mm/min, you might test 35–75% power and 2000–3500 mm/min speed.
After running the test matrix, carefully evaluate the results and compare each parameter combination against your original goal.
Avoid judging results based on appearance alone. Gently remove the test piece if needed and inspect the underside, edge quality, and repeatability of the result. Once you identify promising results, record the corresponding parameters in detail.
| Machine | Material | Process | Power | Speed | Frequency / DPI | Passes | Result | Notes |
|---|---|---|---|---|---|---|---|---|
| Thunder Bolt 30W | 3mm Plywood | Cutting | Max: 35% Min: 10% | 10 mm/s | / | 1 | Fully cut | Slight char on edges |
| Cutting | Max: 25% Min: 10% | 10 mm/s | / | 1 | Fully cut | Perfect | ||
| Engraving | 30% | 600 mm/s | 300 DPI | 1 | Good contrast | Clean surface |
Example of a laser parameter test log.
Once you have identified the most promising results from your test matrix, narrow the parameter range and focus on small, controlled adjustments. Instead of testing wide variations, fine-tune the settings around the best-performing combinations.
Adjust only one parameter at a time, such as slightly increasing or decreasing power or speed, while keeping other variables unchanged. This makes it easier to see how each adjustment affects the final result and helps you avoid confusion.
Run a second round of smaller tests to confirm consistency. Pay attention to subtle improvements in cut quality, edge smoothness, engraving depth, and contrast. When the results are stable and repeatable, finalize the parameters and add them to your parameter library.
This refinement process ensures that your final settings are not just acceptable, but optimized for your specific material, machine, and application.
Before moving to full production, run a final verification test using a more complex design rather than a simple square or straight line. Designs with curves, sharp corners, fine details, and varying directions better reflect real-world processing conditions.
This final test helps confirm that your selected parameters handle corners, curves, and detail transitions correctly without overburning, undercutting, or losing detail. If issues appear, make small adjustments and repeat the test until the results remain clean and consistent across the entire design.
Finding the best laser parameters becomes much easier when you test systematically. By observing results carefully, recording your findings, and making thoughtful adjustments, you can achieve consistent, high-quality cuts and engravings. Every machine and material behaves differently, so ongoing testing and fine-tuning are key to maintaining reliable results.
With patience and attention to detail, even beginners can achieve professional-quality outcomes while minimizing errors and material waste.
Need Help Finding the Right Laser Parameters?
Contact Thunder Laser to discuss your machine, material, cutting goals, engraving requirements, and parameter testing needs.
Contact UsTalk To Our Experts Now!
Please leave your contact information so that we can serve you better.
FAQS
NEED HELP FINDING THE RIGHT SOLUTION?
Talk to our team for machine recommendations, application advice, and support based on your needs.

 Stable & Consistent MachinesUnlimited ApplicationRobust After-sales SupportFactory Direct Supply