


Canton Tower Building Engineer Laser Cutting Project for STEAM Classrooms
 2024-08-15
WHAT ARE YOU LOOKING FOR?
Search Across Products, Blog Posts, Support Content, And Resources.

Canton Tower Building Engineer Laser Cutting Project for STEAM Classrooms
2024-08-15

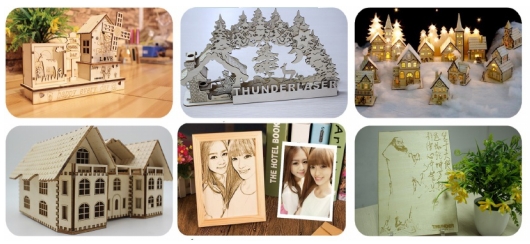
In this STEAM engineering and maker project, students continue the “magic brush” design journey by turning a hand-drawn building into a laser-cut Canton Tower model using LaserMaker. The lesson reviews image scanning, cropping, outlining, engraving, and cutting, then extends the activity with a cross-connected 3D tower structure and a simple LED lighting upgrade.
This project helps students connect architecture, observation, digital drawing, laser cutting, structural assembly, and simple electronics. Students begin with a single building silhouette, then create a stronger crossed model and add a small light feature at the top.
| Item | Details |
|---|---|
| Project | Canton Tower Building Engineer laser cutting project |
| Software | LaserMaker |
| Main Skills | Hand drawing, image scanning, picture cropping, outline extraction, bitmap engraving, vector cutting, rectangle drawing, welding, Bessel curve drawing, cross-slot structure, LED holder design, and assembly |
| Suggested Materials and Parts | Plywood, paper, drawing pen, LED, button battery, glue, and basic classroom assembly tools |
| Classroom Fit | Engineering and building challenges, STEAM architecture activities, laser cutting and maker projects, beginner LaserMaker review, structural model design, and simple lighting upgrades |
Students will sketch a building, scan the drawing into LaserMaker, create a clean outer cutting contour, engrave the original drawing, laser cut the building silhouette, build a crossed Canton Tower structure, and add a small LED light feature to complete the model.
For teachers: Use this project to connect architecture, building observation, structural stability, digital fabrication, and simple circuit awareness.
For students: Use the activity to turn a building drawing into a physical tower model and explore how crossed parts can stand more firmly.
For makerspaces: Use it as a beginner-friendly architecture model project that combines drawing, laser cutting, assembly, and lighting.
Discuss what buildings are and identify examples of buildings in daily life, such as homes, schools, hospitals, playgrounds, and landmark structures.
Observe famous buildings and use the Canton Tower as inspiration for a laser-cut architecture model.
Create a clear building drawing and process it in LaserMaker using Picture Crop and Picture Outline.
Use two matching tower silhouettes and cross slots to create a more stable three-dimensional structure.
Design and assemble a small LED holder so the finished tower can include a simple lighting feature.
Design thinking: Turn a landmark building idea into a simplified physical model with recognizable shape and visual effect.
Computational thinking: Use cropping, outlining, layer settings, dimensions, mirrored or duplicated parts, and slot placement to prepare a usable laser file.
Engineering thinking: Consider balance, crossed structure, slot fit, glue reinforcement, lighting placement, and how a flat drawing can become a standing model.
Students should operate the laser cutter only under teacher or lab supervisor guidance. Before cutting, check focus, material placement, layer output, and processing parameters. When using an LED and button battery, check polarity carefully and keep small electronic parts organized.
This lesson introduces students to building engineering through a simple architecture model. Teachers can begin by asking students what a building is, whether a home is a type of building, what buildings they see around them, and which famous buildings they know.
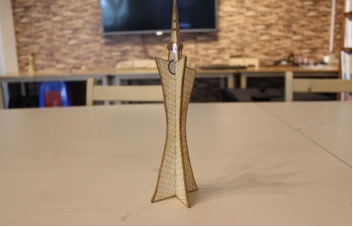
The source lesson uses Canton Tower as the model theme. Students first create a flat silhouette, then make two matching pieces that cross together to form a standing tower.

Teachers can use the following questions to help students connect the project with architecture, daily life, and creative design.
What is a building?
Is the house we live in a kind of building?
What buildings can you see around you?
What famous buildings or landmarks do you know?
What kind of building interests or impresses you the most?
Classroom Discussion: Students can talk about homes, schools, hospitals, stadiums, towers, museums, bridges, and landmarks. For this maker project, the focus is on observing building shapes, simplifying them into laser-cut silhouettes, and making the model stand.
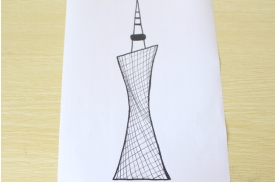
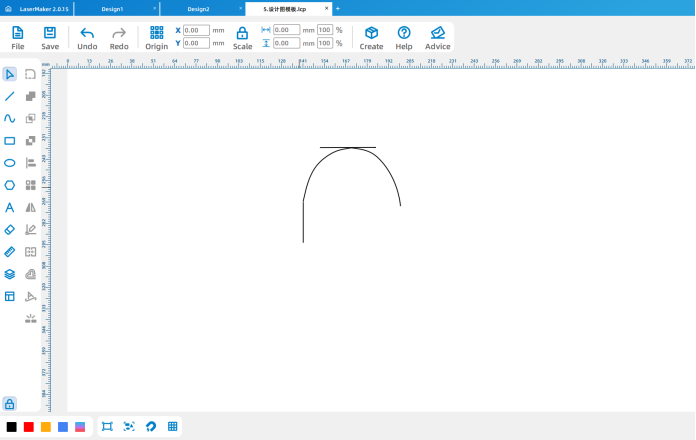
Ask students to sketch the building they want to make. The drawing can be inspired by Canton Tower or another familiar landmark. The outer edge should be clear enough for LaserMaker to recognize and turn into a cutting contour.
Use a scanning app or another classroom-approved method to scan the drawing and import it into LaserMaker. First, use Picture > Crop to remove blank space around the image.
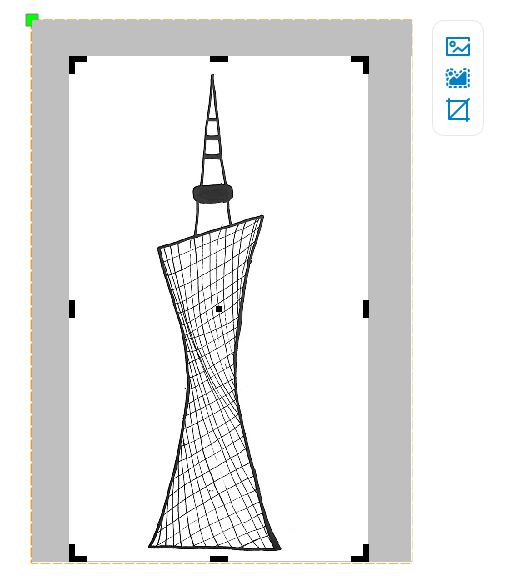
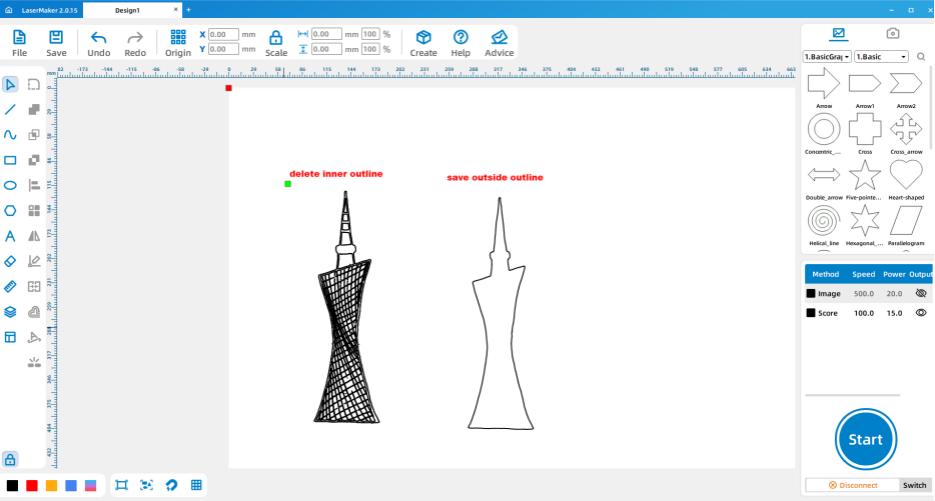
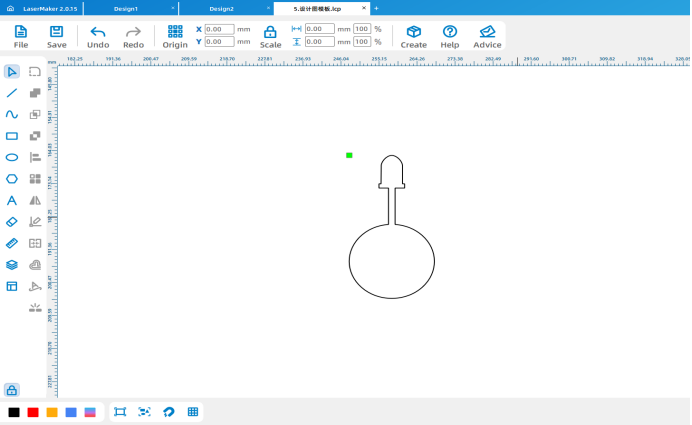
Next, use Picture > Outline to generate the building outline. Temporarily turn off bitmap output, select and delete the inner outline, and keep only the outer contour for cutting. Then turn bitmap output back on so the student’s original drawing can be engraved on the finished model.
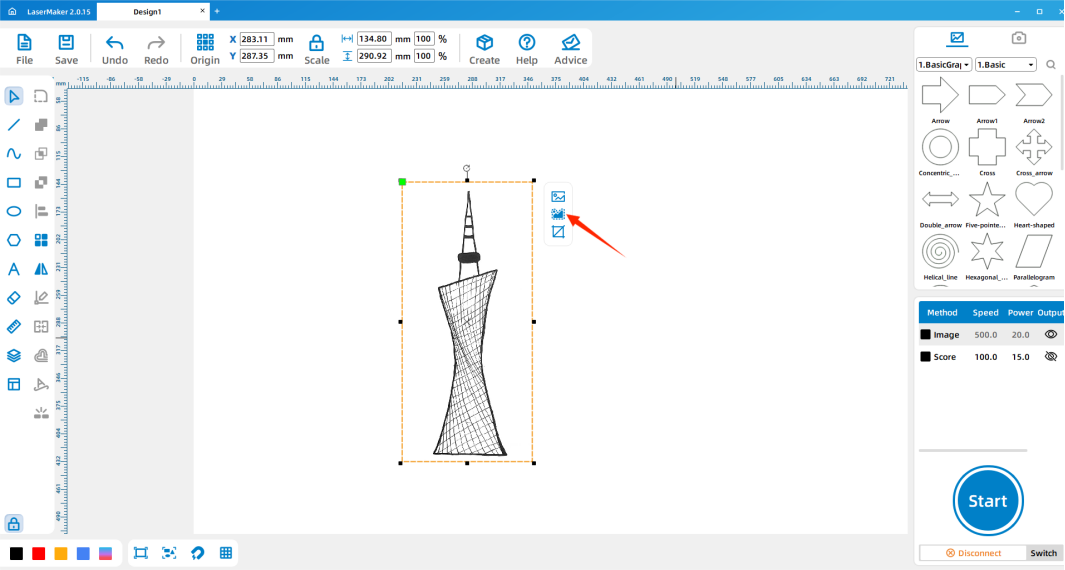
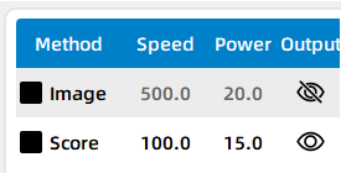
Double-click the layer parameter area in LaserMaker and set the engraving and cutting parameters for the plywood project. After checking the layer settings, send the file to the laser cutter for processing.
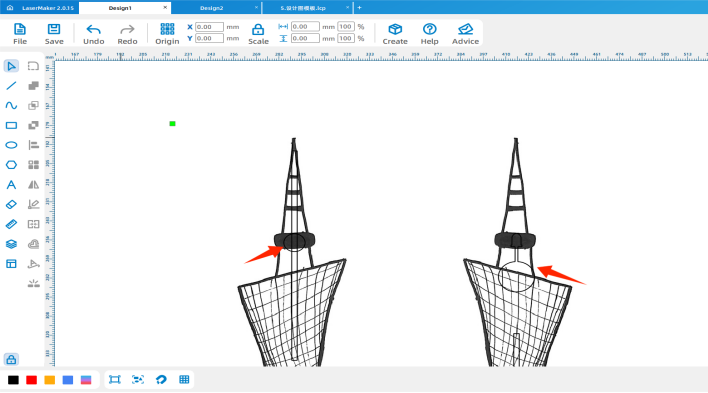
To make the building stand more securely, duplicate the Canton Tower silhouette. Then draw two 3 mm by 140 mm rectangles and place them at the top and bottom positions of the tower design to create matching cross slots.
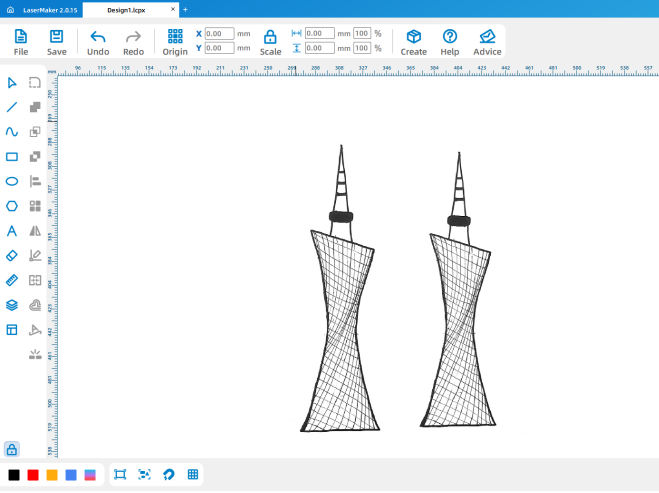
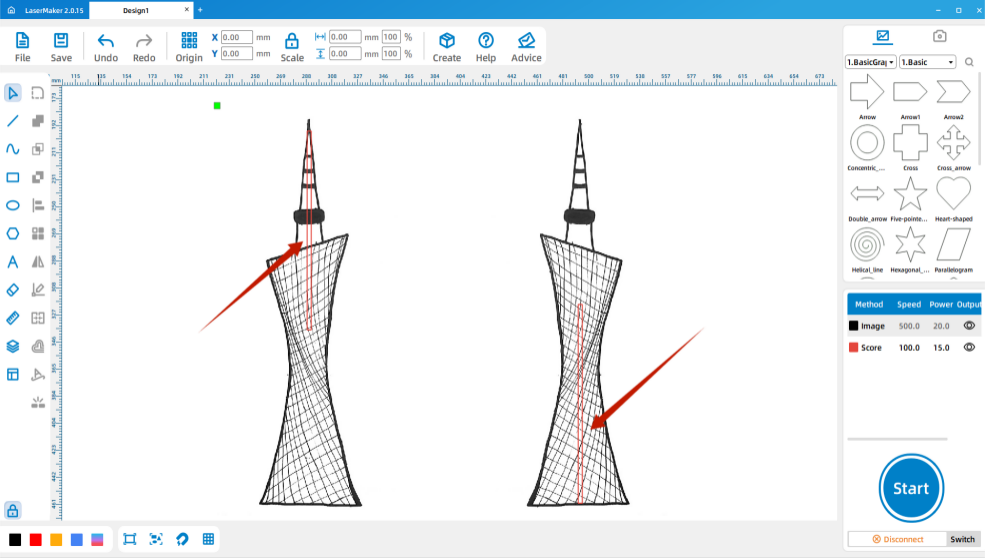
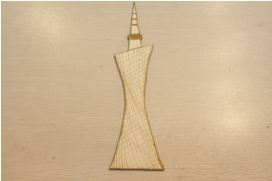
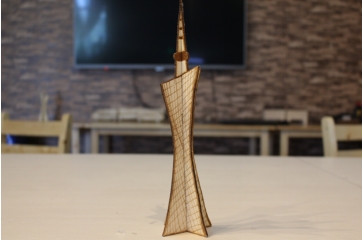
After laser processing, cross-connect the two Canton Tower pieces. Glue can be used if the fit needs additional support. This creates a simple three-dimensional tower that can stand more firmly than a single flat silhouette.
Import the saved design files into the laser cutting machine for processing. Before processing, check material placement, engraving and cutting layers, and focal length. The source lesson reminds students to adjust the focus before cutting to reduce the risk of incomplete cutting.

To make the tower more visually engaging, students can add a small LED light feature at the top. First, draw a 21 mm circle. Then draw a 2 mm by 10 mm rectangle and use the Weld function to connect the rectangle to the circle.

Next, draw a 6 mm by 2 mm rectangle and weld it to the shape. Then use the Bessel curve and line drawing tool to roughly draw the shape needed for holding the LED, and weld it to the previous figure.
Draw another 12.03 mm circle, then place the two lighting-related parts at the top of the Canton Tower design. After checking the layout, prepare the final file for laser processing.
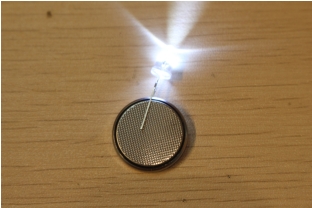
After laser processing, take out the lighting parts. Clip the long leg of the white LED to the smooth side of the button battery, and clip the short leg to the rough side. Place the LED and battery assembly at the top of the Canton Tower model. If the part does not sit securely, use glue carefully to fix it in place.
Testing Reminder: If the LED does not light, check the battery side and LED leg direction first. Students should handle the button battery and LED only under teacher guidance.
Hand drawing: Give students paper and pens, then check that each building drawing has a clear outer contour before scanning.
Software design: Guide students through importing, cropping, outlining, deleting inner contours, setting layers, duplicating the tower, and adding cross slots.
Machine processing: Process student files in a safe classroom order and confirm focus before cutting.
Assembly: Let students assemble the crossed tower structure and add the lighting feature with teacher support.
Review the earlier drawing-to-laser workflow before introducing the building challenge.
Encourage students to observe real buildings and simplify their outlines before drawing.
Prepare spare LED holder parts, button batteries, and tower pieces when class time is limited.
Use batch processing when appropriate by arranging several student building models into one laser processing file.
Ask students to compare how a single flat tower and a crossed tower differ in stability and display effect.
How do you build a building model from a drawing?
What are the main structures of a building?
If you were asked to design your own building, how would you make it stand out?
Students can evaluate their own work and give peer feedback based on creativity, structural firmness, appearance, and learning attitude.
| Evaluation Item | Self-Evaluation | Peer Evaluation |
|---|---|---|
| Creativity, 30 points | ||
| Firmness, 30 points | ||
| Appearance, 20 points | ||
| Learning Attitude, 20 points | ||
| Total, 100 points |
At the end of the lesson, students can display their Canton Tower models, explain how they created the drawing, prepared the laser file, assembled the crossed structure, and added lighting. Teachers can encourage students to discuss what they would improve in the next version.
After finishing the Canton Tower model, students can choose another landmark or a building from their local community and create a new laser-cut structure. They can test different slot positions, model heights, base supports, lighting locations, or decorative engraved details.
For a broader engineering challenge, students can compare which structure stands more firmly: a single flat silhouette, a crossed two-piece model, or a model with an added base. This helps connect the maker activity with real building stability and structural design.
This project is suitable for classroom laser cutters that support engraving and cutting of thin plywood for student maker activities. For schools and beginner STEAM labs, projects like hand-drawn building models, tower structures, LED display models, and beginner LaserMaker activities can be completed with a classroom laser cutter such as the Thunder Laser Bolt Series.
Teachers can choose the machine and material setup based on classroom space, student supervision needs, material thickness, project size, and ventilation setup. Students should always test settings, check focus, and follow the school’s laser safety rules before final cutting.
Talk To Our Experts Now!
Please leave your contact information so that we can serve you better.
NEED HELP FINDING THE RIGHT SOLUTION?
Talk to our team for machine recommendations, application advice, and support based on your needs.

 Stable & Consistent MachinesUnlimited ApplicationRobust After-sales SupportFactory Direct Supply


