


Finger-Joint Table Lamp Laser Cutting Project with LaserMaker
 2024-07-03
WHAT ARE YOU LOOKING FOR?
Search Across Products, Blog Posts, Support Content, And Resources.

Finger-Joint Table Lamp Laser Cutting Project with LaserMaker
2024-07-03

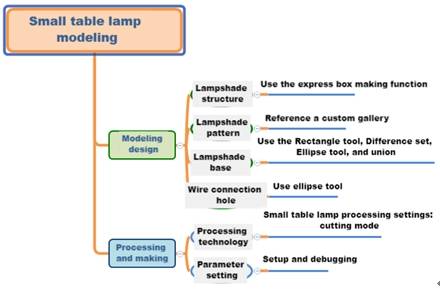
In this STEAM engineering project, students design and make a small laser-cut table lamp using LaserMaker. The lesson connects box structure design, finger joints, Quick Box Making, decorative cutouts, cutting setup, and hands-on assembly.
This project helps students understand how a flat two-dimensional layout can become a three-dimensional lampshade. Students explore box dimensions, material thickness, joint fit, decorative light transmission, and the efficiency of generating a finger-joint box template in LaserMaker.
| Item | Details |
|---|---|
| Project | Laser-cut small table lamp |
| Software | LaserMaker |
| Main Skills | Quick Box Making, finger joint structure, Rectangle Tool, Ellipse Tool, Select Gallery, Difference Set, Union Tool, cutting setup, and assembly |
| Suggested Materials | Basswood plywood board, Osong board, acrylic board, or corrugated paper |
| Classroom Fit | Engineering challenges, box structure design, product design, maker education, lighting projects, and classroom laser cutting |
Students will design a small table lamp by generating a finger-joint box template, adding decorative lampshade patterns, creating a base and wire holes, setting cutting parameters, and assembling the laser-cut parts into a simple lamp structure.
For teachers: Use this lesson to connect box structures, finger joints, two-dimensional expansion diagrams, material thickness, and assembly testing.
For students: Use the project to design a decorative lampshade while learning how flat panels can form a three-dimensional object.
For makerspaces: Use it as an introduction to product prototyping, light-transmission patterns, and fast box-template generation.
Use LaserMaker Quick Box Making to generate a box template with finger joints.
Understand how adjacent faces of a box are connected through tenons and sockets.
Calculate box dimensions, material thickness, groove size, and laser compensation for a practical structure.
Add decorative cutout patterns to lampshade panels using Gallery graphics.
Create screw holes, wire holes, and base shapes for a functional lamp design.
Design thinking: Turn a simple box structure into a useful and attractive table lamp through shape, pattern, and light-transmission design.
Computational thinking: Connect three-dimensional box dimensions with a two-dimensional cutting layout and finger-joint template.
Engineering thinking: Consider material thickness, joint fit, assembly tightness, panel stability, and how decorative openings affect the lampshade.
Students may study existing lamp designs for inspiration, but their final work should include their own improvements and creative choices. Any electrical components should be handled according to school safety rules and under appropriate adult supervision.
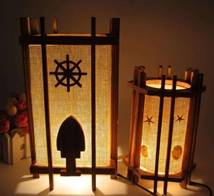
A table lamp is a common lighting product used for reading, studying, desk work, and home decoration. It can also create a warm atmosphere in a bedroom, study area, or living space.
In this lesson, students study simple lampshade structures and use LaserMaker to design a cuboid lamp body. The lampshade panels can include decorative cutouts or etched patterns so light can pass through in an interesting way.
Before drawing in LaserMaker, students should analyze the table lamp as both a box structure and a lighting object.
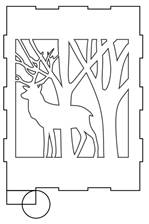
Part shape: Lampshades can be cuboid, ring-shaped, hemispherical, or artistic. This project focuses on a hexahedral lampshade made from flat panels.
Modeling method: LaserMaker Quick Box Making can generate the expanded box layout with tenons and sockets for the lampshade structure.
Part size: The size should be determined by the lamp design, material size, and laser machine workspace.
Connection method: Adjacent panels are joined with finger joints. Because the tenon and socket sizes match closely, the parts may need careful pressure during assembly.
Material selection: The source lesson suggests basswood plywood board, Osong board, acrylic board, or corrugated paper.
Process effect: Decorative patterns can be created with cutting for hollow effects, or with tracing and engraving for etched effects. Parts can also be colored after processing.
Students should decide the lamp size and record the length, width, and height before creating the digital layout. The lamp size should match the intended use, material size, and classroom equipment setup.
| Data Recording / Unit: mm | ||
|---|---|---|
| Length: | Width: | Height: |
After measuring, students should sketch the lampshade shape, decorative pattern, base shape, screw holes, wire hole, and assembly direction.
There are two ways to create the lampshade. Students can manually draw the panels and finger joints, or they can use LaserMaker Quick Box Making to generate the box template more efficiently.
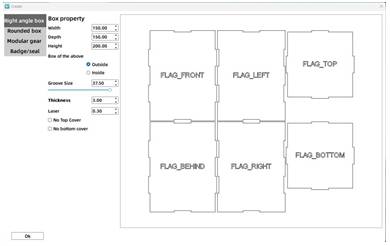
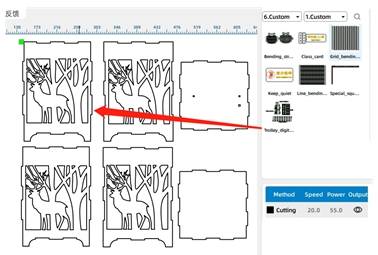
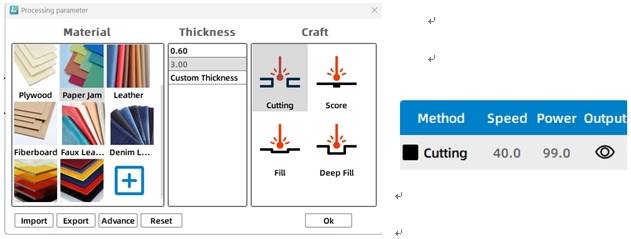
In the source workflow, students open Quick Box Creation and enter 150 mm for box width, 200 mm for box height, and 150 mm for box depth. The groove size is set to 25 mm, the material thickness is 3 mm by default, and the laser compensation is changed to 0.12 mm. After clicking Create Box, the lampshade frame is added to the drawing area.
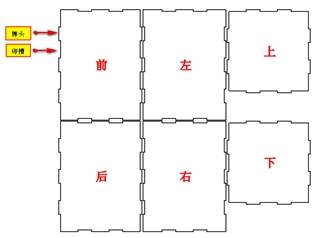
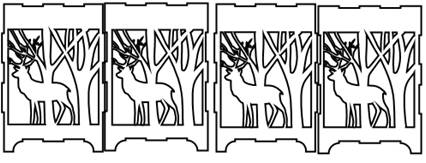
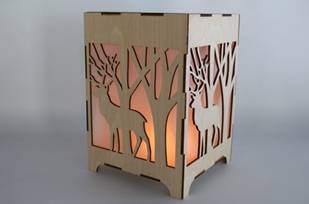
Delete the default panel labels such as front, back, left, right, up, and down. Then open Select Gallery and add a decorative pattern to the lampshade faces. In the source workflow, a forest deer pattern is dragged onto the four side panels.
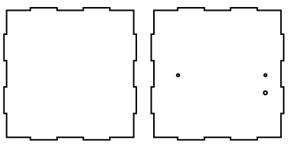
Use the Rectangle Tool and Ellipse Tool to draw the base shape. In the source workflow, students draw a 31.43 mm by 15 mm rectangle and align it with the protruding area on the left side of the lampshade template. Then they draw a 30.19 mm circle and align one quarter of the circle with the small rectangle.
Use Difference Set to remove part of the rectangle with the circle, creating one base foot. Copy the foot, flip it horizontally, and align it with the other side of the lampshade. Then use Union Tool to combine the feet with the lampshade base structure. The remaining base shapes can be copied from the finished version.
Use the Ellipse Tool to draw two 3 mm circles on the bottom panel. In the source workflow, the horizontal distance between the two circles is 99 mm, based on the length of the LED strip used in the sample lamp.
Then draw a 4 mm circle below the right screw hole as the wire outlet. These holes help support the internal lamp installation plan.
After completing the box template, decorative patterns, base shapes, and holes, review the full table lamp drawing before setting the cutting process.

Select the table lamp objects and open the black cutting process layer. In the source workflow, the material is set to basswood plywood, the process is set to cutting, and the processing thickness is set to 3 mm.
The source project uses cutting as the main process. If the pattern design is adapted, teachers may also guide students to compare cutting, tracing, or engraving effects on sample material before final production.
Compare Quick Box Making with manually drawing the six panels and finger joints.
Test how tenon and socket size affect the tightness of the box assembly.
Consider how material changes caused by temperature or humidity may affect joint fit.
Explore whether increasing or decreasing the number of finger joints improves strength or assembly experience.
Check whether the decorative cutouts allow enough light transmission while keeping the lampshade panels strong.
After the final settings are confirmed, students can cut the lamp parts, assemble the finger-joint panels, and add the planned lamp components under teacher guidance. The finished result is a small decorative table lamp structure.
Knowledge Card: A finger joint is a traditional woodworking joint made from repeated interlocking tenons and sockets. It is often used for box structures because it increases the bonding area and helps improve structural strength.
After completing the basic table lamp, students can design a more decorative carved lamp. They can experiment with different panel patterns, hollow designs, and light-transmission effects while keeping the box structure stable.
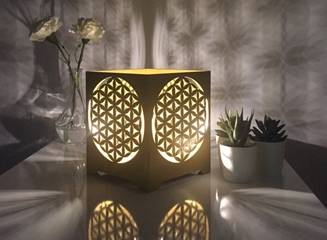
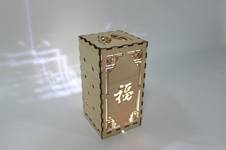
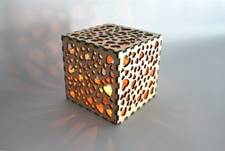
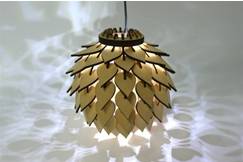
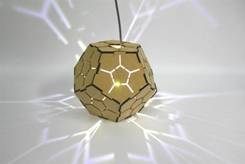
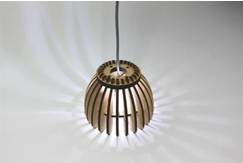
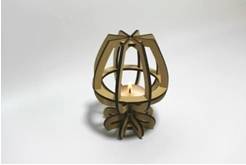
The following lighting examples can be used for classroom discussion and design inspiration. Encourage students to compare panel structure, light-transmission patterns, finger-joint design, material choice, and finished visual effect.
This project is suitable for classroom laser cutters that support cutting of sheet materials for box structures and decorative panels. For schools, makerspaces, and beginner STEAM labs, projects like small table lamps, finger-joint boxes, decorative lampshades, and product prototypes can be completed with a classroom laser cutter such as the Thunder Laser Bolt Series.
Teachers can choose the machine and material setup based on classroom space, project size, material thickness, decorative cutout density, and learning goals. The same Quick Box Making workflow can also be adapted for other CO2 laser machines when students move on to larger lampshades, boxes, or more advanced engineering challenges.
Talk To Our Experts Now!
Please leave your contact information so that we can serve you better.
NEED HELP FINDING THE RIGHT SOLUTION?
Talk to our team for machine recommendations, application advice, and support based on your needs.

 Stable & Consistent MachinesUnlimited ApplicationRobust After-sales SupportFactory Direct Supply


