


3D Pine Tree Laser Cutting Project with LaserMaker
 2024-06-26
WHAT ARE YOU LOOKING FOR?
Search Across Products, Blog Posts, Support Content, And Resources.

3D Pine Tree Laser Cutting Project with LaserMaker
2024-06-26

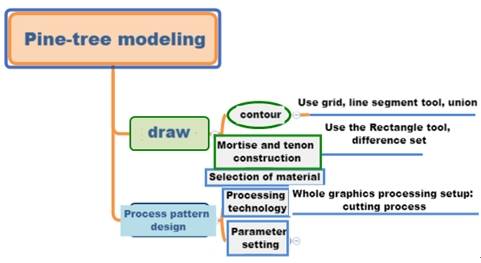
In this STEAM engineering project, students design and make a small 3D pine tree using LaserMaker. The lesson connects grid-based drawing, geometric modeling, union and difference operations, cross-tenon slot design, laser cutting, and hands-on assembly.
This project helps students understand how two flat laser-cut sections can interlock to create a standing three-dimensional object. It is suitable for engineering design, holiday decoration projects, maker education, and beginner 3D construction lessons.
| Item | Details |
|---|---|
| Project | 3D interlocking pine tree |
| Software | LaserMaker |
| Main Skills | Grid Tool, Line Segment Tool, Union Tool, Difference Set Tool, Rectangle Tool, cross-tenon slot design, cutting setup, and assembly |
| Suggested Materials | Basswood plywood board or acrylic board |
| Classroom Fit | Engineering challenges, 3D structure design, maker education, geometric modeling, and classroom laser cutting |
Students will design a small pine tree from two matching cross sections. They will draw the tree shape, create interlocking slots, set cutting parameters, and assemble the finished parts into a simple 3D decorative model.
For teachers: Use this lesson to connect geometry, 2D-to-3D thinking, slot-fit design, material thickness, and assembly testing.
For students: Use the project to create a standing tree model while learning how flat sections can form a stable 3D object.
For makerspaces: Use it as an introductory project for cross-tenon structures, decorative models, and flat-pack design.
Use the Grid Tool and Line Segment Tool to draw regular geometric sections.
Use the Union Tool to combine multiple triangles into a pine tree profile.
Use the Difference Set Tool to create cross-tenon slots for interlocking assembly.
Set laser cutting parameters based on material thickness and project requirements.
Design thinking: Understand how points, lines, surfaces, and geometric shapes can form a recognizable pine tree model.
Computational thinking: Analyze section graphics, calculate slot size, and plan the relationship between the two interlocking parts.
Engineering thinking: Consider material thickness, slot fit, center of gravity, assembly stability, and the final standing effect.
Students may study existing tree designs for inspiration, but their final work should include their own improvements and creative decisions.
Pine trees have a clear visual structure, with layered branches and a tapered overall shape. In this lesson, students translate those natural features into a simplified geometric model that can be cut and assembled from flat sheet material.
The project encourages students to observe the shape of a pine tree, simplify it into triangular sections, and think about how two laser-cut profiles can interlock to form a stable decorative object.

Before drawing in LaserMaker, students should analyze the pine tree as both a visual design and an assembled structure.
Part shape: The whole tree is a 3D model. Each section is based on a triangular pine-tree profile.
Modeling method: Multiple triangles are combined with the Union Tool to create one tree-shaped section.
Part size: The section size should match the intended decoration size and material thickness.
Splicing method: Two tree-shaped sections are joined with cross-tenon slots.
Material selection: The source lesson suggests basswood plywood board or acrylic board.
Process effect: The main process is laser cutting, with optional coloring after assembly.
Students should decide the width and height of the pine tree, then calculate the tenon and slot dimensions based on the material thickness and the intended interlocking structure.
| Data Recording / Unit: mm | |
|---|---|
| Width: | |
| Height: | |
| Tenon size: | |
| Mortise size: | |
| Number of mortise and tenon joints: | |
After measuring, students should sketch the pine tree shape and mark where the cross-tenon slots will be placed.
Turn on the Grid Tool and use the Line Segment Tool to draw an isosceles triangle. In the source workflow, one triangle is 60 mm wide and 30 mm high. The grid helps students draw the triangle accurately.

Copy the triangle and adjust the next two triangles to different sizes. In the source workflow, the second triangle is 70 mm wide and 35 mm high, and the third triangle is 80 mm wide and 40 mm high.
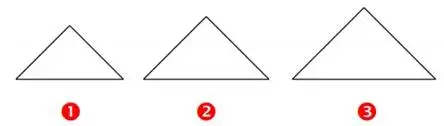
Use Align Guides to align the three triangles vertically, then use the Union Tool to merge them into one pine tree profile. Copy the finished profile to create the second interlocking section.
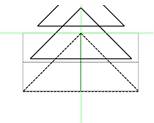
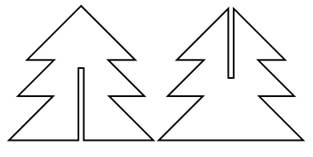
Use the Rectangle Tool to draw a slot. In the source workflow, the slot width is 3 mm, matching the sheet thickness, and the slot height is 40 mm, which is half the height of the 80 mm tree profile.

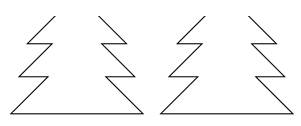
Place one slot from the bottom of one tree profile and the other from the top of the second profile. Use the Difference Set Tool to subtract the slot shape from each tree section. When the two parts are inserted together, they form a cross-tenon connection.
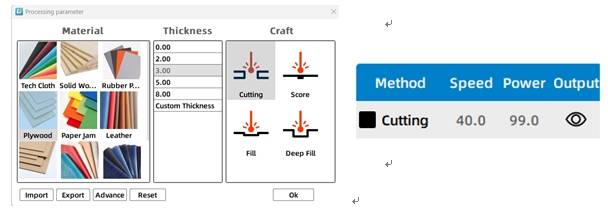
Select the pine tree objects and open the black cutting process layer. In the source workflow, the material is set to Osone wood, the process is set to cutting, and the processing thickness is set to 3 mm. The displayed processing speed is 25 and the power is 70.
Test whether the two tree sections fit together securely without being too loose or too tight.
Adjust the slot width slightly to compare different levels of tightness.
Consider whether four interlocking pieces could make the tree more vivid or stable.
Explore other ways to design the tree crown, trunk, and base.
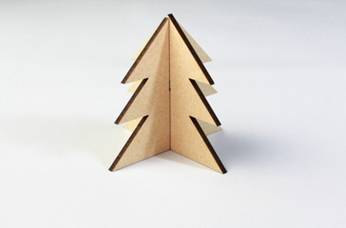
After the final settings are confirmed, students can cut the two tree sections and assemble them through the cross-tenon slots. The finished project is a small standing pine tree model.
Knowledge Card: A cross tenon is a simple woodworking joint. Two matching slots are cut into separate workpieces, then the pieces are inserted into each other at a crossing angle to form a stable joint.
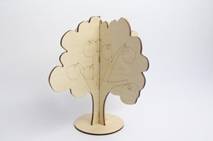
After completing the pine tree, students can design another interlocking tree model. The source lesson suggests a palm tree as an extension activity. Students can follow the example or create a more personal tree shape.

The following examples can be used for classroom discussion and design inspiration. Encourage students to compare tree shapes, slot positions, balance, assembly method, and finished visual effect.


This project is suitable for classroom laser cutters that support small-format cutting of sheet materials. For schools, makerspaces, and beginner STEAM labs, projects like 3D pine trees, interlocking decorations, flat-pack models, and cross-tenon structures can be completed with a classroom laser cutter such as the Thunder Laser Bolt Series.
Teachers can choose the machine and material setup based on classroom space, project size, material thickness, slot fit, and learning goals. The same interlocking workflow can also be adapted for other CO2 laser machines when students move on to larger models or more advanced engineering challenges.
Talk To Our Experts Now!
Please leave your contact information so that we can serve you better.
NEED HELP FINDING THE RIGHT SOLUTION?
Talk to our team for machine recommendations, application advice, and support based on your needs.

 Stable & Consistent MachinesUnlimited ApplicationRobust After-sales SupportFactory Direct Supply


