


Car Inventor Laser Cutting Project for STEAM Classrooms
 2024-08-12
WHAT ARE YOU LOOKING FOR?
Search Across Products, Blog Posts, Support Content, And Resources.

Car Inventor Laser Cutting Project for STEAM Classrooms
2024-08-12

In this STEAM maker project, students turn a hand-drawn car idea into a laser-cut wooden model using LaserMaker. The lesson connects drawing, image scanning, bitmap cleanup, outline extraction, laser engraving, wheel design, chassis design, bayonet-style joints, assembly, and creative project upgrades.
This project is inspired by the story of Ma Liang and the magic brush: a drawing can become real when students combine imagination with digital fabrication. Students begin with a simple hand-drawn car, then upgrade it step by step into a wheeled car, a complete car body, and optional powered versions.
| Item | Details |
|---|---|
| Project | Car Inventor laser cutting project |
| Software | LaserMaker |
| Main Skills | Hand drawing, image scanning, picture cropping, outline extraction, bitmap engraving, vector cutting, circle drawing, array copy, bayonet-style joint design, assembly, and project upgrading |
| Suggested Materials and Parts | Plywood, paper, drawing pen, small wooden sticks, wooden rings, LED lights, button batteries, tape, wind-up device, N20 motor, battery box, wires, and optional fixed accessories |
| Classroom Fit | Laser cutting and maker projects, STEAM art and engineering, digital fabrication, car design, student invention activities, and beginner LaserMaker lessons |
Students will draw an original car design, scan it into LaserMaker, create a usable cutting outline, engrave the hand-drawn image, cut the car body, add wheels, assemble a more complete vehicle structure, and explore optional upgrades such as headlights, wind-up motion, and motor-driven movement.
For teachers: Use this project to connect creative drawing, digital image processing, laser cutting, simple mechanisms, and iterative design.
For students: Use the activity to turn a drawing into a real object, then improve it through wheels, structure, lights, and motion.
For makerspaces: Use it as a beginner-friendly project that helps learners understand the full path from idea to physical prototype.
Observe the basic external structure of a car, including wheels, windows, doors, lights, front, rear, and mirrors.
Create a hand-drawn car with a clear, closed outer edge that can be processed in LaserMaker.
Crop a scanned image, generate an outline, keep the outer cutting contour, and use the original bitmap for engraving.
Design wheels, wheel spacers, chassis pieces, front and rear panels, and bayonet-style joints for assembly.
Upgrade a basic laser-cut car with headlights, a wind-up power device, or a motor and rubber-band linkage structure.
Design thinking: Start from an imaginative drawing, then improve the object step by step so it becomes more useful, stable, and expressive.
Computational thinking: Use cropping, outline extraction, layer output settings, dimensions, arrays, and alignment to prepare production-ready laser files.
Engineering thinking: Consider wheel rotation, chassis stability, joint fit, material strength, battery placement, and simple power transmission.
Students should use the laser cutter only under teacher or lab supervisor guidance. Before processing, check the focus, material placement, engraving and cutting layers, and machine settings. When adding lights or motors, keep wiring tidy and test batteries and moving parts carefully.
The lesson uses the idea of a “magic brush” to help students see design as a way to make ideas real. A hand-drawn picture can become a physical object when students observe the object, understand its structure, process the image digitally, and fabricate it with a laser cutter.
For this lesson, students first create a car. They begin with the car shape they imagine, then develop it into a moving or semi-moving model through additional parts and upgrades.

Before opening the software, teachers can guide students with practical design questions. These questions help students connect the creative drawing task with real object structure and function.
What are the basic structures of a car?
What visible features make a car recognizable from the outside?
If you were building a car model, what materials could you use?
How could you make the car move?
Classroom Discussion: A car can be discussed as a system with a body, chassis, wheels, power source, and electrical parts. For this beginner project, students mainly focus on the visible body shape, wheels, simple structure, and optional power upgrades.
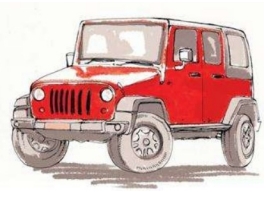
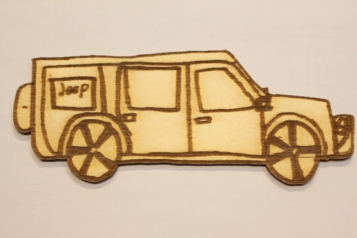
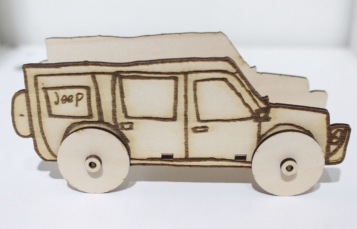
Ask students to draw the car they imagine on paper. The car can be any creative shape, but the outer edge should be clear and closed. A closed outline helps LaserMaker create a usable cutting contour later.

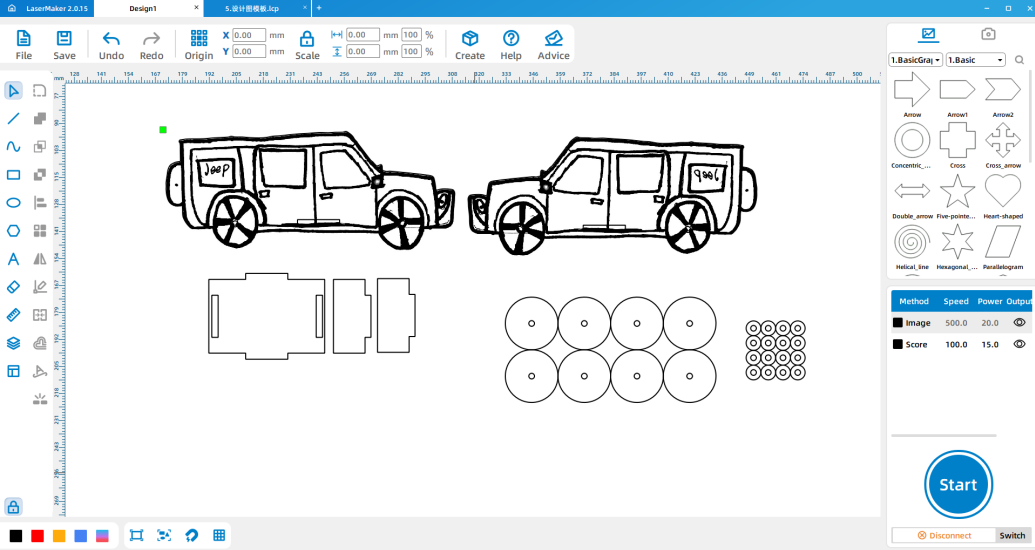
Use a scanning app or another classroom-approved method to scan the drawing and import it into LaserMaker. In the source workflow, the scanned image is processed with the Picture tools. First, use Picture > Crop to remove blank space and reduce unnecessary background interference.
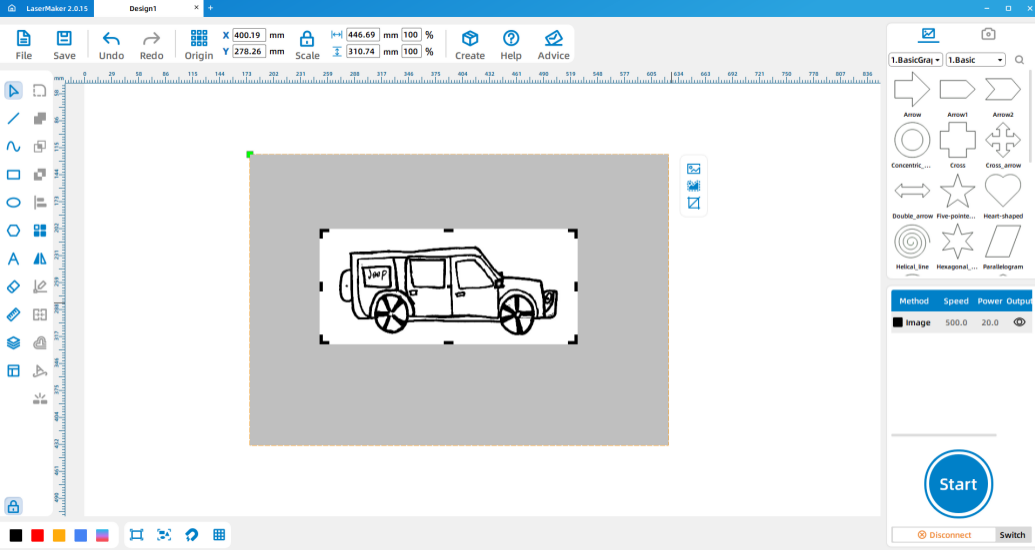
Next, use Picture > Outline to generate an outline from the image. The outline may overlap with the bitmap image, so students need to manage the bitmap layer and vector layer carefully.
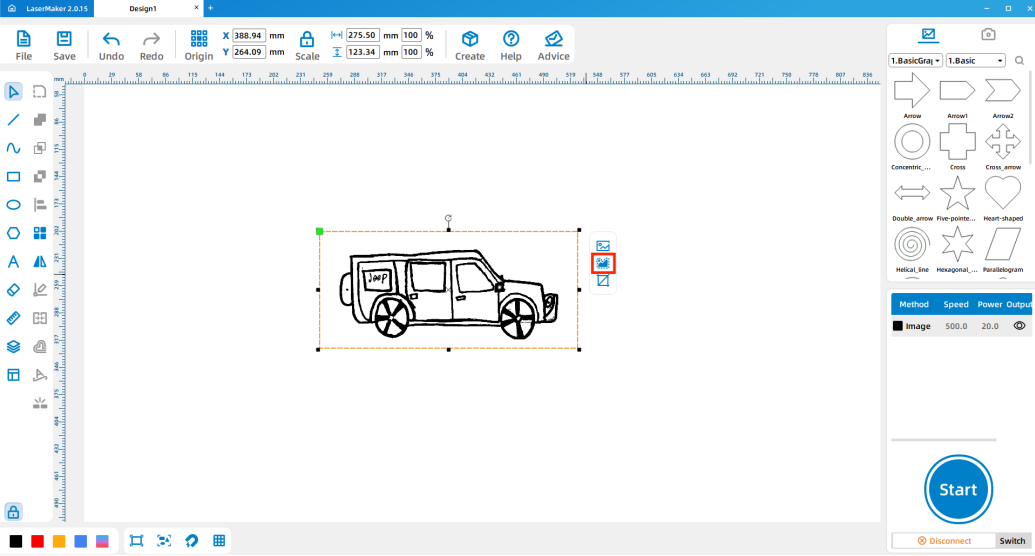
Temporarily remove the output check mark from the BMP layer. Select and delete the inner outline, leaving only the outer contour for cutting. Then restore the BMP output check mark, select all objects, and resize the design width to 140 mm.
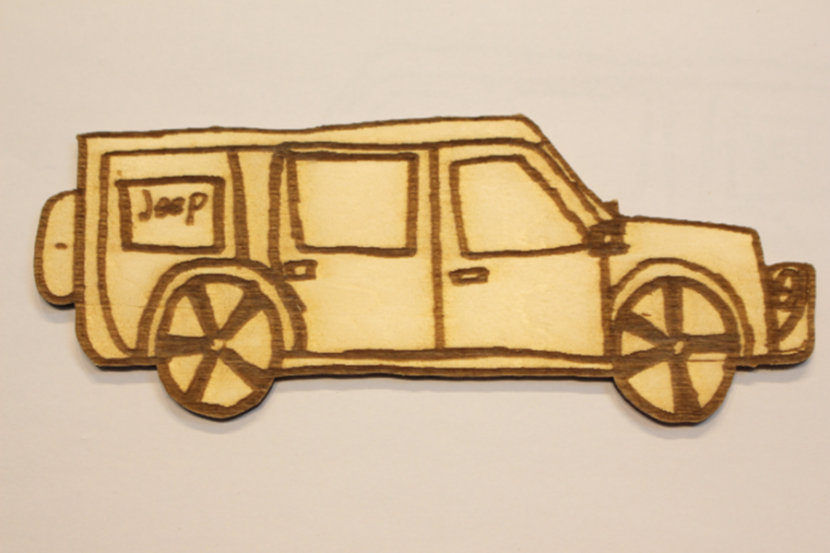
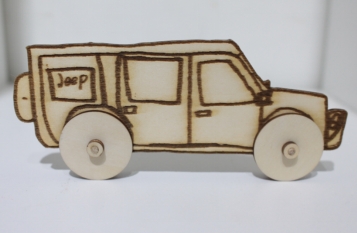
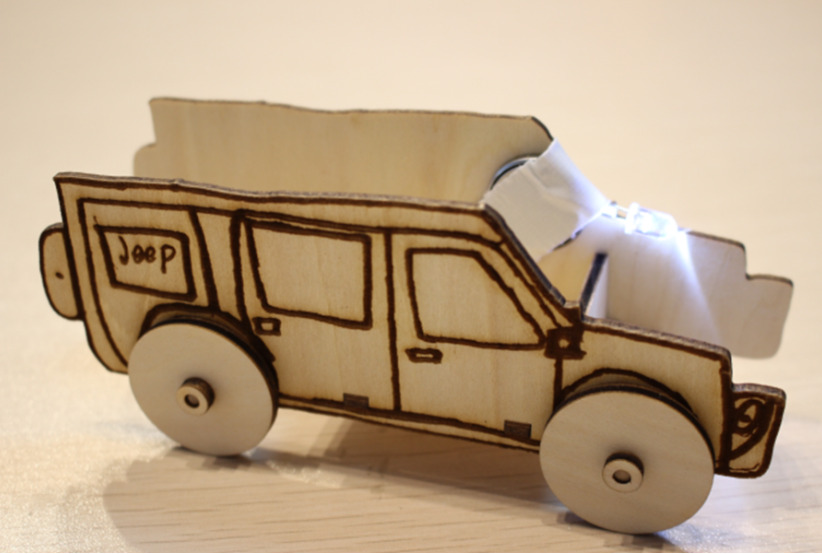
Why keep only the outer outline? The outer vector contour is used to cut out the car shape. The original bitmap can still be used for surface engraving, so the student’s drawing remains visible on the wooden car.
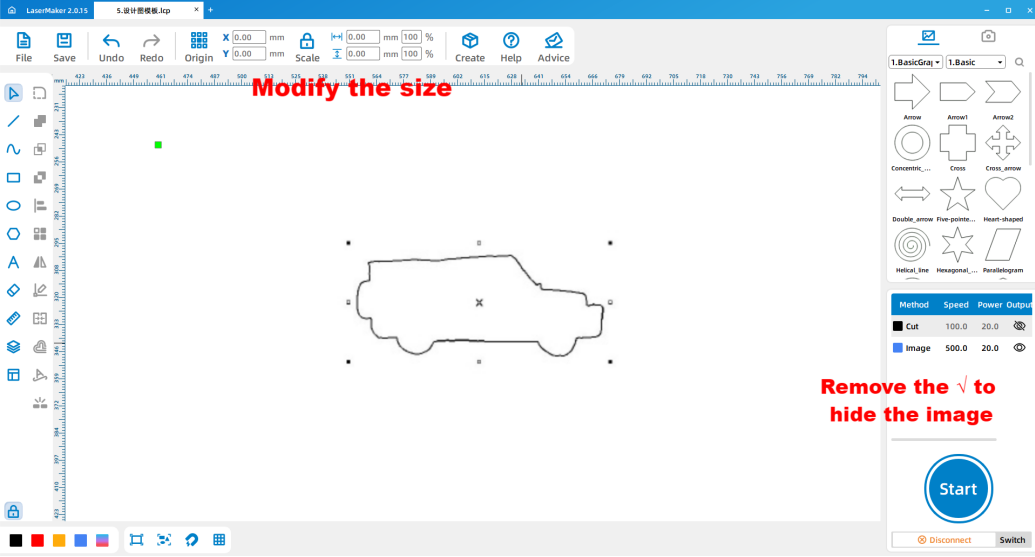
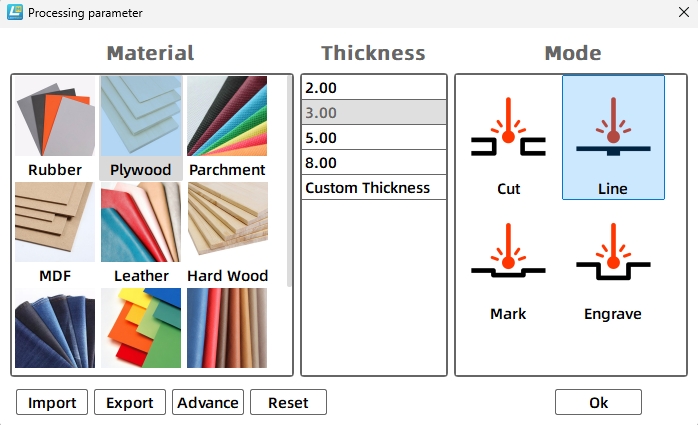
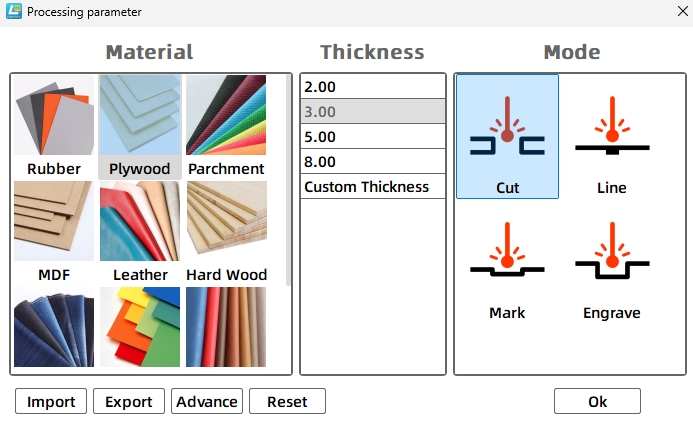
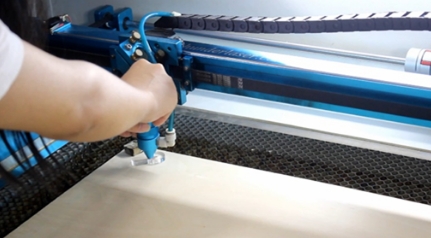
Set the BMP layer to a plywood engraving or carving parameter. Set the cutting layer to the plywood cutting parameter for 3.00 mm material. After checking the layers and previewing the design, send the file to the laser cutter for processing.
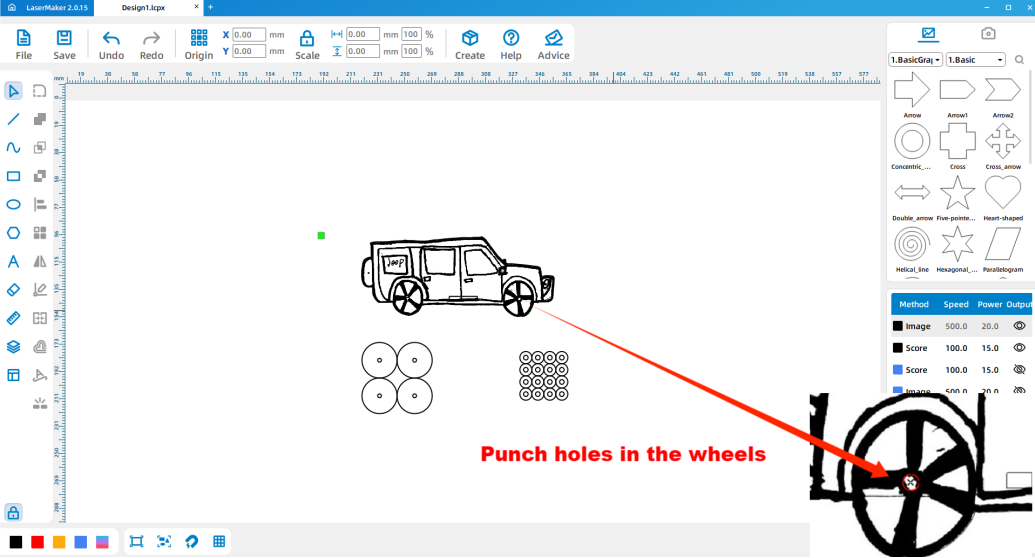
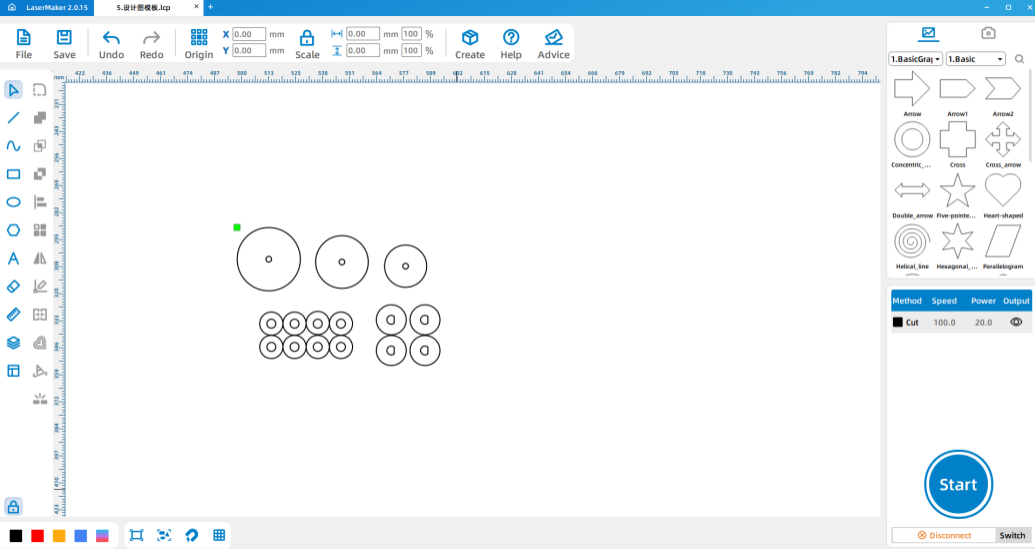
To help the car move, students add wheels and small wooden rings. In LaserMaker, draw a 30 mm outer circle for one wheel and a 2.7 mm inner circle for the axle hole. Center-align the circles, then use Array Copy with 2 horizontal copies and 2 vertical copies to create four wheels.
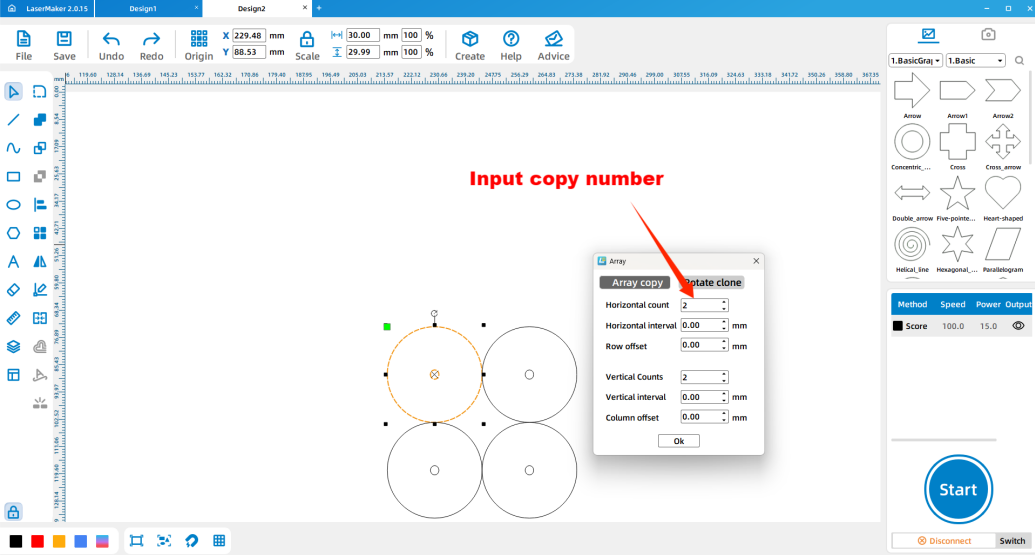
Using the same method, draw 16 small wooden ring structures with a 7 mm outer diameter and 2.7 mm inner diameter. These rings help hold the wheels in place on the wooden sticks.
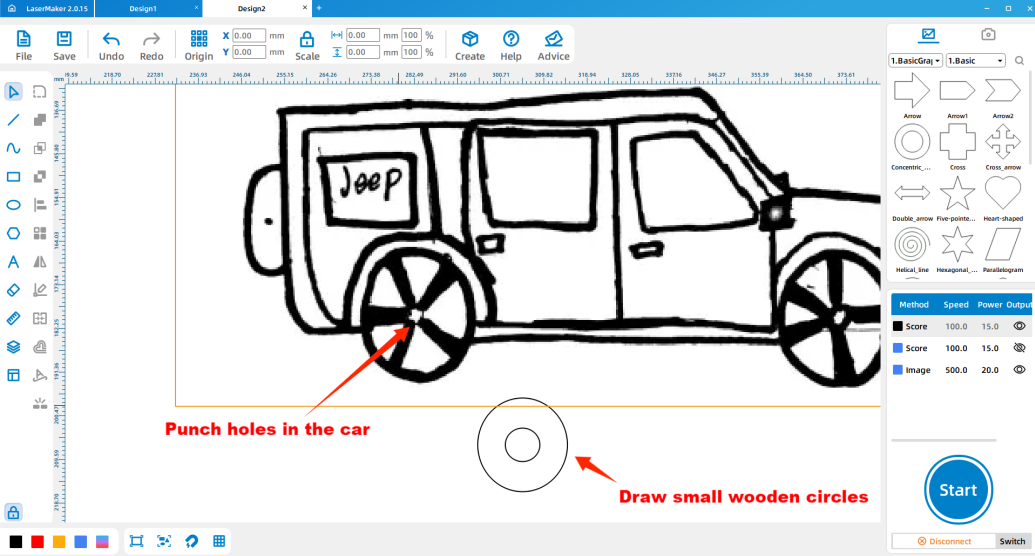
Draw a 3 mm circle at the center of each car wheel position on the car body. After setting engraving and cutting parameters, laser cut the parts. Assemble the wheels, wooden sticks, and small rings to complete the wheeled car.
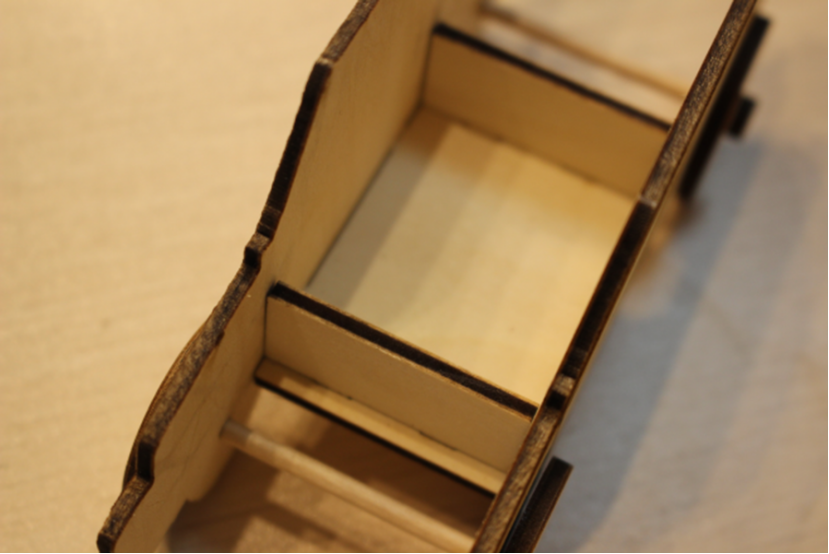
To make the model look more like a real car, students can add a chassis and front and rear panels. Draw a 50 mm by 35 mm rectangle for the car chassis, then draw two 15 mm by 35 mm rectangles for the front and rear panels.
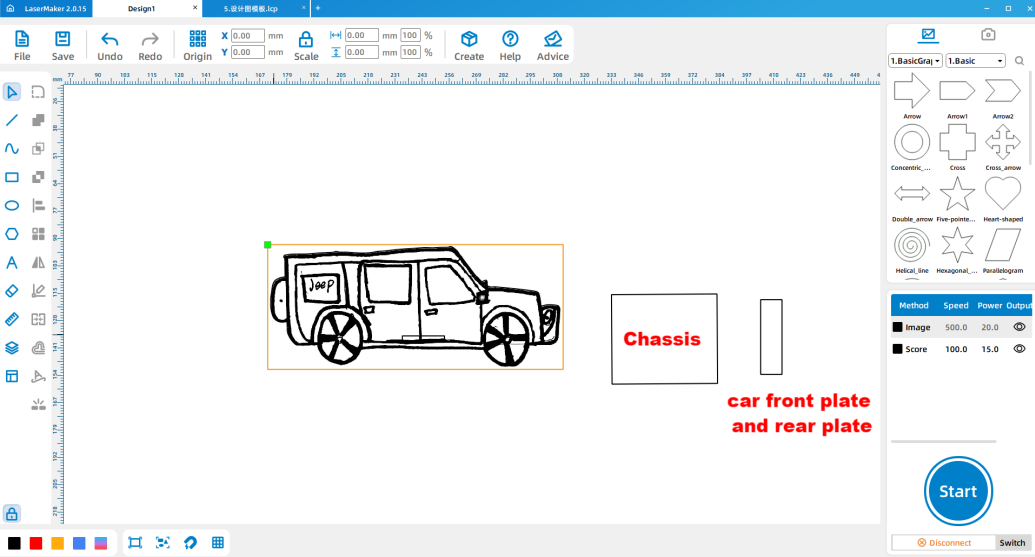
Draw four auxiliary rectangles sized 3 mm by 20 mm. Rotate two of them by 90 degrees as needed, place them at the center of the upper and lower chassis edges and on the front and rear panels, then use graph welding or Union-style operations to create bayonet-style joint features.
Why add bayonet-style joints? These joint features help the chassis, front panel, and rear panel fit together more securely during assembly.
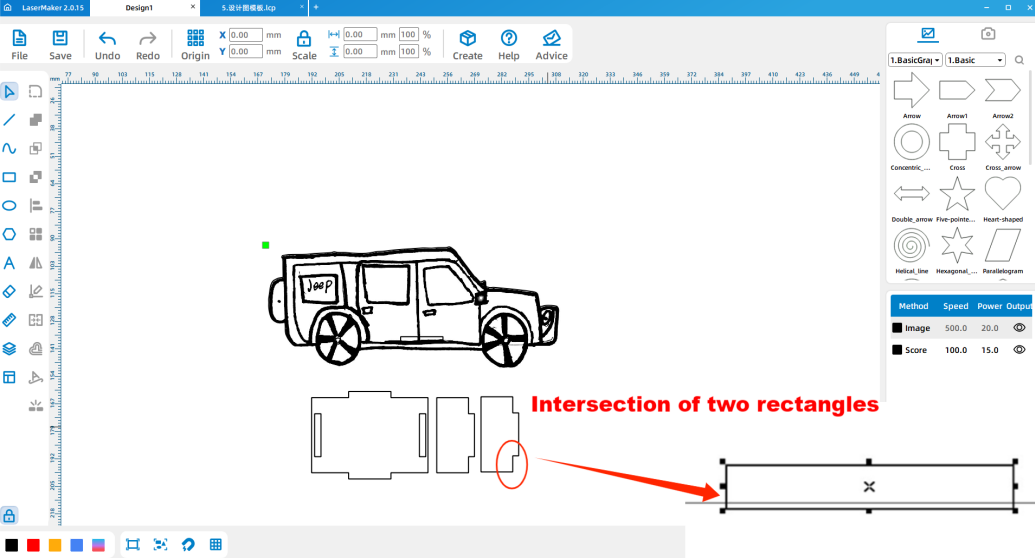
Draw three more 3 mm by 20 mm rectangles. Place them in the center positions of the left and right chassis sides and the lower car body area as shown in the source workflow. Use horizontal flip to complete the matching body image processing.
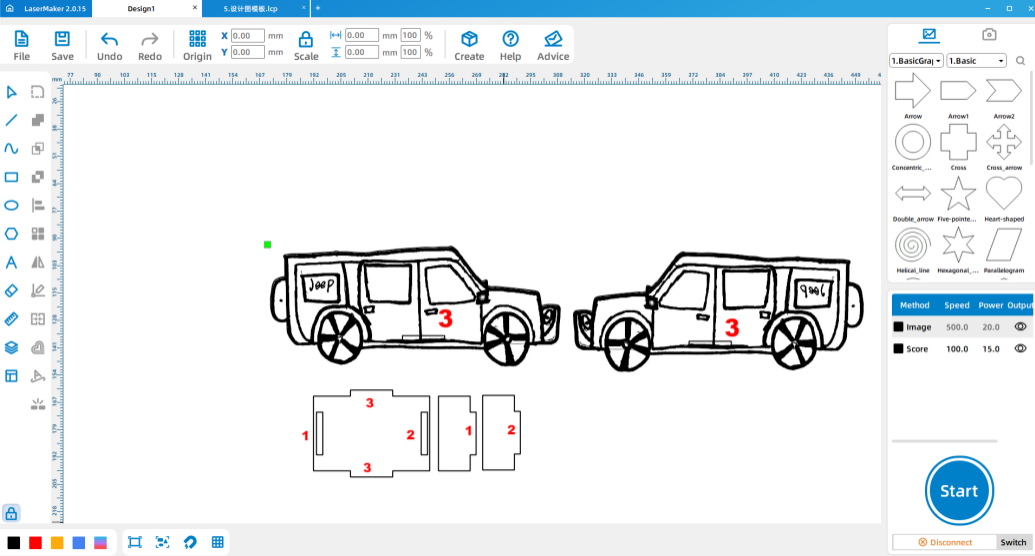
Use Array Copy to increase the number of wheels to eight. Then set the engraving and cutting parameters, process the parts with the laser cutter, and assemble the complete version of the car according to the matching bayonet-style joints.
After students finish their LaserMaker files, check the layer settings, material selection, and process settings. The source lesson reminds students to adjust the focal length before processing to avoid incomplete cutting.
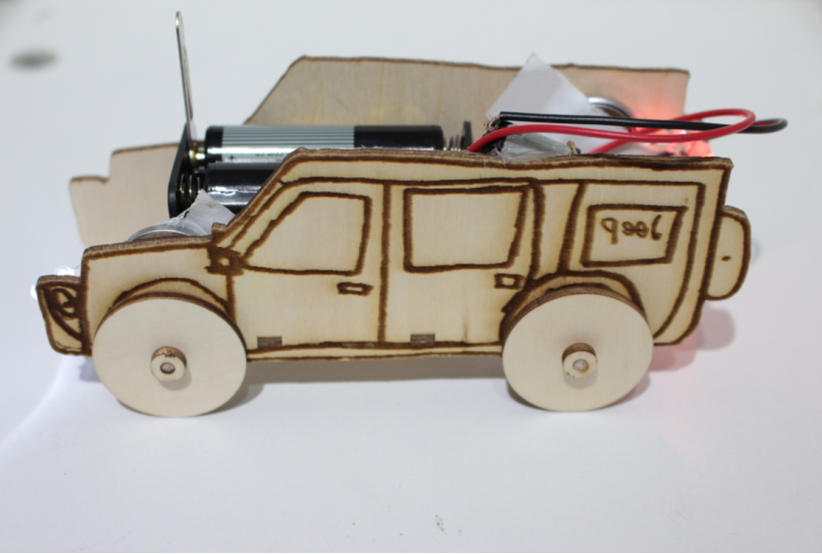
Students can add simple headlights with an LED and a button battery. Clip the long LED leg to the positive side of the button battery and the short LED leg to the negative side. Tape the light to the front of the car body. The rear light can be made in the same way.
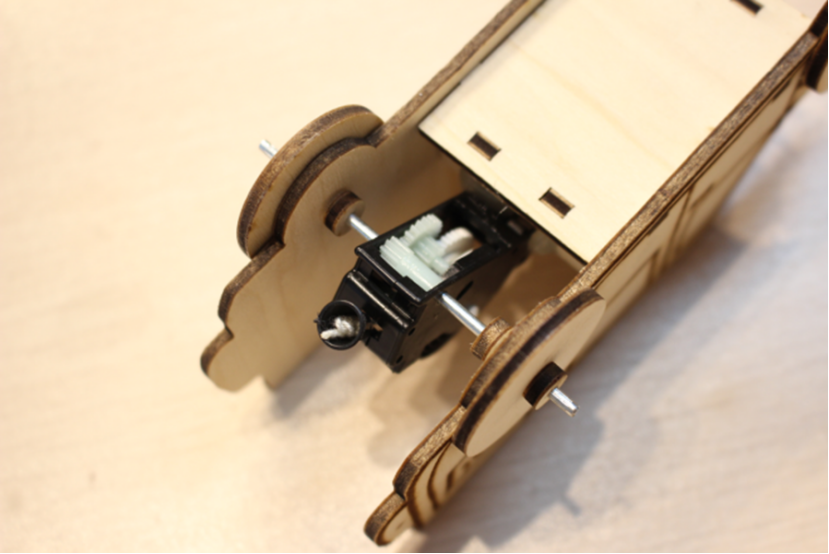
To make the car drive by itself for a short distance, students can add a drawstring wind-up device. Replace the rear wheel’s small wooden stick with the rotating shaft of the wind-up device and attach the device to the car body with glue.
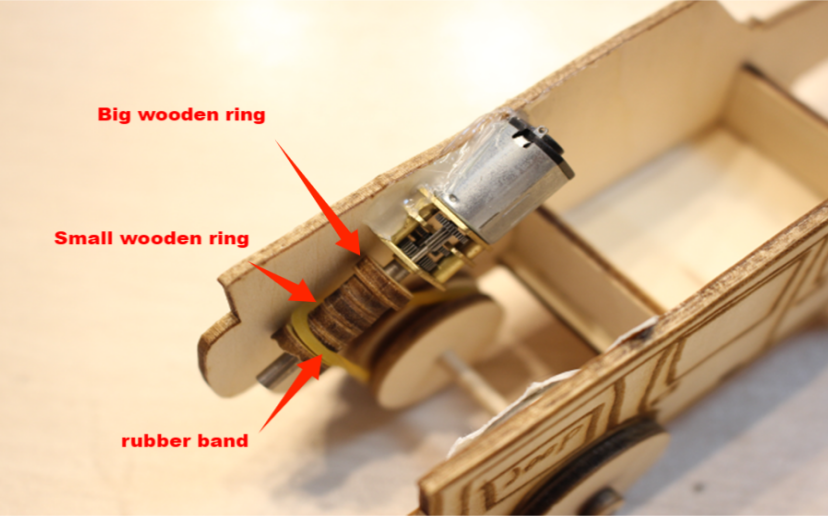
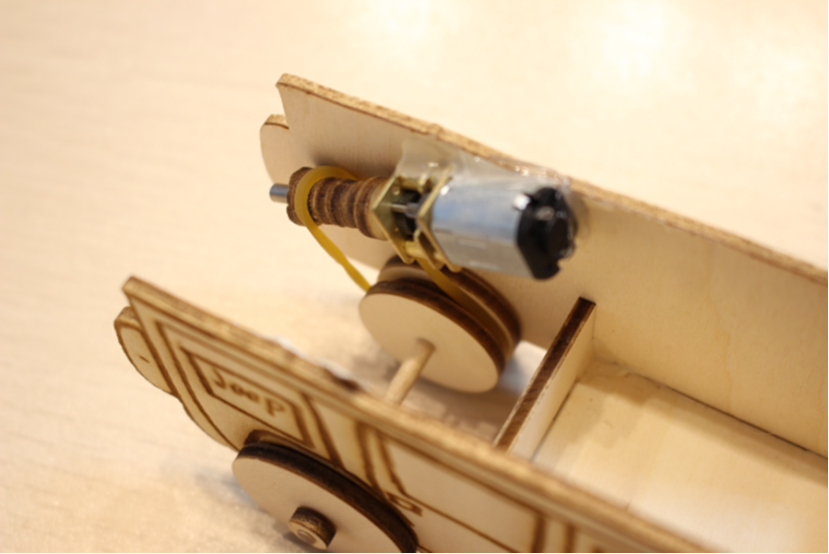
For a more advanced upgrade, students can design D-hole rings, inner wheels, and a rubber-band linkage structure. In the source workflow, students create 8 small D-hole rings, 4 large D-hole rings, one small inner wheel, and two large inner wheels in LaserMaker.
| Part | Source Size Reference |
|---|---|
| Small D-hole ring | 7 mm diameter |
| Large D-hole ring | 9 mm diameter |
| Small inner wheel | 20 mm diameter |
| Large inner wheel | 25 mm diameter |
Fix the N20 motor on the inside of the car body with hot-melt glue, then assemble the rubber-band linkage structure according to the source workflow. Connect the No. 5 battery box to the N20 motor with wires and place the battery box in the car body.
Hand drawing: Give students paper and pens, then check that each drawing has a clear, closed outer edge before scanning.
Software design: Guide students through importing, cropping, outlining, deleting inner contours, resizing, and setting layers.
Machine processing: Process student files in a safe classroom order and confirm focus before cutting.
Assembly: Distribute tools in groups and let students assemble their own car models with teacher support.
Divide students into groups based on class size and choose group leaders to help organize materials and progress.
Move to the next module after more than half of the groups have completed the previous step.
Prepare spare parts in advance when class time is limited.
Use batch processing when appropriate by arranging several student works into one laser processing file.
Allow enough time for each student to complete and display their own work.
What are the basic structures of a car?
How could cars evolve in your imagined world?
Besides cars, what else could you draw, build, and upgrade with the same process?
Students can evaluate their own work and give peer feedback based on creativity, structural firmness, appearance, and learning attitude.
| Evaluation Item | Self-Evaluation | Peer Evaluation |
|---|---|---|
| Creativity, 30 points | ||
| Firmness, 30 points | ||
| Appearance, 20 points | ||
| Learning Attitude, 20 points | ||
| Total, 100 points |
At the end of the lesson, students can present their car models, explain their design and upgrade choices, and discuss what they would improve in the next version. This turns the project from a one-time craft activity into an iterative maker challenge.

The same workflow can be used beyond cars. Students can draw and build trains, planes, ships, rockets, animals, plants, characters, or other imaginative objects. The key idea is to start with a drawing, turn it into a digital laser file, fabricate it, and then upgrade it one version at a time.
For a further challenge, students can improve their automatic car by testing different wheel sizes, rubber-band tension, motor positions, battery placement, and body shapes to compare how each change affects motion and stability.
This project is suitable for classroom laser cutters that support engraving and cutting of thin plywood for student maker activities. For schools and beginner STEAM labs, projects like hand-drawn car models, wheeled vehicles, simple lighting upgrades, and beginner LaserMaker activities can be completed with a classroom laser cutter such as the Thunder Laser Bolt Series.
Teachers can choose the machine and material setup based on classroom space, student age and supervision needs, material thickness, project size, and ventilation setup. Students should always test settings, check focus, and follow the school’s laser safety rules before final cutting.
Talk To Our Experts Now!
Please leave your contact information so that we can serve you better.
NEED HELP FINDING THE RIGHT SOLUTION?
Talk to our team for machine recommendations, application advice, and support based on your needs.

 Stable & Consistent MachinesUnlimited ApplicationRobust After-sales SupportFactory Direct Supply


