Stacked Coin Bank Laser Cutting Project with LaserMaker
 2024-06-26
WHAT ARE YOU LOOKING FOR?
Search Across Products, Blog Posts, Support Content, And Resources.

Stacked Coin Bank Laser Cutting Project with LaserMaker
2024-06-26

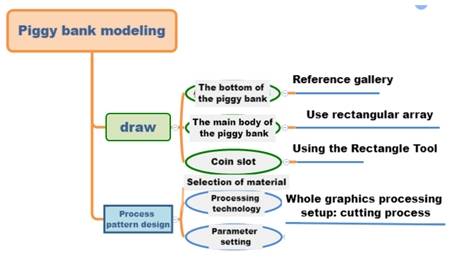
In this STEAM engineering project, students design and make a stacked coin bank using LaserMaker. The lesson introduces regular geometry, repeated part design, rectangular arrays, alignment, cutting, bonding, and layered construction through a practical 3D object.
This project helps students understand how flat laser-cut parts can be stacked and bonded to create a three-dimensional structure. It is suitable for engineering design, maker education, geometry-based modeling, and classroom laser cutting activities.
| Item | Details |
|---|---|
| Project | Stacked laser-cut coin bank |
| Software | LaserMaker |
| Main Skills | Gallery graphics, regular hexagon design, copying and resizing, Rectangular Array, Align Guides, Rectangle Tool, cutting parameter setup, and layered assembly |
| Suggested Materials | Basswood plywood board, acrylic board, or Osung board |
| Classroom Fit | Engineering challenges, stacked structure design, geometry-based modeling, maker education, product design, and classroom laser cutting |
Students will design a simple coin bank by creating repeated geometric layers, cutting the parts from sheet material, and assembling the layers into a functional three-dimensional object.
Students should create school-appropriate designs and protect personal information when adding decorative text or graphics. They may study existing coin bank designs for inspiration, but the final project should include their own improvements and creative choices.
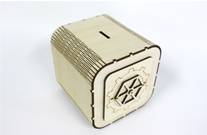
A coin bank is a container used to store coins. It usually includes a slot at the top for inserting coins and a larger opening or removable part for taking coins out. In many homes and classrooms, coin banks are also used to help children understand saving and basic money management.
In this lesson, students observe the shape and structure of a coin bank, then design a simple version using stacked laser-cut layers.
Before drawing in LaserMaker, students should analyze the coin bank as a physical product. The design needs to consider shape, size, repeated parts, bonding, material choice, and how coins will enter or be removed.
Start by deciding the overall size of the coin bank. Students should record the length, width, and height in millimeters before creating the digital design.
| Measurement Data Recording / Unit: mm | ||
|---|---|---|
| Length: | Width: | Height: |
Students should sketch the coin bank structure, including the bottom shape, repeated body layers, coin slot, and any opening or stopper idea they may want to test.
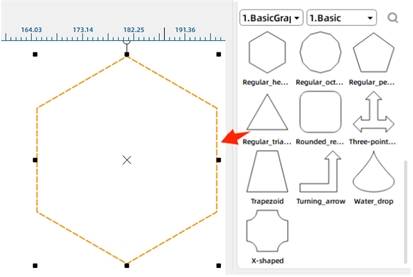
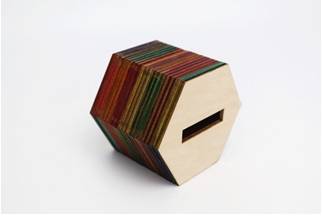
In LaserMaker, open the Select Gallery panel. Under Common Graphics, choose Regular Hexagon and drag it into the drawing area. Adjust the size of the hexagon according to the measurement plan and use it as the bottom of the coin bank.
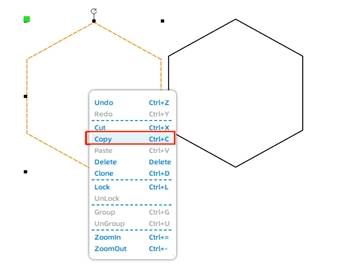
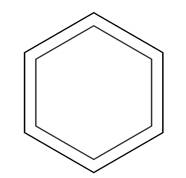
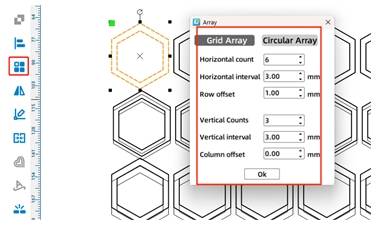
Copy and paste the regular hexagon to create additional shapes. One copy will be reduced and placed inside a larger hexagon to form a ring-shaped hexagonal layer.
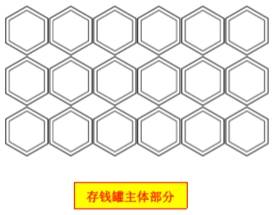
Select the ring-shaped hexagon and use the Rectangular Array tool to create repeated copies. In the source workflow, the horizontal number is set to 6 and the vertical number is set to 3, creating multiple layers for the stacked coin bank body.
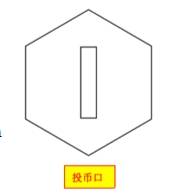
Copy the bottom regular hexagon and use it as the top layer for the coin slot. Use the Rectangle Tool to draw a slot in the center of the hexagon.
The source lesson notes that a one-yuan coin has a diameter of 25 mm and a thickness of 1.85 mm, so the slot should be larger than the coin. In the sample design, the slot is set to 45 mm long and 10 mm wide, then centered with Align Guides.
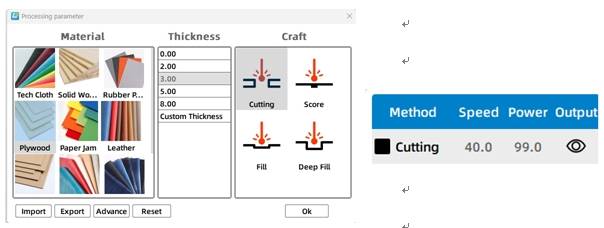
Select the coin bank objects and open the corresponding black cutting process layer. In the source workflow, the material is set to basswood plywood, the process is set to cutting, and the processing thickness is set to 3 mm.
After cutting a test product, students may return to the Processing Parameters dialog box to adjust the values if the parts do not cut cleanly or do not fit as expected.
Before assembling the final coin bank, students should test the cut quality, layer fit, bonding method, and slot function. They should also consider whether the coin bank needs a removable stopper or another way to take coins out.
After the final settings are confirmed, students can cut the hexagonal pieces, bond the layers one by one, and add color or finishing treatment if desired. The finished result is a simple stacked coin bank made from laser-cut parts.
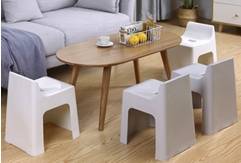
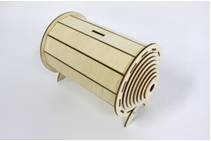
After completing the coin bank, students can apply the same stacked structure method to another object. The source lesson suggests designing a small stool using the Rectangular Array tool and layered construction.
The following examples can be used for classroom discussion, design inspiration, and student reflection. Encourage students to compare how stacked layers, repeated parts, material thickness, and bonding methods affect the final structure.
This project is suitable for classroom laser cutters that support small-format cutting of sheet materials. For schools, makerspaces, and beginner STEAM labs, projects like stacked coin banks, small stools, layered models, puzzle structures, and product prototypes can be completed with a classroom laser cutter such as the Thunder Laser Bolt Series.
Teachers can choose the machine and material setup based on classroom space, project size, material choice, bonding method, and learning goals. The same stacked-structure workflow can also be adapted for other CO2 laser machines when students move on to larger models or more advanced engineering challenges.
Talk To Our Experts Now!
Please leave your contact information so that we can serve you better.
NEED HELP FINDING THE RIGHT SOLUTION?
Talk to our team for machine recommendations, application advice, and support based on your needs.

 Stable & Consistent MachinesUnlimited ApplicationRobust After-sales SupportFactory Direct Supply