


STEAM Music Car Laser Cutting Project with LaserMaker
 24-08-19
WHAT ARE YOU LOOKING FOR?
Search Across Products, Blog Posts, Support Content, And Resources.

STEAM Music Car Laser Cutting Project with LaserMaker
24-08-19

In this STEAM mechanism project, students design and build a music car using LaserMaker, a laser cutting machine, and a music box movement. The lesson connects hand drawing, car body design, hole placement, gear design, laser cutting, movement installation, gear meshing, assembly, and testing.
This project builds on the earlier Car Inventor activity and the heart-shaped music box lesson. Students reuse the car-making workflow, then add a music box movement and rear gear wheels so the model combines sound, motion, and mechanical design.
| Item | Details |
|---|---|
| Project | Music car laser cutting project |
| Software | LaserMaker |
| Main Skills | Hand drawing, car body design, hole placement, gear import, gear resizing, laser cutting, music box movement installation, gear alignment, splicing, and assembly |
| Suggested Materials and Parts | Laser-cut sheet material, paper, drawing pen, music box movement, small wooden sticks, gear wheels, screws, and basic classroom assembly tools |
| Classroom Fit | Robotics and mechanism projects, music-themed STEAM activities, laser cutting, product design, gear motion, beginner LaserMaker practice, and creative classroom projects |
Students will draw a car idea, prepare a laser-cut car body in LaserMaker, modify the car structure for a music box movement, add installation holes and gear wheels, laser cut the parts, assemble the model, and test how the music box movement and rear gears work together.
For teachers: Use this project to connect music box principles, gear motion, car body design, and laser-cut assembly.
For students: Use the activity to turn a hand-drawn car into a physical model that includes sound and mechanical movement.
For makerspaces: Use it as a compact mechanism project that combines creative drawing, fabrication, and hands-on testing.
Recall how a music box movement creates sound through a spring, rotating cylinder, and sound plate.
Use a previous car design workflow to create laser-cut car body parts in LaserMaker.
Add 3.1 mm and 7 mm holes for installing the music box movement, based on the actual movement’s winding and screw positions.
Import gear graphics, duplicate gears, and adjust one gear hole to 4.60 mm for the music box winding position.
Assemble the music car, align the gear wheels, test movement, and discuss how size and gear setup affect performance.
Design thinking: Turn a familiar car model into a more expressive product by adding music and motion.
Computational thinking: Use measurements, hole sizes, copied parts, gear placement, and design revisions to prepare a usable laser file.
Engineering thinking: Consider music box movement position, screw alignment, gear hole size, gear meshing, rear wheel installation, and movement speed.
Students should operate the laser cutter only under teacher or lab supervisor guidance. Before cutting, check material placement, focal length, layer settings, and cutting paths. During assembly, keep fingers away from moving gears and tighten the music box movement only after the holes are aligned.
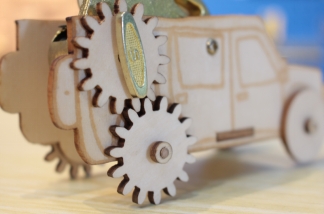
A music box is a small mechanical device that plays music when its movement is powered by a spring or crank. In this project, students use that mechanism in a new way: instead of placing the movement inside a box only, they install it inside a laser-cut car body.
The design challenge is to make the car body, music box movement, and gear wheels fit together. Students need to think about where the winding shaft should pass through the body, where the screw hole should go, and how the rear gear wheel should mesh with the gear installed on the music box movement.

Before opening the software, teachers can guide students with short review and design questions.
What is the origin of the music box, and how does a music box movement work?
What kinds of music boxes can be made besides heart-shaped ones?
If you were asked to make a music car, where would you place the music box movement?
How can gears help transfer motion from one part to another?
What could affect whether the car moves smoothly or slowly?
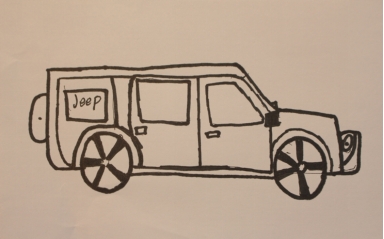
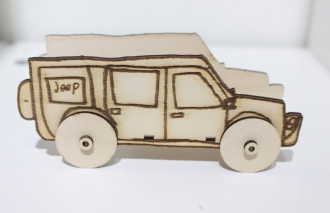
Ask students to draw the car they imagine on paper, using the same general idea from the earlier Car Inventor lesson. The drawing should be clear enough to support a laser-cut car body design.
In LaserMaker, design the car parts by referring to the earlier Car Inventor workflow. Students can use their hand-drawn car as the visual starting point, then prepare the car body, wheel positions, and assembly parts for laser cutting.
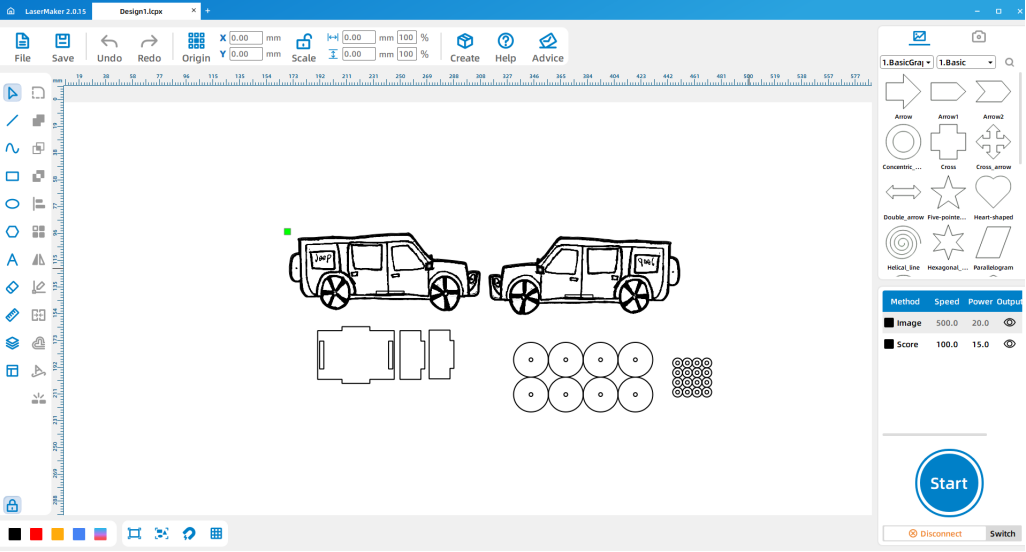
Because this project adds a music box movement, reduce the production of one welding plate from the original car structure. This leaves room for the movement and helps the assembly match the updated design.
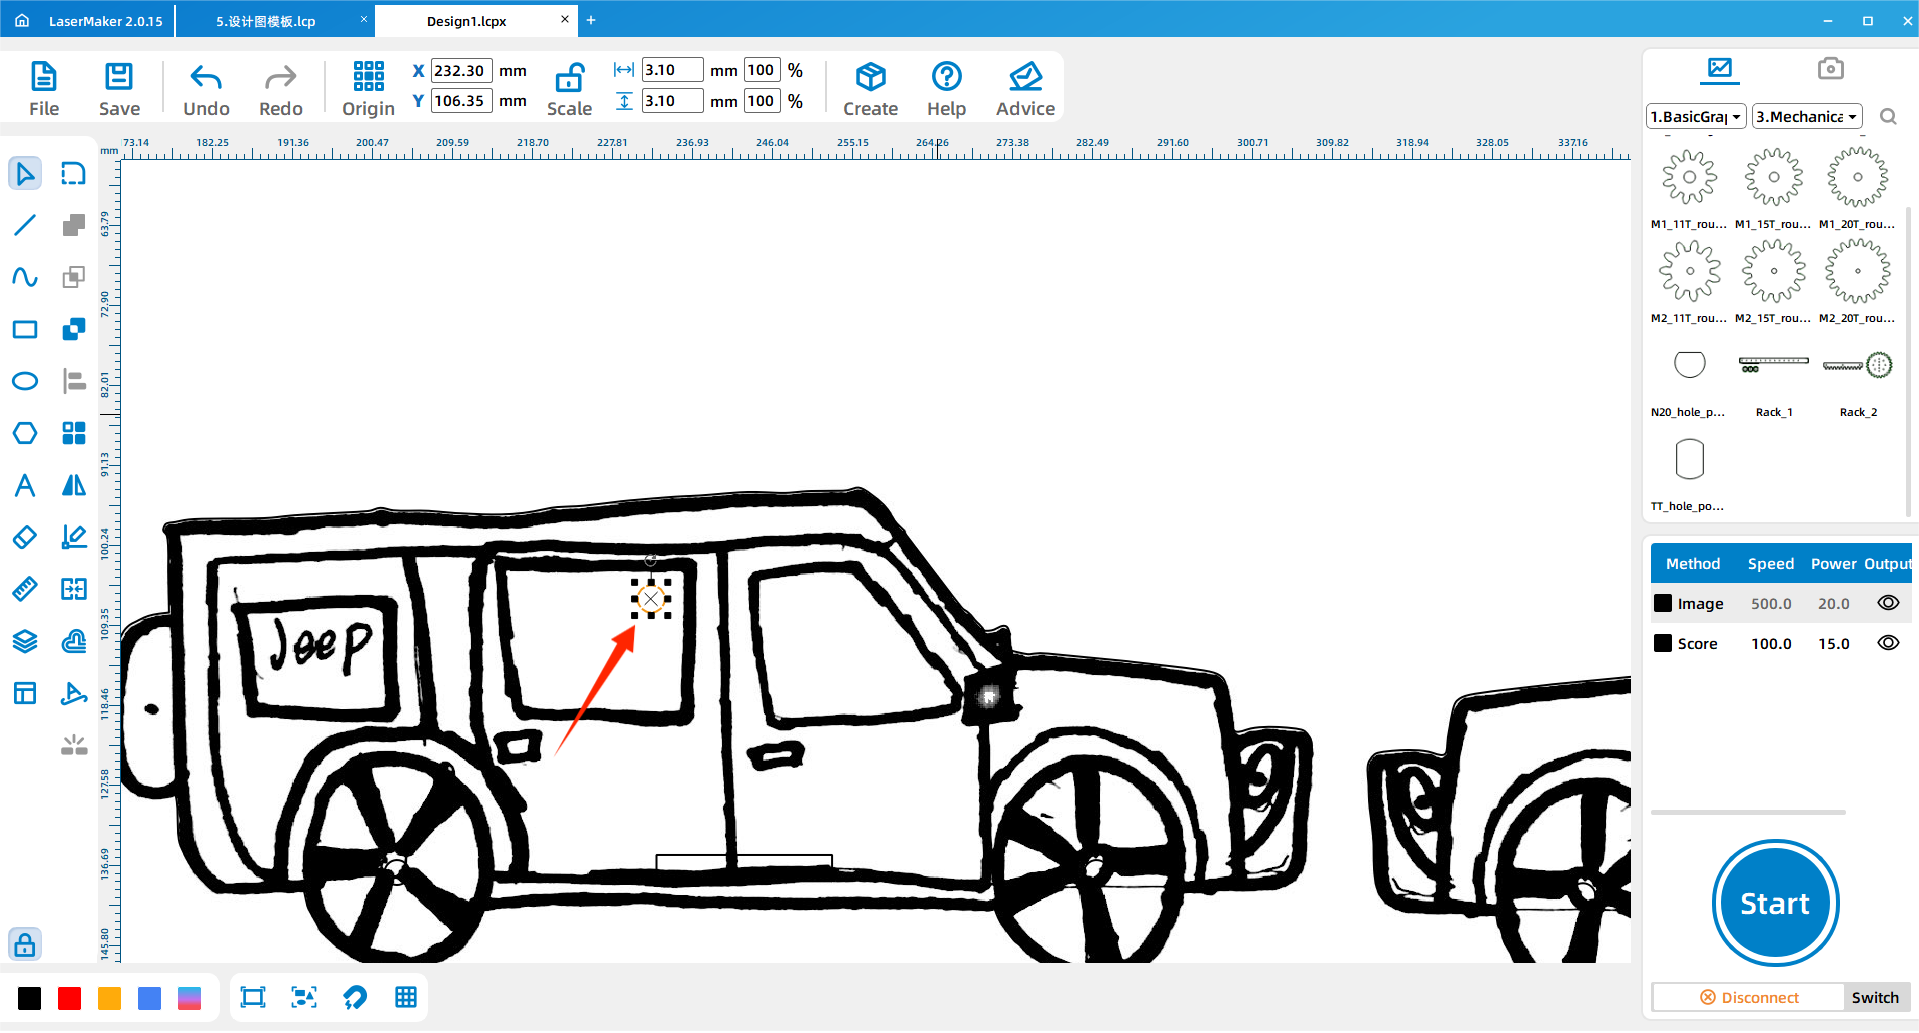
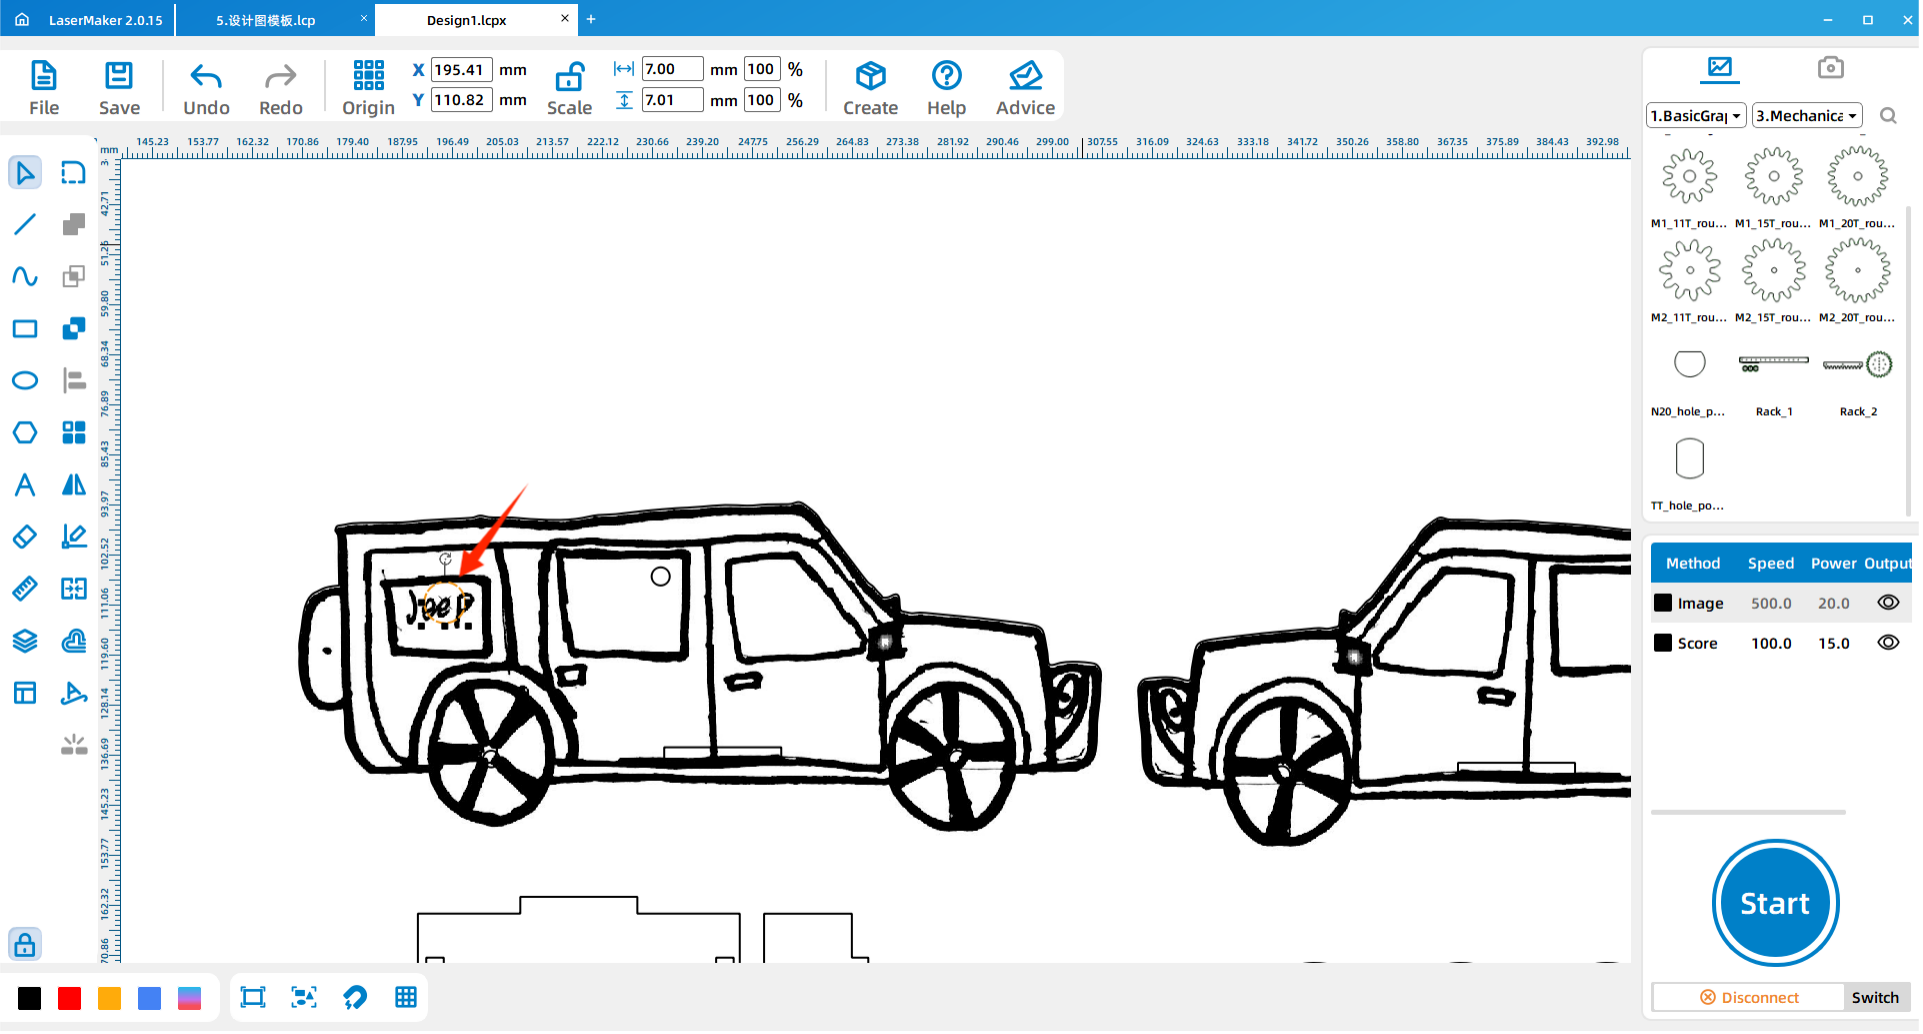
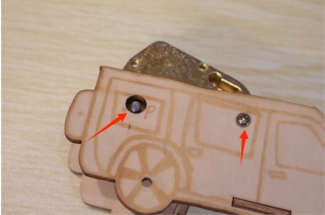
On one side of the car body, draw the holes needed for the music box movement. The source workflow uses a 7 mm hole for the winding position and a 3.1 mm hole for the screw position.
The distance between these holes should be based on the actual distance between the winding shaft and screw position of the music box movement. Students should measure the movement before final cutting.
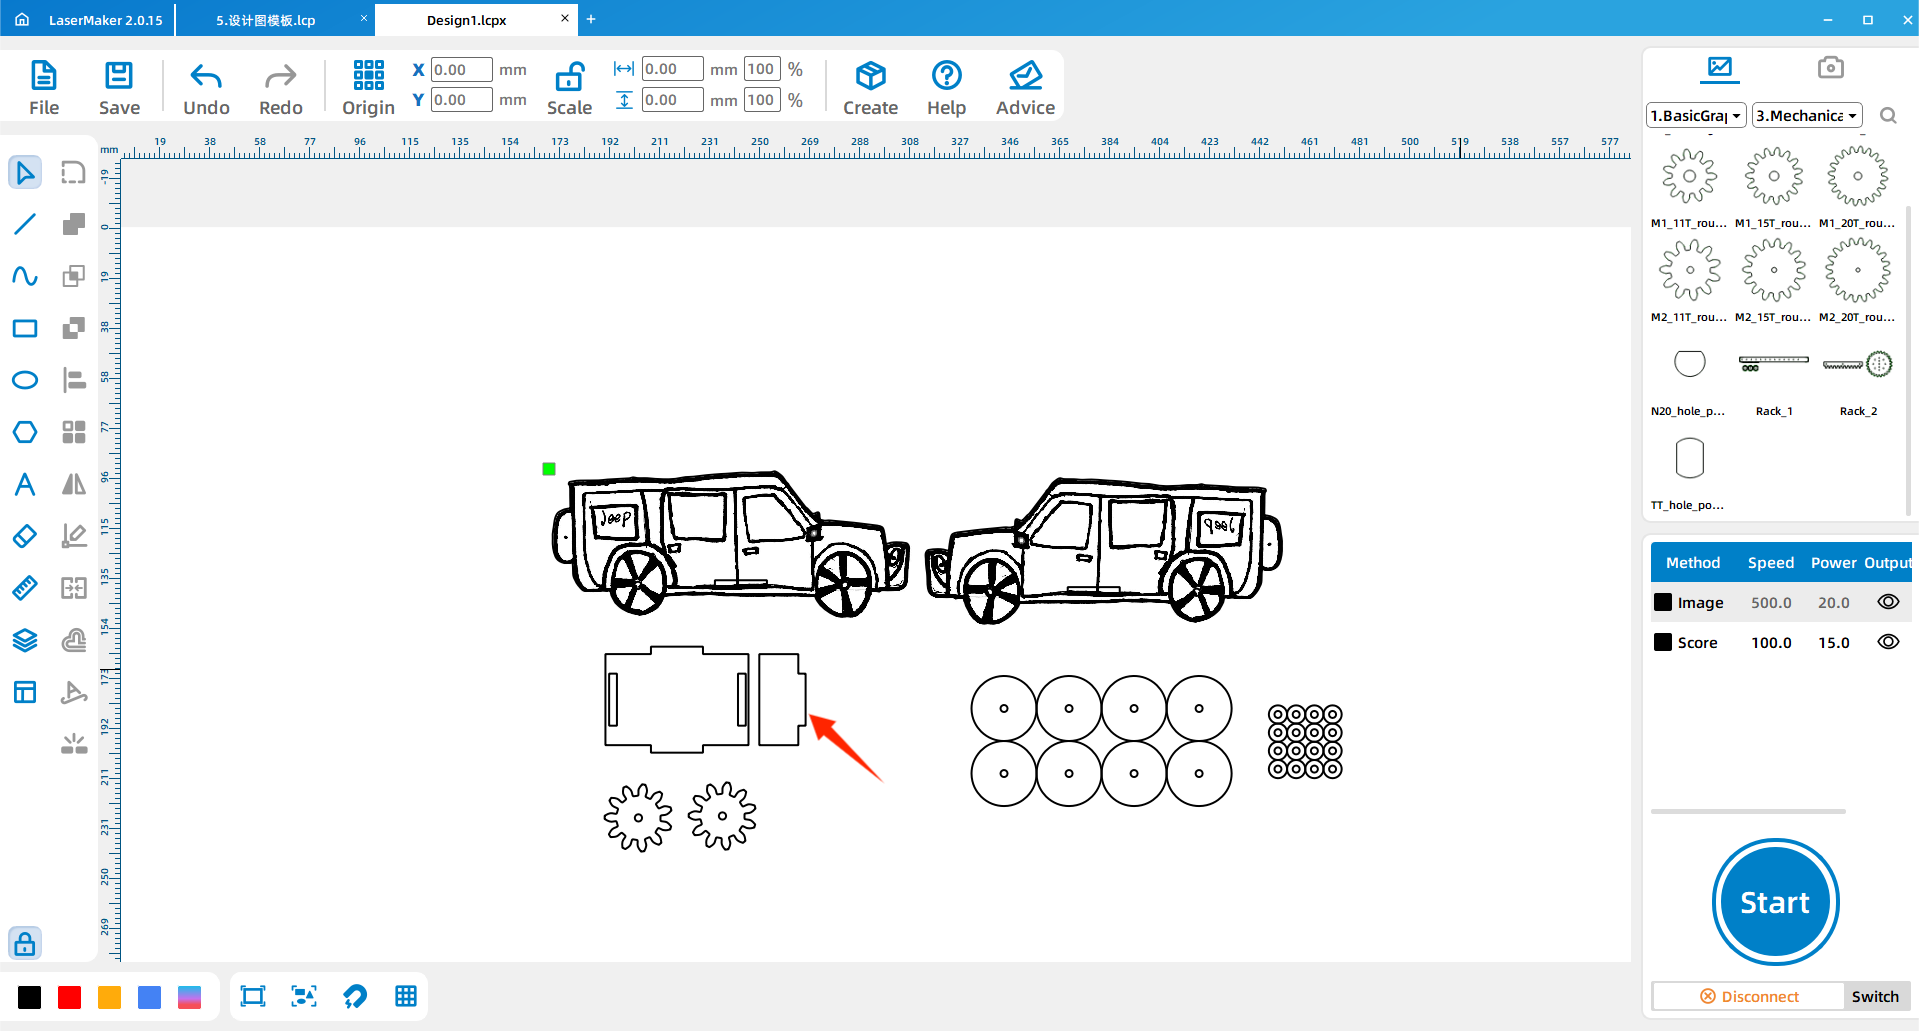
Click Gallery in the LaserMaker menu, select the gear graphic, and drag it onto the workspace. Copy and paste the gear until there are three gears. These gears are used as the rear wheel and movement-drive gear parts of the music car.
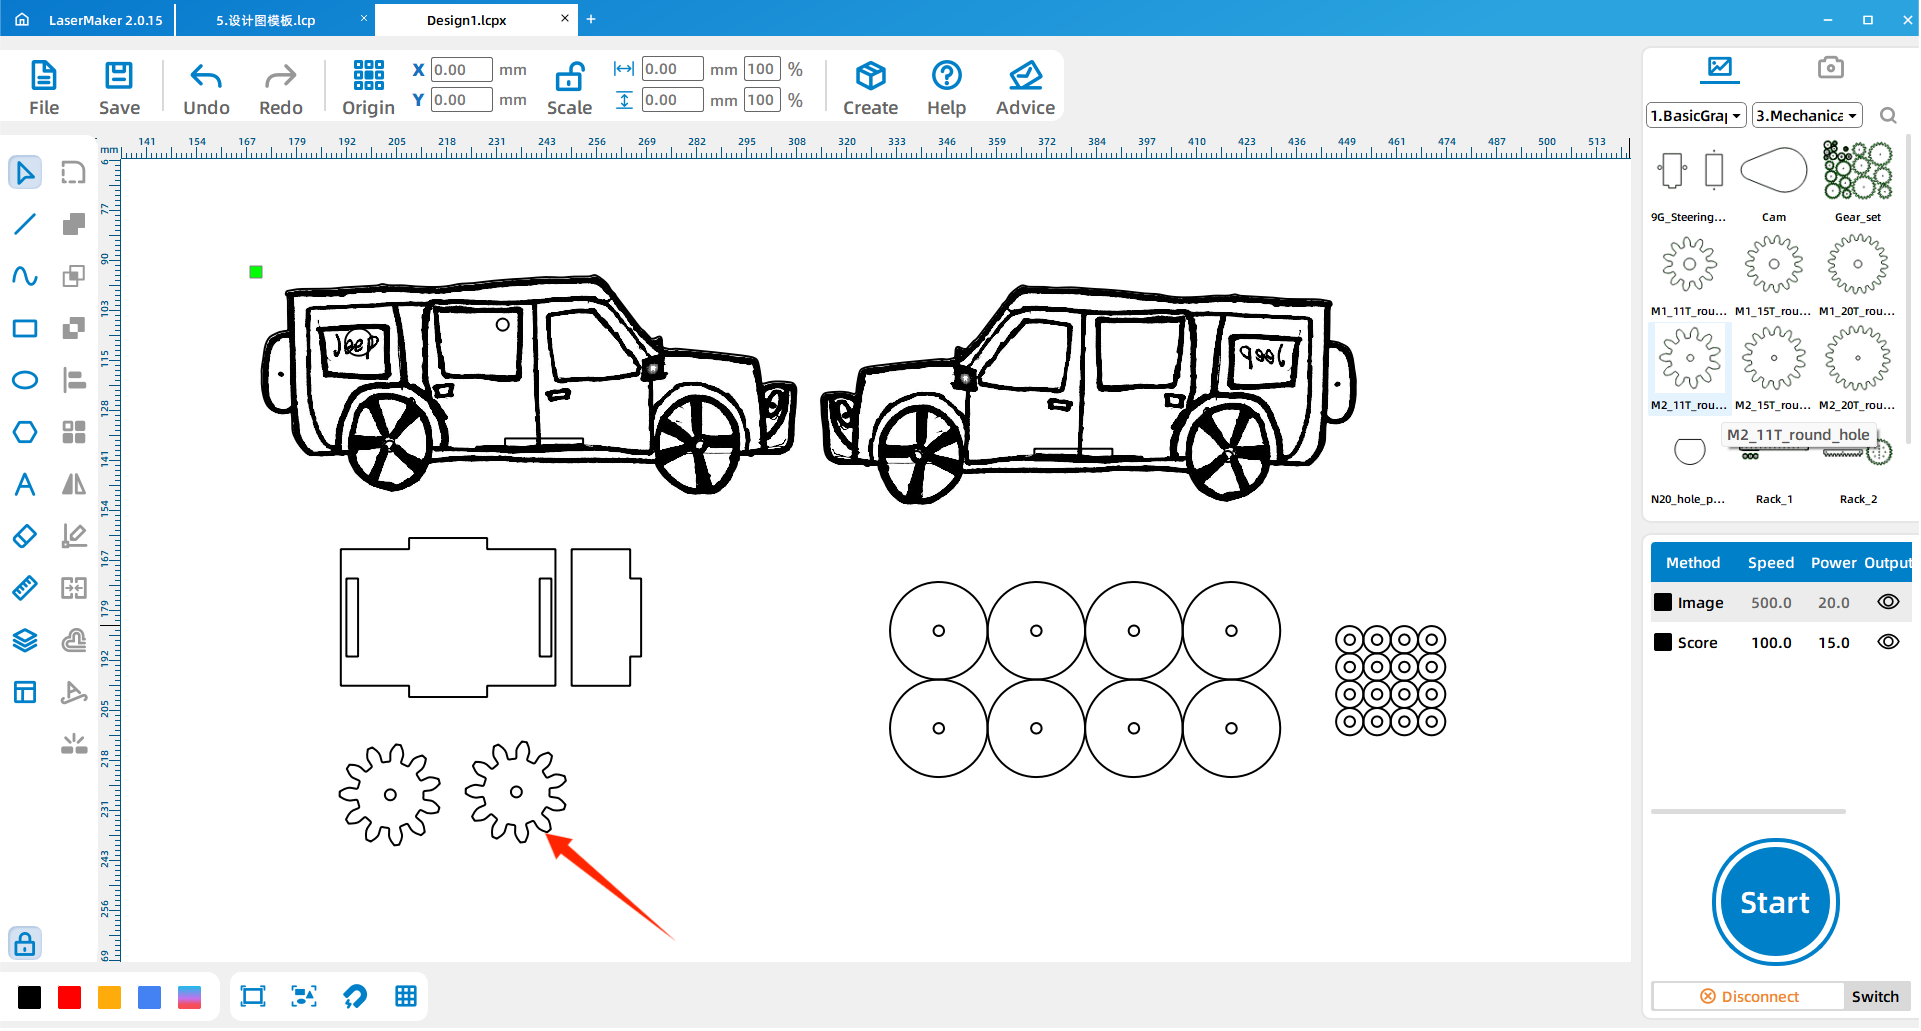
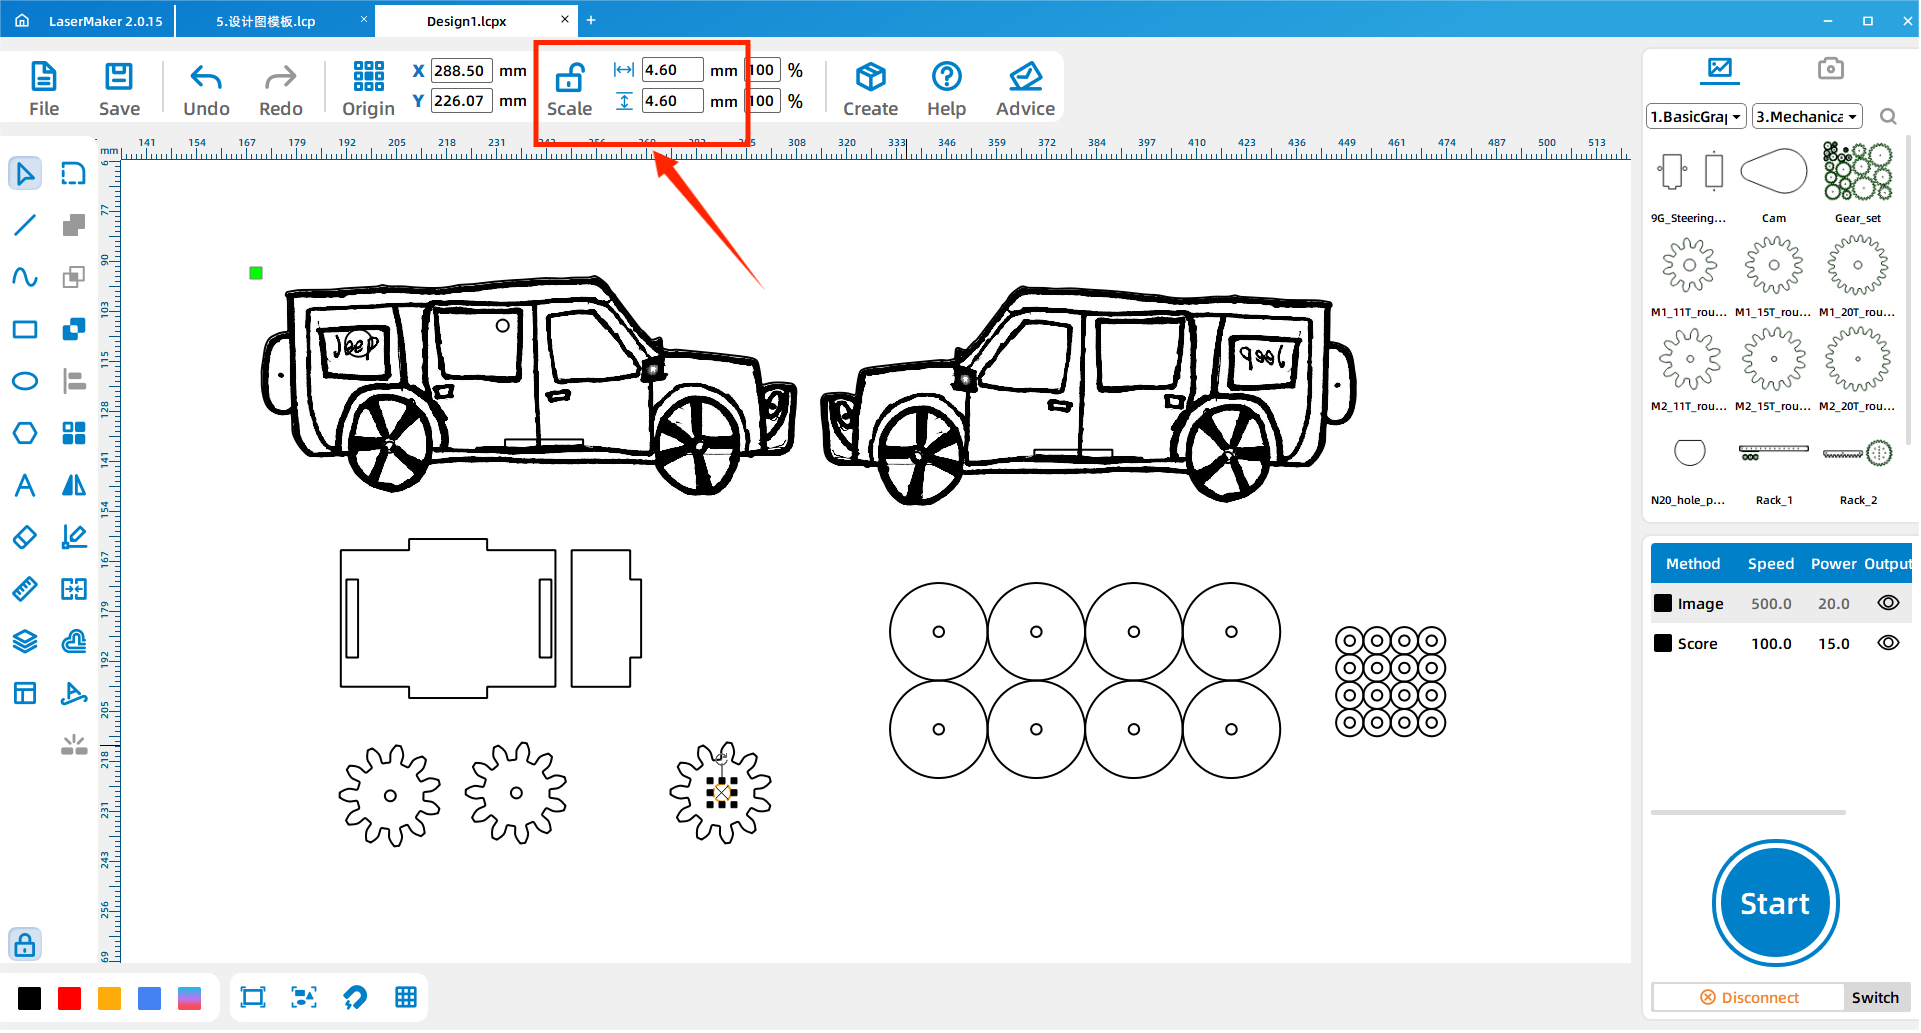
Change the center hole diameter of one gear to 4.60 mm. This gear will be installed on the music box movement’s winding position, so the hole size should match the movement part used in class.
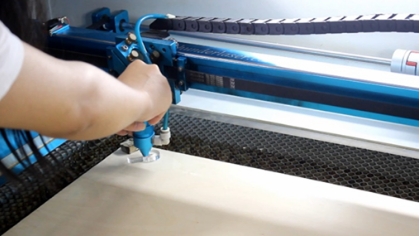
After the car body, holes, and gears are complete, check the layer settings and processing order. Make sure cutting lines, engraving lines, and hole features are assigned to the correct layers before sending the file to the laser cutter.
Import the completed design file into the laser cutting machine for processing. Before starting the job, adjust the focal length carefully to reduce the risk of incomplete cutting.
Assemble the car according to the Car Inventor splicing steps. For this music car version, do not install the original rear wheel at this stage. Attach the welding plate to the front as shown in the source workflow.
Remove the spring handle from the music box movement. Insert the movement through the 7 mm round hole, align the screw hole with the 3.1 mm hole, and tighten the screw to secure the movement.
Install the gear with the 4.60 mm center hole at the music box movement’s spring position. Then reinstall the spring handle so the movement can still be wound and tested.
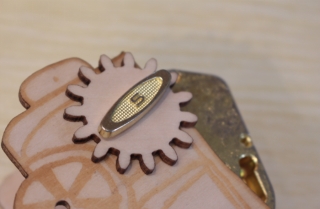
Use the 3.1 mm gear as the rear wheel. Install it at the back of the car with a small wooden stick. During installation, make sure the rear gear and the movement gear mesh properly.
After assembly, wind the music box movement and observe whether the gears move smoothly. If the gear connection is too tight, too loose, or misaligned, students should adjust the installation before repeated testing.
Check whether the movement is securely fastened to the car body.
Check whether the 4.60 mm gear is installed firmly on the music box movement.
Check whether the rear 3.1 mm gear wheel turns smoothly on the small wooden stick.
Check whether the two gears mesh without slipping or jamming.
Observe whether the car moves too slowly and discuss what design changes might improve motion.
The music box movement includes a power source, a rotating cylinder, a sound plate, a base plate, and a transmission structure. When the movement is wound, the spring drives the cylinder. Pins on the cylinder pluck the metal teeth of the sound plate, creating musical notes.
In the music car, students also add gears to explore motion transfer. The gear connected to the movement interacts with the rear gear wheel, so students can observe how rotation, gear contact, and alignment affect the finished model.
Teacher Tip: Ask students to compare the music box movement by itself with the movement installed in the car. This helps them see how one mechanism can be reused in different product designs.
Preparation: Students draw a car idea on paper and prepare a music box movement for measurement.
Software design: Students create the car body, reduce one welding plate, add movement holes, and prepare the gear parts.
Machine processing: Students process files in a safe classroom order under teacher supervision.
Assembly: Students assemble the car, install the music box movement, add the gears, and check gear meshing.
Testing: Students test the music car and record problems they want to improve.
Use the heart-shaped music box lesson as a review before starting this activity.
Ask students to measure the actual music box movement instead of copying hole positions without checking.
Prepare extra small wooden sticks and gear parts for groups that need to retry assembly.
Remind students that the rear gears must mesh closely enough to transfer motion, but not so tightly that they jam.
Use the testing stage to discuss how size, gear placement, and friction can affect the car’s movement.
What problems did your group meet during the design or assembly process?
If the music car is too small and you want to make it larger, what measurements need to change?
If the car is too slow, what design factors could you investigate?
How does the music box movement help the car combine sound and motion?
Students can evaluate their own work and give peer feedback based on creativity, technical process, artistic effect, and collaboration.
| Evaluation Item | Self-Evaluation | Peer Evaluation |
|---|---|---|
| Creativity, 30 points | ||
| Technology, 30 points | ||
| Art, 20 points | ||
| Assist, 20 points | ||
| Total, 100 points |
At the end of the lesson, students can present their music cars, explain how they designed the body, where they placed the music box movement, and how the gears work together. Teachers can invite students to compare which designs are creative, well assembled, smooth in motion, and visually complete.


After finishing the basic music car, students can redesign the car body, enlarge the structure, adjust the gear placement, or test different rear gear sizes. They can also add engraved decoration, windows, names, patterns, or a themed body style to make the car more personal.
For a mechanism challenge, students can compare different gear setups and observe how gear contact, friction, wheel size, and car weight affect speed and movement quality.
This project is suitable for classroom laser cutters that support cutting and engraving of sheet materials for small maker and mechanism projects. For schools and beginner STEAM labs, projects like music cars, gear-wheel vehicles, music box models, and beginner LaserMaker activities can be completed with a classroom laser cutter such as the Thunder Laser Bolt Series.
Teachers can choose the machine and material setup based on classroom space, student supervision needs, material thickness, project size, music box movement dimensions, and ventilation setup. Students should always test settings, check focus, and follow the school’s laser safety rules before final cutting.
Talk To Our Experts Now!
Please leave your contact information so that we can serve you better.
TAKE THE NEXT STEP WITH THUNDER LASER

 Stable & Consistent MachinesUnlimited ApplicationRobust After-sales SupportFactory Direct Supply


