Build a Laser-Cut Boring Box STEAM Project
 24-08-26
WHAT ARE YOU LOOKING FOR?
Search Across Products, Blog Posts, Support Content, And Resources.

Build a Laser-Cut Boring Box STEAM Project
24-08-26

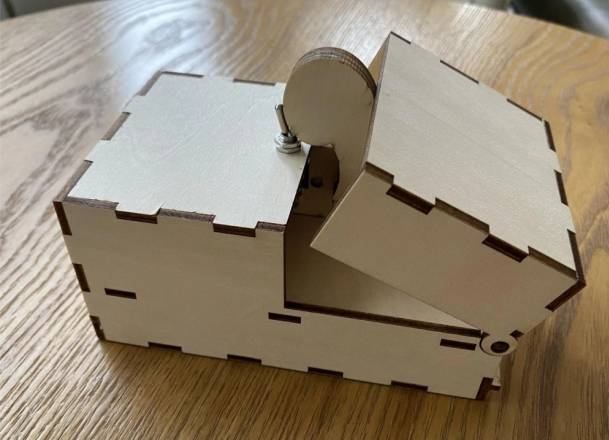
The Boring Box is a playful maker project designed to respond to boredom in a surprising way. It combines a laser-cut basswood structure with simple electronic components, helping students explore motion, switches, wiring, and creative product design.
In this STEAM lesson, students build a small interactive box using a laser-cut structure, a TT motor, a toggle switch, a normally closed limit switch, battery boxes, and connecting wires. After completing the basic build, students can customize the telescopic moving part into a cat paw, animal paw, or another original shape.
This project is suitable for a classroom, makerspace, or beginner electronics activity where students can connect laser cutting with movement and interaction. The wooden shell gives the project its physical structure, while the motor and switches help students understand how a simple circuit can control mechanical action.
Many everyday products are designed not only to perform a function, but also to change how people feel. The Boring Box introduces students to emotional design through a simple interactive object. When students build it, they can discuss why people enjoy surprising, playful, or stress-relieving products.
This lesson can also support conversations about product prototyping. Students can first assemble the provided design, then propose changes to the shape, movement, or appearance to make the object more personal and engaging.
| Number | Material or Component | Quantity |
|---|---|---|
| 1 | 3 mm basswood board | 1 |
| 2 | Rubber band | 2 |
| 3 | Two-AA battery box | 2 |
| 4 | Electrical wire | 1 |
| 5 | Normally closed limit switch | 1 |
| 6 | Toggle switch | 1 |
| 7 | TT motor | 1 |
| 8 | Dupont wire | Several |
Classroom note: Teachers should check the laser file, confirm the material thickness, and supervise both laser processing and circuit assembly. Students should not power the circuit until the wiring has been reviewed.
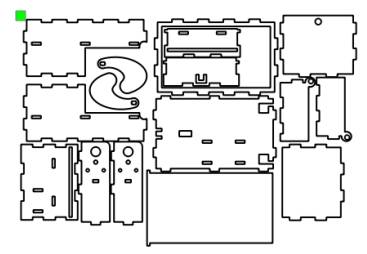
The source lesson notes that the project drawing can be found in the official Lei Yu Laser forum’s “Laser Block” open-source community. After logging in, search for “boring box” to download the drawing file for this project.
Before cutting, review the drawing and confirm that the parts match the 3 mm basswood board. Students should identify the box panels, moving structure, and any holes or slots needed for assembly.
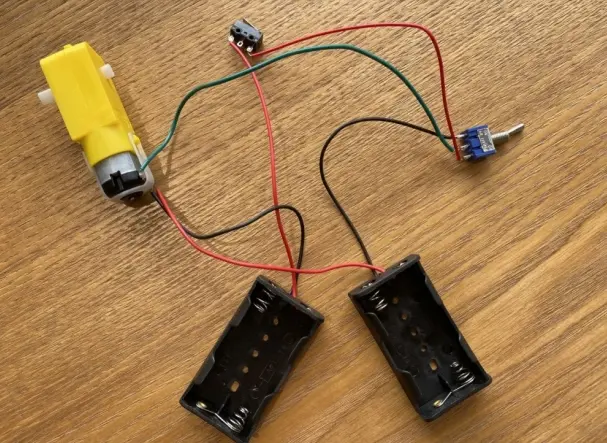
Connect the components according to the wiring reference. The circuit includes the battery boxes, electrical wire, normally closed limit switch, toggle switch, TT motor, and Dupont wires.
Testing reminder: Check every connection before switching on the power. If the moving part does not respond correctly, turn off the power first, then inspect the switch and motor connections.
After the laser-cut parts and circuit are ready, assemble the box structure. Keep the moving part clear of blocked edges so it can extend and retract smoothly. Check that the switch can activate the motion as intended.
Once the basic box works, students can customize the telescopic part. The source project suggests turning it into a cat paw or another animal paw shape, but students can also design their own playful version.
The completed Boring Box gives students a simple but memorable example of how structure, motion, and interaction can work together. By making the object themselves, students practise both hands-on building and design reflection.
Ask students to redesign the moving part, adjust the outer box decoration, or create a themed version of the Boring Box. They can also compare different paw shapes or character designs and explain which version creates the clearest and most enjoyable interaction.
For schools and beginner STEAM labs, this project can be completed on a classroom laser cutter such as the Thunder Laser Bolt Series.
Talk To Our Experts Now!
Please leave your contact information so that we can serve you better.
TAKE THE NEXT STEP WITH THUNDER LASER

 Stable & Consistent MachinesUnlimited ApplicationRobust After-sales SupportFactory Direct Supply