






Laser Engraving & Cutting Leaf: Everything You Need to Know
 26-07-29
WHAT ARE YOU LOOKING FOR?
Search Across Products, Blog Posts, Support Content, And Resources.

Laser Engraving & Cutting Leaf: Everything You Need to Know
26-07-29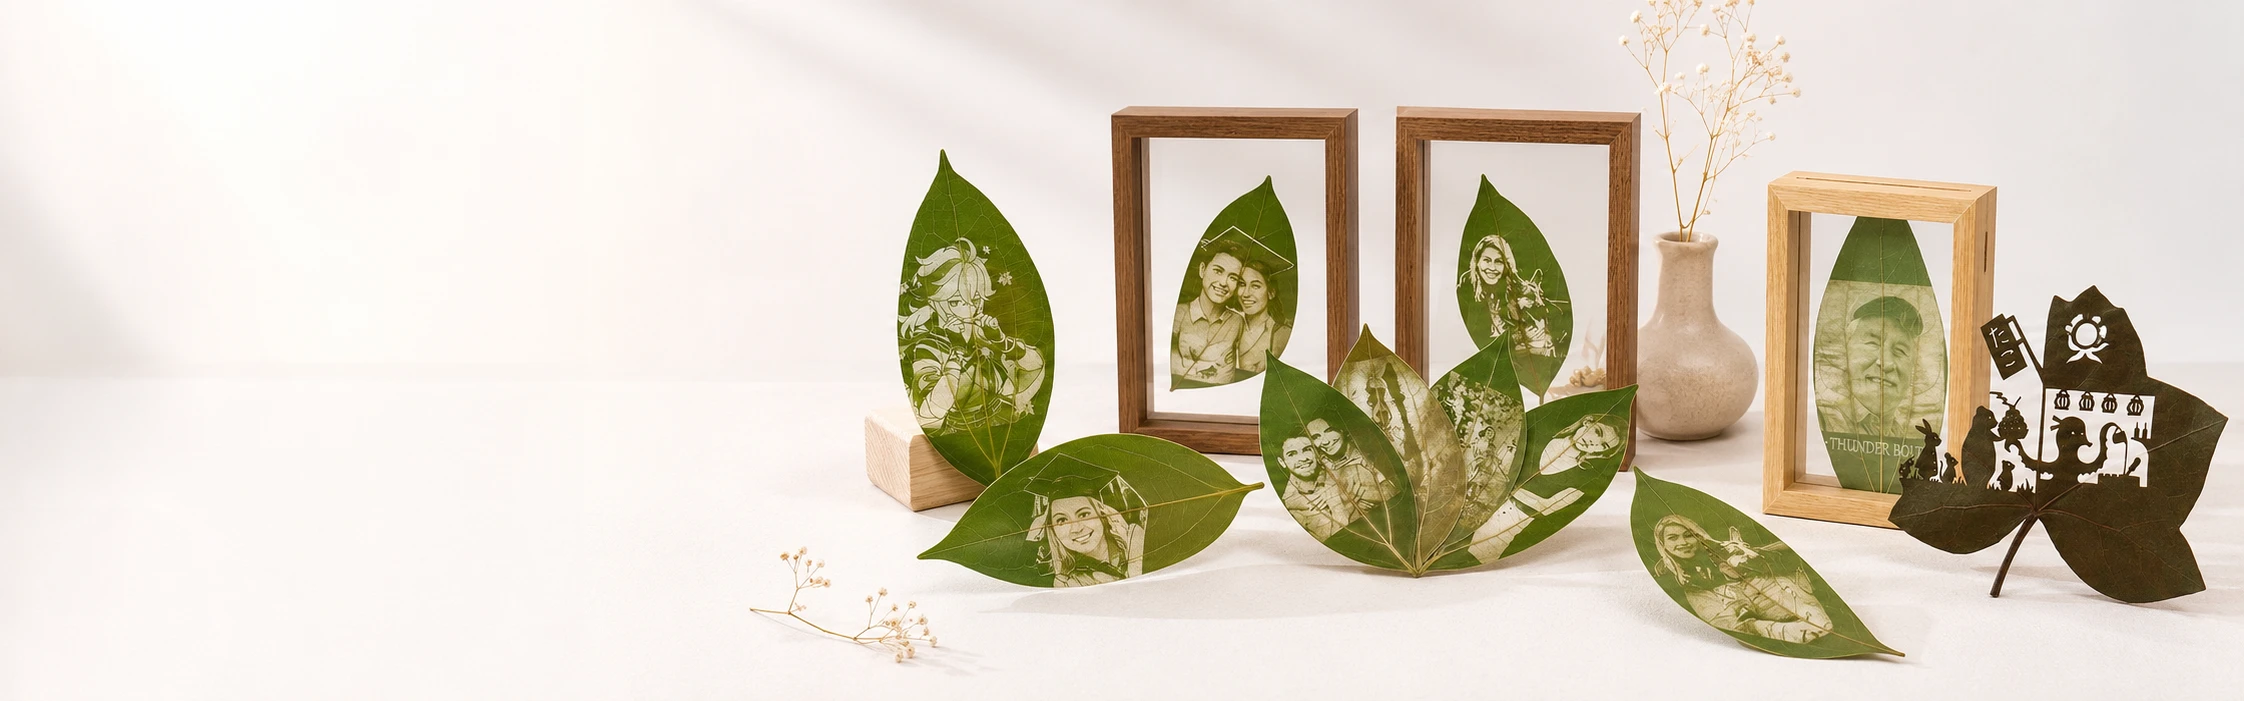
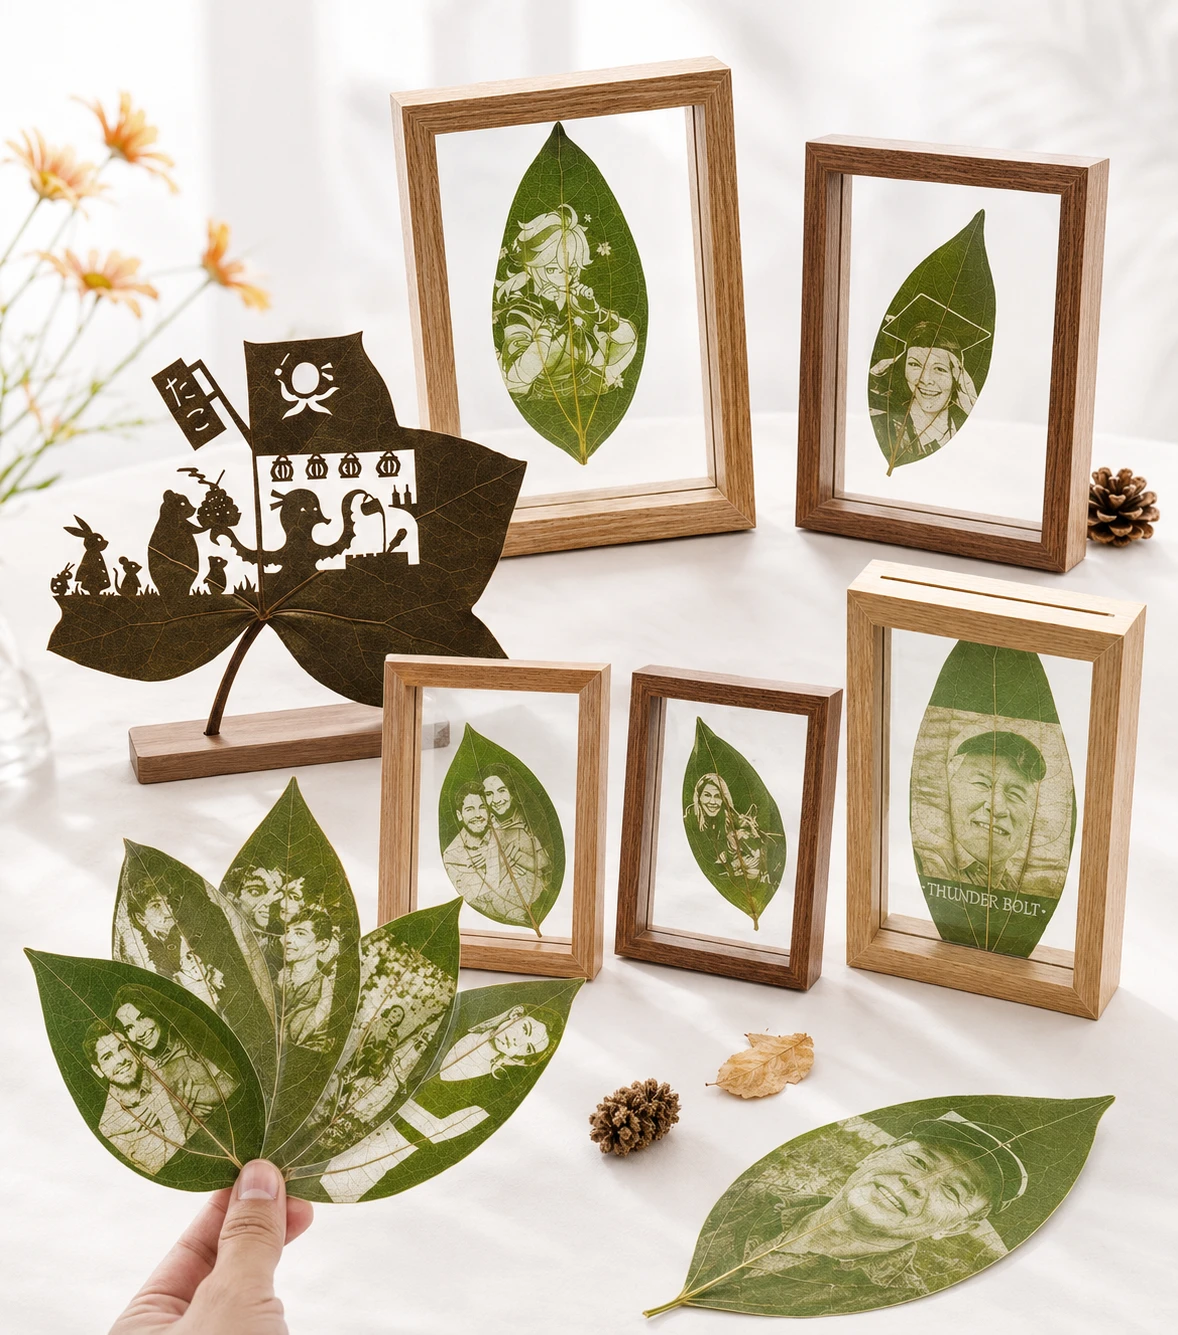
A real leaf can become a personalized wedding place card, a botanical bookmark, a detailed portrait, a framed artwork, or a laser-cut ornament. Its natural veins and irregular shape give every finished piece a character that cannot be reproduced with ordinary paper, wood, or acrylic.
However, engraving such a thin and delicate natural material is not as simple as placing it inside a laser machine and pressing start. Leaves vary in thickness, moisture, surface texture, vein structure, color, and strength. One leaf may produce a dark and detailed engraving, while another may curl, crack, move under airflow, or burn through with the same settings.
The result also depends on the laser source and the intended process. A CO₂ laser, UV laser, and diode laser can all be used to test selected leaves, but they are not designed for exactly the same workflow. Surface marking, photo engraving, contour cutting, openwork designs, and repeated production place different demands on the machine.
This guide covers everything you need to know about laser engraving and cutting leaves. It explains how to choose and prepare suitable leaves, compare CO₂, UV, and diode lasers, develop practical designs, use tested starting settings, secure and position the material, prevent burning, troubleshoot common problems, preserve the finished leaf, and choose an appropriate Thunder Laser setup.
Quick Answer: Real leaves can be laser engraved, and selected sturdy leaves can also be contour-cut or processed with simple openwork designs.
Thick, relatively flat leaves such as magnolia, rubber plant, oak, and selected maple leaves usually provide a more practical starting point than extremely thin or brittle leaves. The exact result still depends on the condition of each individual leaf.
The best laser depends on the intended project. An RF CO₂ laser provides the most flexible workflow for photographs, text, vector engraving, contour cutting, larger leaves, positioning fixtures, and repeated production. A UV laser may be considered for ultra-fine, low-heat surface marking on selected leaves, while a diode laser is commonly used for hobby experiments and simple engraving.
Whichever laser is used, the leaf should be cleaned, flattened, secured on a laser-safe backing, focused accurately, and tested with controlled power, speed, DPI, and airflow before the final project begins.
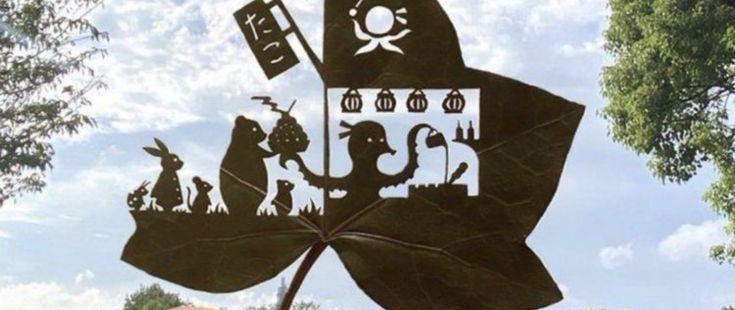
A sturdy natural leaf can be engraved with detailed artwork and cut into a decorative botanical ornament.
Leaves can be engraved, marked, perforated, and cut with a laser, but the available processes depend on the strength, thickness, moisture, and condition of the material.
Laser engraving changes the surface without intentionally passing through the leaf. Laser cutting applies enough energy to separate the material along a vector path. Both processes can also be combined in one design.
Leaf laser engraving uses a focused laser beam to change or remove a thin layer from the leaf surface. The process can create visible contrast while preserving the surrounding veins, fibers, color, and natural outline.
Suitable engraving content includes:
Every leaf responds differently. Even leaves from the same plant can produce different contrast because of differences in maturity, thickness, moisture, surface wax, and vein structure.
The engraving result is affected by:
Selected sturdy leaves can be laser cut, although cutting is usually more demanding than surface engraving. The beam must pass completely through the material without creating excessive charring, curling, or structural damage.
Suitable leaf laser cutting designs include:
Start with a simple outer contour before attempting intricate internal details. Very small cutouts, narrow bridges, and lace-like patterns can weaken the leaf or cause thin sections to separate.
Stop the process immediately if:
| Process | What It Does | Suitable Designs | Main Challenge |
|---|---|---|---|
| Leaf engraving | Creates a surface mark without intentionally cutting through the leaf. | Photographs, portraits, text, logos, dates, line art, and decorative patterns. | Producing visible contrast without burning through the surface. |
| Leaf cutting | Passes through the material to create an outer shape or internal opening. | Contours, silhouettes, borders, hanging holes, lettering, and simple openwork designs. | Completing the cut without excessive charring, curling, or structural damage. |
| Engraving and cutting | Combines surface artwork with a cut outer edge or internal cut detail. | Bookmarks, place cards, gift tags, framed art, ornaments, and botanical displays. | Controlling accumulated heat from both engraving and cutting stages. |
Leaf engraving and leaf cutting require different energy control, design preparation, and material handling.
A project can also combine engraving and cutting. For example, a leaf bookmark may include an engraved quote and a cut outer edge, while a hanging ornament may include a portrait, decorative border, and hanging hole.
Traditional leaf vein bookmarks are usually created by removing the softer leaf tissue while preserving the natural vein structure. The remaining skeleton is cleaned, dried, flattened, and sometimes colored or sealed.
Laser engraving uses a different process. It adds a digital design to the surface of a complete or prepared leaf. A laser does not automatically turn an ordinary leaf into a traditional leaf skeleton.
| Type | Main Characteristics |
|---|---|
| Traditional leaf vein art | Emphasizes the natural vein network, requires the removal of soft leaf tissue, produces a translucent skeleton-like appearance, and may involve soaking or other treatment methods. |
| Laser-engraved leaf art | Preserves more of the original surface, adds text, photographs, or digital patterns, uses a computer-prepared design file, and can combine engraving with contour cutting. |
Traditional leaf vein art and laser-engraved leaf art are different botanical craft processes.
A prepared leaf skeleton may also be tested with a laser, but it is extremely fragile and requires separate settings and careful handling.
CO₂, UV, and diode lasers can all be used to test selected leaves, but they are designed around different processing methods. The best choice depends on whether the project requires detailed surface marking, photo engraving, contour cutting, a larger working area, or repeated production.
Many online leaf engraving guides recommend diode or UV lasers because these systems can create controlled marks on delicate materials. Those recommendations may be appropriate for hobby experiments or compact marking areas.
However, users who need both engraving and cutting, larger fixtures, several leaves in one job, or broader non-metal processing capability may benefit more from an RF CO₂ laser.
| Laser Source | Best For | Can It Cut Leaves? | Main Advantage | Main Limitation |
|---|---|---|---|---|
| RF CO₂ laser | Photo engraving, text, vector artwork, contour cutting, larger leaves, reusable fixtures, multiple leaves, and repeated production. | Yes, after testing. | Provides the broadest engraving-and-cutting workflow. | Heat and airflow must be controlled carefully. |
| UV laser | Fine text, small logos, compact graphics, detailed line patterns, and low-heat surface marking tests. | Cutting is generally not its main application. | Supports ultra-fine marking with limited visible heat impact. | Smaller marking area and limited contour-cutting capability. |
| Diode laser | Hobby experiments, simple line art, short text, and individual leaves. | Some systems may cut selected leaves, depending on power and configuration. | Common among hobby and entry-level users. | Speed, spot size, cutting ability, and engraving results vary considerably between machines. |
CO₂, UV, and diode lasers serve different roles in leaf engraving and cutting workflows.
An RF CO₂ laser provides the broadest workflow for leaf engraving and cutting. It can process raster photographs, grayscale portraits, vector lines, text, outer contours, hanging holes, and simple openwork patterns.
Gantry-based CO₂ machines also provide enough working area for larger leaves, reusable fixtures, framed leaf collections, and several leaves arranged in one job. This is particularly useful for wedding place cards, repeated ornaments, customized products, and small-batch production.
RF laser sources support fast response and high engraving speeds. This can help reduce the time that heat remains over one area of the leaf, although it does not remove the need for careful testing.
Users still need to balance:
For artists, schools, studios, and small businesses that also process wood, acrylic, paper, leather, fabric, and other non-metal materials, an RF CO₂ laser offers a more complete production platform than a machine dedicated only to small surface marks.
A UV laser may be suitable when the priority is very fine surface marking rather than cutting. Its short wavelength and compact galvo marking system make it useful for testing small text, fine lines, miniature logos, and detailed graphics on selected leaves.
UV marking can be valuable when a project requires a small marked area and reduced visible heat impact. It may also suit users who need to produce repeated compact graphics at high marking speed.
However, UV should not automatically be described as the best laser for every leaf project. Its marking area is normally smaller than that of a gantry CO₂ laser, and it is not designed to provide the same contour-cutting workflow.
A UV laser marker is most relevant when:
A waxy, textured, damp, or extremely thin leaf may not respond in the same way as another leaf under identical UV settings.
Diode lasers are widely recommended in hobby-focused leaf engraving guides because they are accessible and can mark selected organic materials.
They may be suitable for:
Their performance varies according to:
Some diode machines may require slower processing or additional testing to produce a result comparable with a high-speed RF CO₂ system.
Thunder Laser does not offer diode laser machines. Diode systems are included in this guide so readers can understand the wider market and choose a laser based on the required process rather than assuming that one laser source is universally best.
The best leaves are strong enough to remain flat and stable while receiving controlled laser energy. A suitable leaf should ideally have moderate thickness, a relatively flat surface, visible but not excessively raised veins, and enough open space for the design.
The following descriptions are general material-selection directions rather than guaranteed performance ratings. Individual leaves can still produce different results.
| Leaf Type | Material Characteristics | Possible Uses | Testing Notes |
|---|---|---|---|
| Magnolia | Relatively thick and often waxy. | Decorative artwork, photographs, text, ornaments, framed pieces, and cutting tests. | May produce strong contrast after suitable settings are established, but surface wax and moisture still require testing. |
| Oak | Fibrous and moderately sturdy. | Rustic artwork, botanical collections, framed pieces, and simple cut designs. | Pronounced vein structure may add character but can interrupt fine photographs or small lettering. |
| Rubber plant | Thick, flexible, and waxy. | Personalized décor, large patterns, detailed line art, and surface marking tests. | The waxy surface should be tested for sufficient and even contrast. |
| Maple | Visually distinctive and generally thinner than magnolia or rubber plant leaves. | Wedding décor, pet portraits, keepsakes, framed artwork, and seasonal projects. | Heat input needs to be controlled carefully. |
| Banana leaf | Smooth, delicate, and relatively large. | Larger surface patterns, temporary displays, packaging concepts, and material experiments. | May react inconsistently depending on moisture and preparation. |
| Fern | Multiple small and fragile leaflets. | Decorative arrangements and carefully controlled botanical compositions. | The detailed natural structure can make added artwork difficult to read. |
Leaf species, age, moisture, drying history, and surface condition can all affect laser engraving and cutting results.
| Leaf Condition | Advantages | Limitations | Best Use |
|---|---|---|---|
| Fresh leaves | More flexible and less likely to crumble during handling. They can be easier to flatten without cracking and may retain their natural color before preservation. | Moisture can affect contrast, smoke, curling, and dimensional stability. A fresh leaf may also shrink or change color as it dries after processing. | Use when flexibility is important and the project includes a controlled drying or preservation step. |
| Dried leaves | Can provide stable dimensions and an attractive antique appearance. They are often suitable for framed artwork, bookmarks, and keepsakes. | They are more brittle. A dry leaf may crack during handling or burn through quickly if the settings are too aggressive. | Use when dimensional stability and an aged appearance are more important. |
Fresh and dried leaves both require testing because moisture, brittleness, and flatness affect laser results.
In either case, test a spare leaf in the same condition as the final material.
Avoid or carefully evaluate:
Laser-processed leaves can be used for botanical artwork, event details, personalized gifts, creative displays, and small product collections.
The environmental impact of a finished project still depends on leaf sourcing, preservation, coatings, packaging, transportation, and disposal. A natural appearance alone does not prove that the complete product is environmentally preferable.
Sturdy leaves can be engraved with guest names, table numbers, wedding dates, initials, short messages, or minimal floral borders.
Pressed leaves can also be turned into botanical bookmarks featuring quotes, names, book club logos, dates, and line drawings.
A bookmark may retain the natural outline of the leaf or be contour-cut into a more regular shape. Traditional leaf vein bookmarks and laser-engraved bookmarks remain different products: one emphasizes the natural skeleton, while the other adds a digital design to the surface.
Photographs, pet portraits, silhouette art, landscapes, maps, poems, and scientific illustrations can be engraved onto suitable leaves.
Finished leaves can be framed individually, arranged in a botanical collection, mounted in a shadow box, combined with photographs, or incorporated into mixed-media artwork.
For portrait engraving, choose a relatively flat area and simplify details that overlap with major veins.
Small engraved leaves can be incorporated into pendants, earrings, brooches, hair accessories, decorative charms, and keychains.
Clear outlines and bold designs are usually easier to reproduce on small leaves than highly detailed photographs.
Jewelry projects normally require an additional preservation or mounting method. Test clear coatings, resin, frames, and mounting materials before applying them to the final piece.
Sturdy leaves can be tested as botanical product tags, event labels, display pieces, or temporary branding elements.
Possible engraved content includes:
A natural leaf should not be used for essential legal, ingredient, safety, or permanent traceability information unless the complete application has been fully validated.
Leaf ornaments can include:
Keep connecting sections wide enough to prevent tearing. Engraving should normally be completed before cutting if the final cut shape would make the leaf difficult to hold flat.
Accumulated heat from engraving and cutting should be evaluated on a spare leaf before the final project is processed.

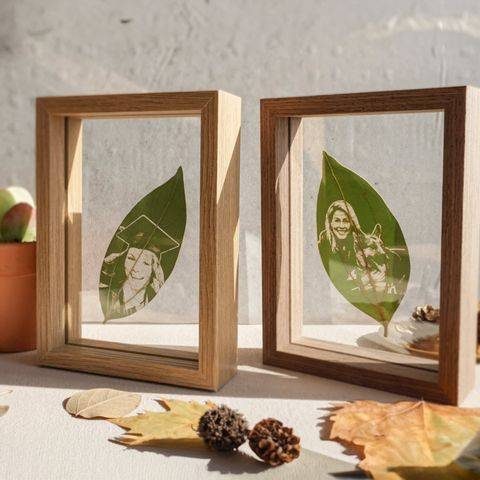
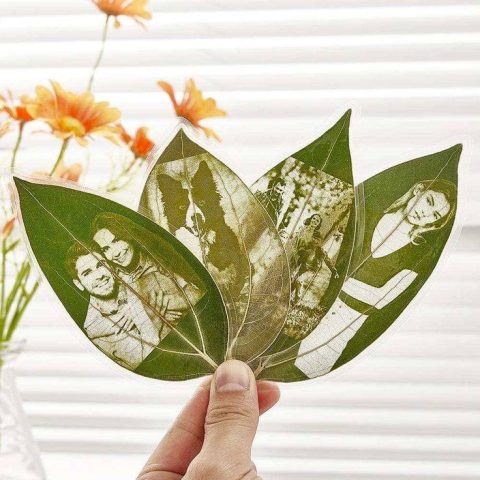
Laser-engraved and cut leaves can be used for portraits, wedding gifts, framed artwork, bookmarks, and botanical ornaments.
Explore a tested leaf ornament project: Ready to see the complete production process?
Visit the Thunder Laser Inspiration Library to explore a tested leaf ornament project, including material preparation, focusing, framing, recommended starting settings, and a downloadable design file.
There is no universal setting for laser engraving leaves. The required parameters depend on the leaf species, fresh or dried condition, thickness, surface texture, moisture, artwork, machine, rated laser power, focus, DPI, airflow, and number of passes.
Thunder Laser has completed different leaf engraving projects using different settings. These examples demonstrate why parameters should be matched to the exact leaf and design rather than copied without testing.
| Project | Material | Machine | Process | Speed | Power | DPI |
|---|---|---|---|---|---|---|
| Leaf Ornament | Natural Leaf | Thunder Bolt 30W | Laser Engraving | 1000 mm/s | 30% | 200 |
These settings should be treated as a starting reference for this specific project rather than a universal setting for every leaf.
| Project | Material | Machine | Process | Speed | Power | DPI |
|---|---|---|---|---|---|---|
| Custom Pet Portrait Leaf | Maple Leaf | Thunder Bolt 30W | Photo Engraving | 1000 mm/s | 50% | 300 |
The portrait project uses higher power and a higher DPI than the simpler leaf ornament project.
This may be related to the leaf condition, desired contrast, artwork detail, material response, or processing goal. The comparison demonstrates that artwork type can be just as important as the general material name.
Use test leaves that match the final material in:
Change only one main variable at a time.
Test:
Evaluate:
| Leaf Species | [Add Species] |
|---|---|
| Leaf Condition | Fresh / Partially Dried / Fully Dried |
| Preparation | [Add Pressing and Cleaning Method] |
| Machine | [Exact Model] |
| Rated Laser Power | [W] |
| Lens | [Add Lens] |
| Speed | [mm/s] |
| Power Setting | [%] |
| DPI or Line Interval | [Add Value] |
| Passes | [Add Number] |
| Airflow | [Add Setting] |
| Backing | [Add Material] |
| Processing Time | [Add Time] |
| Result | [Describe Contrast, Damage, and Stability] |
| Tested by | Thunder Laser Application Testing Team |
| Test Date | [Date] |
A leaf test record helps compare settings and avoid copying one parameter set across different leaves.
Want to know suitable leaf engraving parameters? The tested projects above can provide useful starting points, but the correct settings still depend on the exact leaf, machine, and design.
Visit the Thunder Laser material settings page to review parameters tested by our application team, then verify the selected settings on a spare leaf before processing the final project.
The following workflow can be used for a basic engraved or contour-cut leaf project. Adjust the process according to the leaf species, machine, design, laser source, and preservation method.
Choose a leaf with enough space for the design, moderate thickness, sufficient strength, and no severe damage.
Confirm that it has not been treated with unknown pesticides, paint, glue, glitter, resin, decorative spray, or another unidentified coating.
Gently remove loose dust with a soft cloth. Avoid excessive moisture, especially when working with a dried leaf.
Place the leaf between clean pressing sheets and apply an even weight. Allow a damp leaf to dry before placing it inside the laser machine.
For engraving, use clear text, strong outlines, simplified grayscale images, and details that account for the natural vein structure.
For cutting, use closed vector paths, simple contours, wide connecting sections, and a limited number of small cutouts.
Keep important details away from the thick center vein whenever possible.
Place the leaf on a flat and verified laser-safe backing. Secure the outer edges with a suitable fixture or low-tack tape.
Do not position tape within the intended laser path.
Check that:
Focus on the actual leaf surface after it has been secured.
Use the camera, red-dot guide, or framing function to verify the design position, size, direction, outer boundary, cutting path, and fixture clearance.
Framing is especially important when working with irregular leaf shapes.
Use a spare leaf before processing the final piece.
Begin with relatively low energy, high speed, one pass, controlled airflow, and a small test design. Allow the sample to cool before evaluating the result.
Inspect the cleaned test rather than judging it only while smoke residue is still present.
Begin the process and remain beside the machine.
Watch continuously for flame, continuing glow, sudden curling, movement, excessive smoke, cracking, or backing damage.
When using a UV laser, confirm that the process remains a controlled surface mark and does not weaken the leaf.
When a project includes both engraving and cutting, complete the engraving first unless testing shows that another sequence works better.
Before starting the cutting pass, confirm that the leaf remains flat, the engraving has not weakened critical areas, the cutting contour is correctly positioned, and the fixture remains secure.
Stop immediately if an edge continues burning after the laser has moved away.
Allow the leaf and backing to cool before removing them.
Inspect:
Handle the leaf by stronger areas rather than thin cutouts.
Possible preservation methods include:
Test the selected method on a spare leaf first.
Preservation may change:
No preservation method guarantees indefinite durability. The lifespan depends on the original leaf condition, handling, humidity, light exposure, coating, and display method.
Leaves are thin, combustible, and naturally inconsistent. Most problems can be traced to material condition, focus, applied energy, airflow, or fixture stability.
| Problem | Possible Causes | Adjustment |
|---|---|---|
| Leaf burns through | Excessive power, low speed, high DPI, too many passes, incorrect focus, or a leaf that is too thin. | Reduce power, increase speed, increase the line interval, reduce passes, or test a stronger leaf. |
| Engraving is too light | Insufficient energy, excessive speed, a waxy surface, a large line interval, poor focus, or low natural contrast. | Increase the applied energy gradually, refocus the material, adjust the line interval, or move the design to another part of the leaf. |
| Design looks blurred | Curvature, incorrect focus, excessive artwork detail, prominent veins, or material movement. | Flatten and secure the leaf, refocus, simplify the design, enlarge small text, or reposition the artwork. |
| Leaf moves during processing | Strong air assist, inadequate restraint, curled edges, or an unstable backing. | Reduce airflow carefully, improve the edge fixture, flatten the leaf longer, or use a more stable backing. |
| UV mark is too faint | The leaf may not respond strongly to the selected UV settings, the speed may be too high, focus may be incorrect, or the leaf surface may be waxy. | Run a controlled parameter test or consider an RF CO₂ laser if stronger visible contrast or cutting is required. |
Common leaf engraving problems are usually related to material condition, focus, heat input, or leaf movement.
| Problem | Possible Causes | Adjustment |
|---|---|---|
| Cut does not complete | Insufficient energy, incorrect focus, thickness variation, a cutting path crossing a major vein, or an uneven surface. | Refocus the machine, increase energy gradually, reposition the design, or test another leaf. |
| Cut edge continues burning | Excessive energy, weak extraction, low cutting speed, or additional heat from the backing. | Stop the process immediately, follow the approved fire-response procedure, improve extraction, and reduce the applied energy before testing again. |
| Dry leaf cracks | The leaf may be too brittle, the cutouts may be too small, the connecting sections may be too thin, or the project may have received excessive heat. | Choose a stronger leaf, simplify the design, widen structural connections, and reduce handling after processing. |
| Leaf curls | Moisture, uneven drying, concentrated heat, large filled engraving areas, or repeated passes. | Press the leaf longer, reduce heat input, divide large engraving areas, and allow the material to cool between tests. |
Cutting problems require immediate attention because leaves are combustible and structurally delicate.
Do not process a leaf unless its surface condition and previous treatment are understood.
Avoid:
A filtration system cannot make an unknown or unsuitable material safe to process.
Never leave a leaf unattended during engraving or cutting. Leaves are combustible and can ignite or continue glowing after the laser passes.
Use a clean laser-safe backing, effective extraction, and enough air assist to support the process without lifting the material.
Keep tape and fixtures outside the laser path. Clean the machine bed before processing and follow the machine manufacturer’s approved fire-response procedure.
Allow the leaf and backing to cool before handling them.
| Problem | Possible Causes | Adjustment |
|---|---|---|
| Smoke stains remain | Weak extraction, excessive energy, surface wax, smoke trapped above the leaf, or a dirty backing. | Improve extraction, reduce heat input, clean the leaf before processing, and test another backing. |
| Preservation changes the color | Clear coatings, resin, and lamination can darken the leaf, increase transparency, trap moisture, or change the surface texture. | Test every preservation method on a spare leaf and allow the material to dry fully before applying a coating. |
Preservation methods should be tested because coatings, resin, and lamination can change the final appearance of the leaf.
A suitable leaf engraving machine should not be selected only by headline power. The correct setup depends on the intended process, artwork detail, leaf dimensions, batch quantity, cutting requirements, positioning method, airflow control, smoke management, and other materials the user plans to process.
Users searching for a leaf carving machine or leaf engraving machine should first decide whether they need only a small surface mark or a complete engraving-and-cutting workflow.
The Thunder Laser Bolt Series is the primary Thunder Laser option for users who need a complete leaf engraving and cutting workflow.
It is suitable for:
Useful features include:
The Bolt Series can support photographs, pet portraits, text, botanical patterns, contour cutting, openwork designs, and several leaves positioned in one layout.
A compact Bolt configuration can support individual leaves and experimental projects. Larger configurations within the series can provide additional space for batches, fixtures, and wider leaves.
The correct configuration should be selected according to leaf dimensions, fixture size, production quantity, workspace, and the other non-metal materials the user intends to process.

The Bolt Series supports high-speed photo engraving, vector artwork, contour cutting, accurate positioning, and controlled airflow for leaf projects.
Aurora UV is a specialized option for users who prioritize ultra-fine surface marking instead of contour cutting.
It may be suitable for testing:
Aurora UV uses a compact galvo marking system and provides a smaller working area than the Bolt Series. This makes it more suitable for individual small leaves, fine graphics, and specialized surface experiments.
It should not be positioned as a replacement for a CO₂ cutting machine. Choose Aurora UV when the project is primarily a high-precision surface marking application and the exact leaf has been successfully tested.
Leaf engraving and cutting can produce light smoke, organic odor, fine particles, surface residue, and smoke accumulation inside the enclosure.
Thunder Air or another suitable extraction system can help capture smoke close to the source, reduce smoke remaining inside the enclosure, limit residue on optical components, improve visibility after processing, and support a cleaner shared workspace.
Airflow still needs to be balanced carefully. A lightweight leaf can move if the internal airflow or air assist is too strong.
A fume extractor does not make an unknown or chemically treated leaf safe. The material must be verified before processing, and filters should be inspected and maintained regularly.
| Setup | Choose It When |
|---|---|
| Bolt Series | You need both engraving and cutting, want to engrave photographs or portraits, process larger leaves, need positioning fixtures, arrange several leaves in one job, or also process wood, acrylic, paper, leather, or fabric. |
| Aurora UV | You only need surface marking, very fine details are the main priority, the marked area is relatively small, reduced visible heat impact is important, and the exact leaf has already been tested. |
| Thunder Air | Smoke needs to be filtered, direct outdoor exhaust is limited, the machine is used in a shared workspace, or repeated processing creates noticeable smoke, residue, or odor. |
Choose the laser setup according to the leaf process, finished product structure, and workspace requirements.
Laser engraving and cutting leaves combines digital production with the natural structure of an organic material. It can be used to create portraits, bookmarks, wedding place cards, framed artwork, product displays, and cut-out ornaments, but successful results depend on more than choosing an attractive leaf.
The material should be identified, cleaned, flattened, secured, focused, framed, and tested before the final project begins. Power, speed, DPI, airflow, passes, and laser source all influence whether the result is a clear surface engraving or a damaged leaf.
CO₂, UV, and diode lasers should not be treated as identical solutions. Diode lasers may support hobby experiments and simple engraving. Aurora UV can be tested for ultra-fine surface marking. The Bolt Series provides a broader Thunder Laser workflow for photographs, text, vector patterns, contour cutting, larger leaves, fixtures, and repeated production.
The most reliable approach is to begin with a tested project, record the exact leaf and machine, change one setting at a time, and evaluate both successful and failed samples.
Explore the tested leaf ornament project: Visit the Thunder Laser Inspiration Library for step-by-step instructions, tested starting settings, and the downloadable design file.
Find tested material parameters: Review the Thunder Laser material parameter table for settings tested by our application team, then verify the selected parameters on a spare leaf before processing the final project.
Test Your Leaf Material Before Production
Send Thunder Laser information about your leaf species, fresh or dried condition, product dimensions, design file, required engraving detail, cutting requirements, expected quantity, and available workspace. Our application team can evaluate the project and help determine whether an RF CO₂ laser, UV laser, or another processing approach is more suitable.
Contact Thunder LaserTalk To Our Experts Now!
Please leave your contact information so that we can serve you better.
FAQS
TAKE THE NEXT STEP WITH THUNDER LASER


 Stable & Consistent MachinesUnlimited ApplicationsRobust After-sales SupportFactory Direct Supply


