Introduction
In laser engraving, fine details and sharp contrasts depend on more than just laser power or speed—laser engraving DPI and resolution are key factors that define the outcome. Whether you’re engraving photos on wood or marking logos on acrylic, understanding how DPI in laser engraving interacts with materials and design complexity can save hours of trial and error.
This guide breaks down the role of DPI, its impact on engraving quality, and how to choose the optimal settings for your projects.
1. What is DPI in Laser Engraving?
In laser engraving, DPI, or dots per inch, refers to the number of laser pulses fired per inch during the engraving process. It determines how densely the laser marks are placed on the material, directly affecting the detail and sharpness of the engraved image.
To avoid confusion, it’s important to understand how laser engraving DPI differs from related terms like PPI and resolution:
| Term | Meaning | Relation to Laser Engraving |
| DPI | Number of dots (laser pulses) per inch | Controls the density of laser marks on material |
| PPI | Pixels per inch in a digital image | Describes image pixel density, source quality |
| Resolution | Overall image dimensions (width × height in pixels) | Determines image clarity and detail available |
A table that tells the differences between DPI, PPI and resolution.
In laser engraving, the DPI setting controls the spacing between laser dots, which influences the engraving’s clarity and smoothness. Higher DPI means more dots per inch, producing finer detail, but also increases engraving time and energy usage.
2. Why DPI Is Important in Laser Engraving?
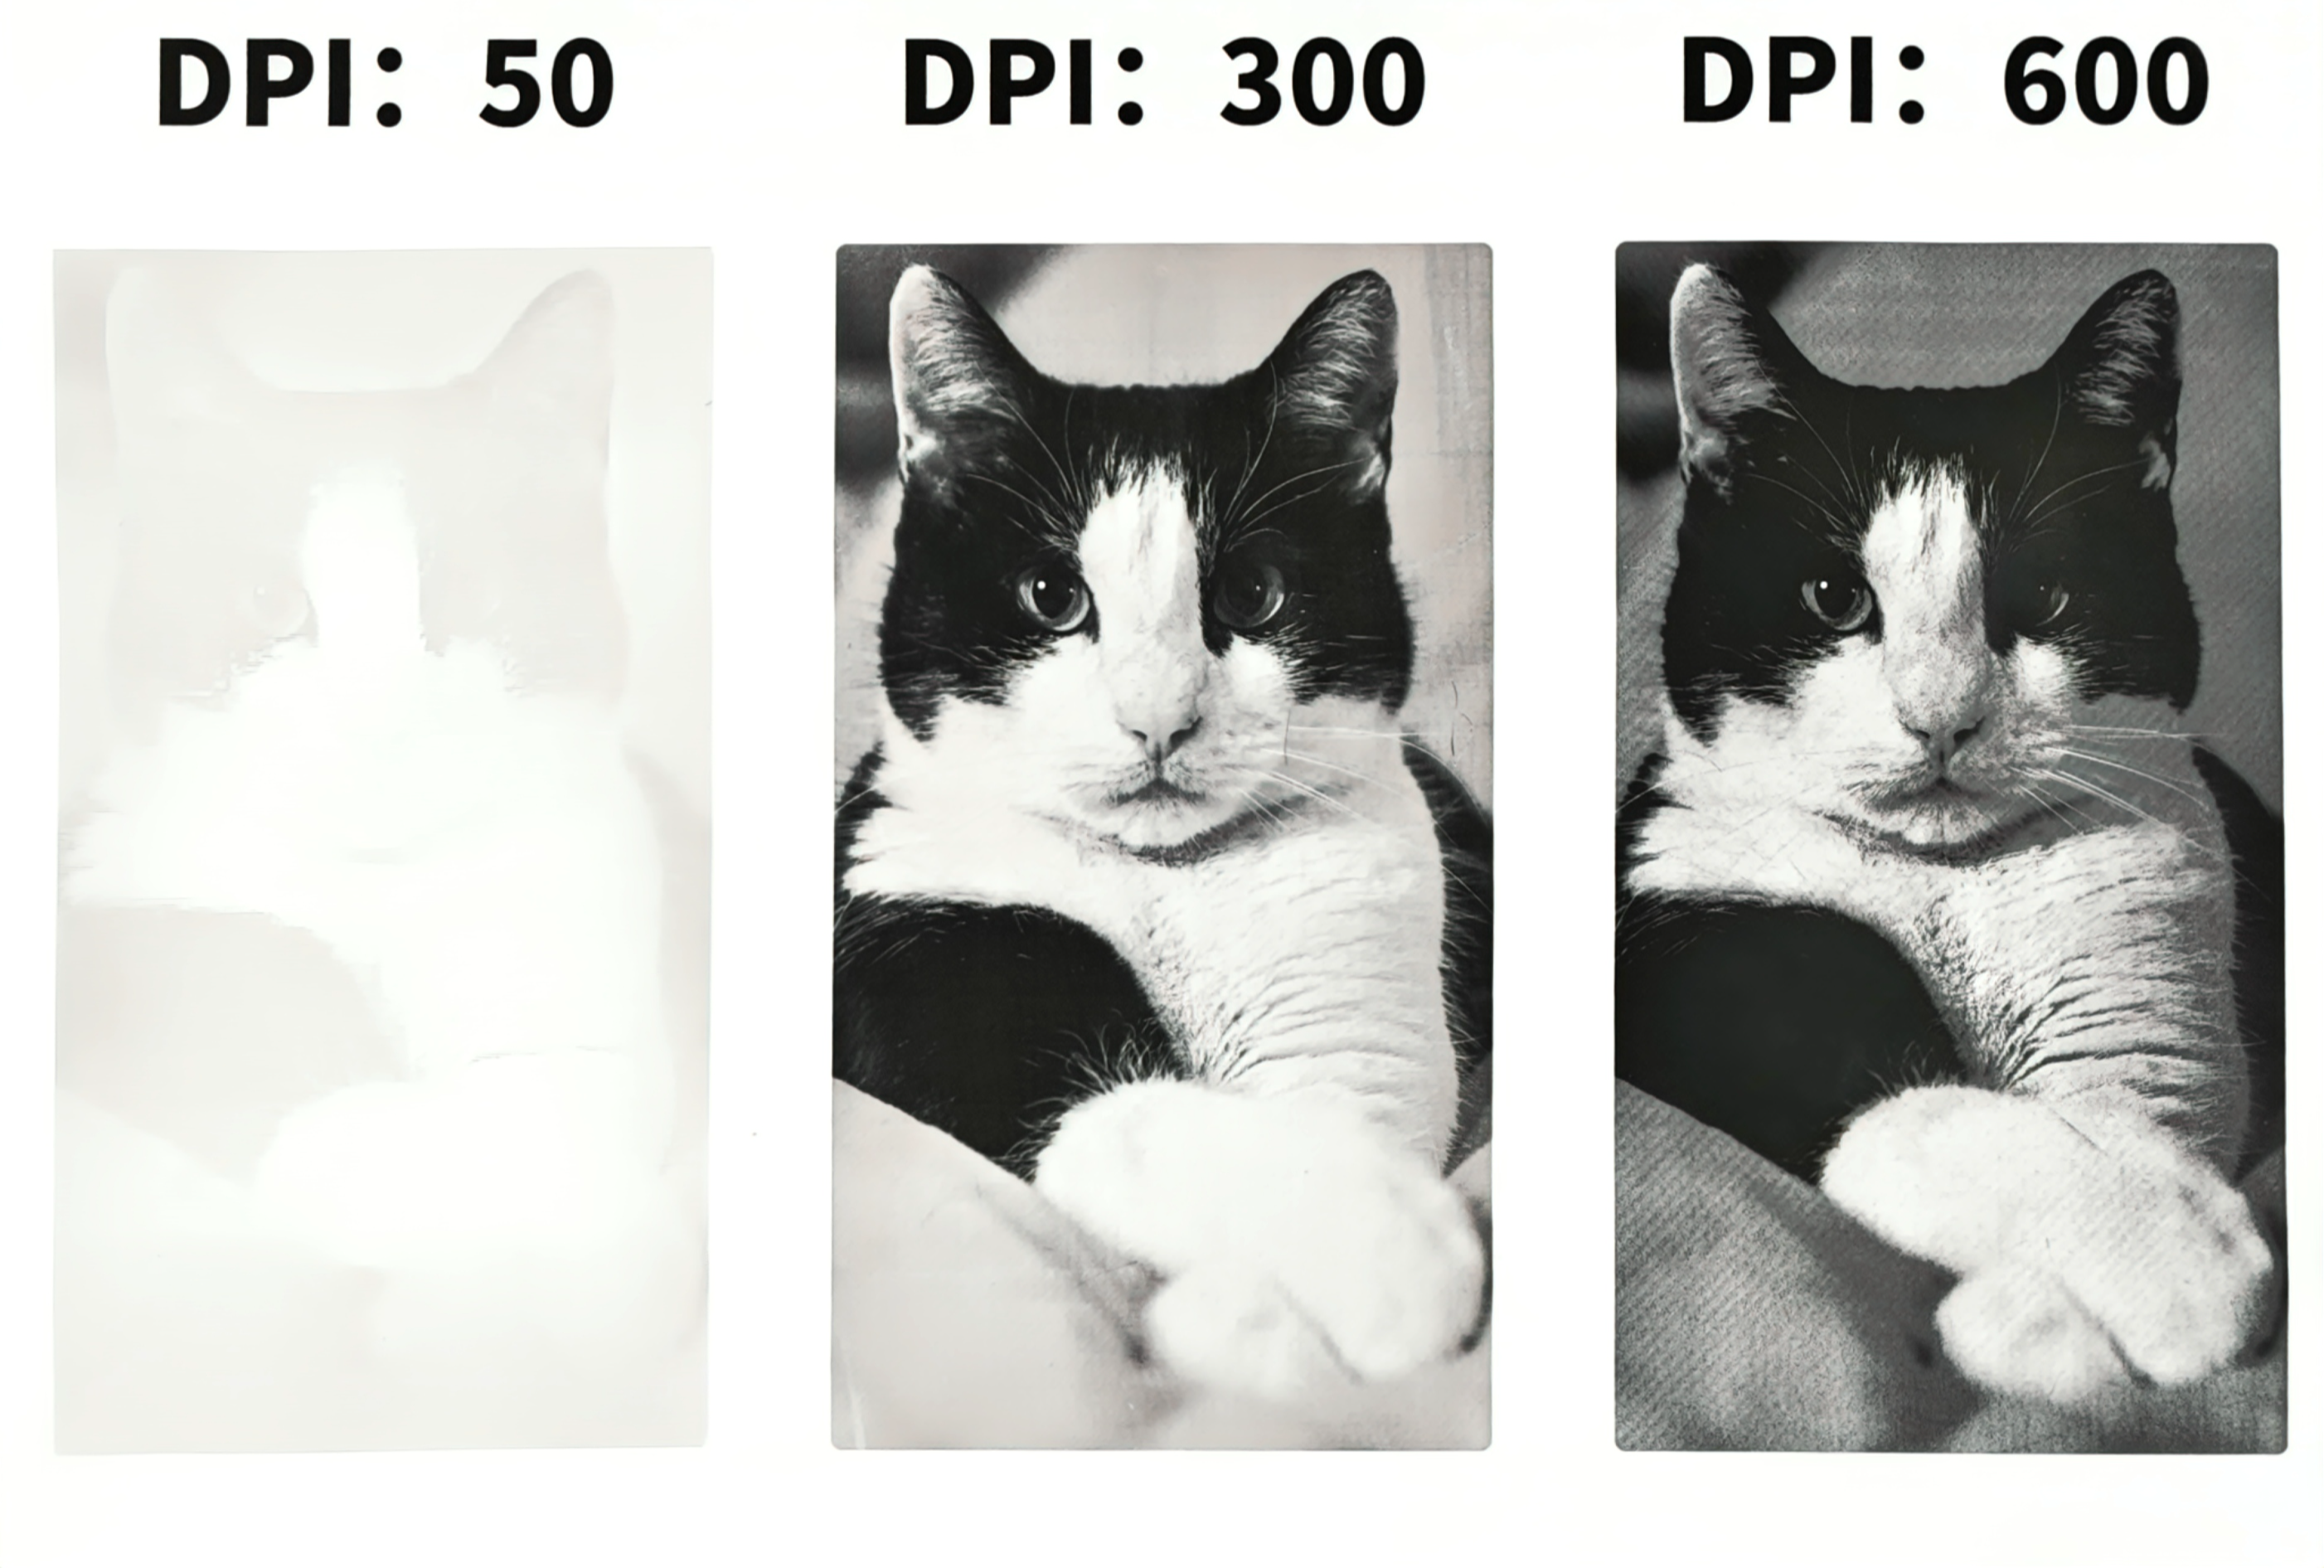
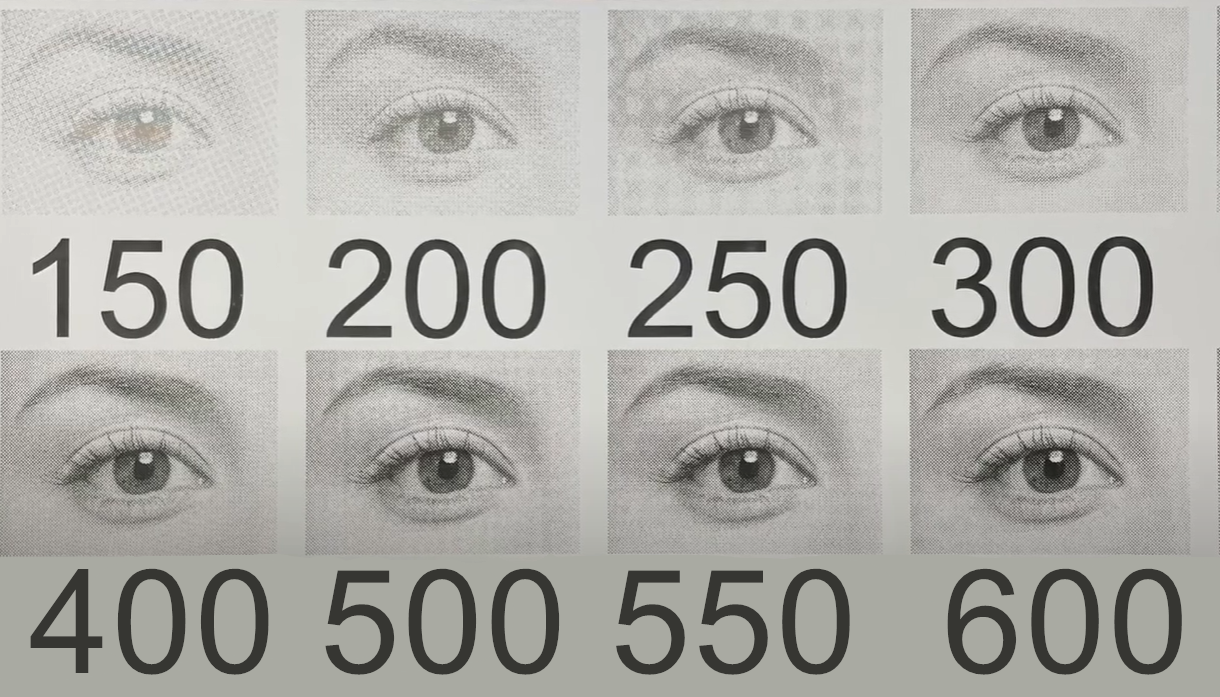
In laser engraving, DPI directly affects how precisely a laser engraver reproduces details from the source image. A higher DPI in laser engraving means the laser places more dots per inch, reducing the gaps between pulses and creating smoother gradients and sharper edges. Conversely, a low DPI increases the spacing between dots, which can result in visible banding or rough textures.
The laser engraving DPI setting also impacts engraving time and energy usage. For example, engraving a photo at 600 DPI might take nearly twice as long as at 300 DPI because the laser must fire twice as many pulses. This not only affects productivity but also increases wear on components like lenses and mirrors.
| Aspect | Low DPI (150–300) | High DPI (≥600) |
| Engraving Time | Faster (fewer pulses, quicker processing) | Longer (more laser passes, slower production speed) |
| Detail & Sharpness | Adequate for text, logos, and large patterns | Excellent for fine lines, photo engraving, and grayscale images |
| Energy Consumption | Lower, more energy-efficient | Higher (more pulses per inch require more energy) |
| Material Wear | Less risk of scorching, cleaner results | Can cause over-burning on wood or leather |
| Best Use Cases | Text, vector logos, deep engraving, wood | Photo engraving, high-detail graphics, acrylic work |
A table that shows the features of low DPI and high DPI
3. How to Quickly Find the Right Laser Engraving DPI?
Setting laser engraving DPI is about finding a balance between engraving quality, material response, and processing time. A practical way to determine the optimal setting is through controlled testing and observation.
3.1 Conduct Material Test Grids
Create a small test grid directly on the material you plan to engrave. Use 3–5 different DPI values (for example, 150, 300, 350, 400) while keeping other parameters such as power and speed constant. Compare the samples for clarity, contrast, and surface finish, and choose the setting that offers the best combination of detail and efficiency.
3.2 Balancing Output Quality and Processing Efficiency
Higher DPI in laser engraving means more laser pulses per inch, which significantly increases the total engraving time. In many cases, the visual improvement from 300 DPI to 600 DPI is minimal, especially on textured surfaces like wood. For large-scale or batch production, using the lowest acceptable DPI can reduce processing time and wear on your machine.
3.3 Observe Material Behavior
Different materials react differently to high dot densities. For instance, soft materials like wood or plastic may over-burn at high DPI, whereas harder surfaces like metal or stone can benefit from higher dot density to achieve finer detail.
Tips for Quick DPI Selection
- For intricate details: Use a high DPI setting to capture fine elements.
- For medium-precision projects: A medium DPI (e.g., 300–400) is often sufficient.
- For low-melting materials (wood, plastics): Use a lower DPI to prevent scorching.
- For hard or high-melting materials (metal, stone): Use a high DPI for sharper edges and accuracy.
4. How to Set Laser Engraving DPI in Laser Software
Setting the correct DPI for laser engraving in your laser software ensures that your chosen resolution is applied accurately during the engraving process. Below are step-by-step instructions for two commonly used programs.
4.1 Setting DPI in LaserMaker
Step 1: Open your design file in LaserMaker.
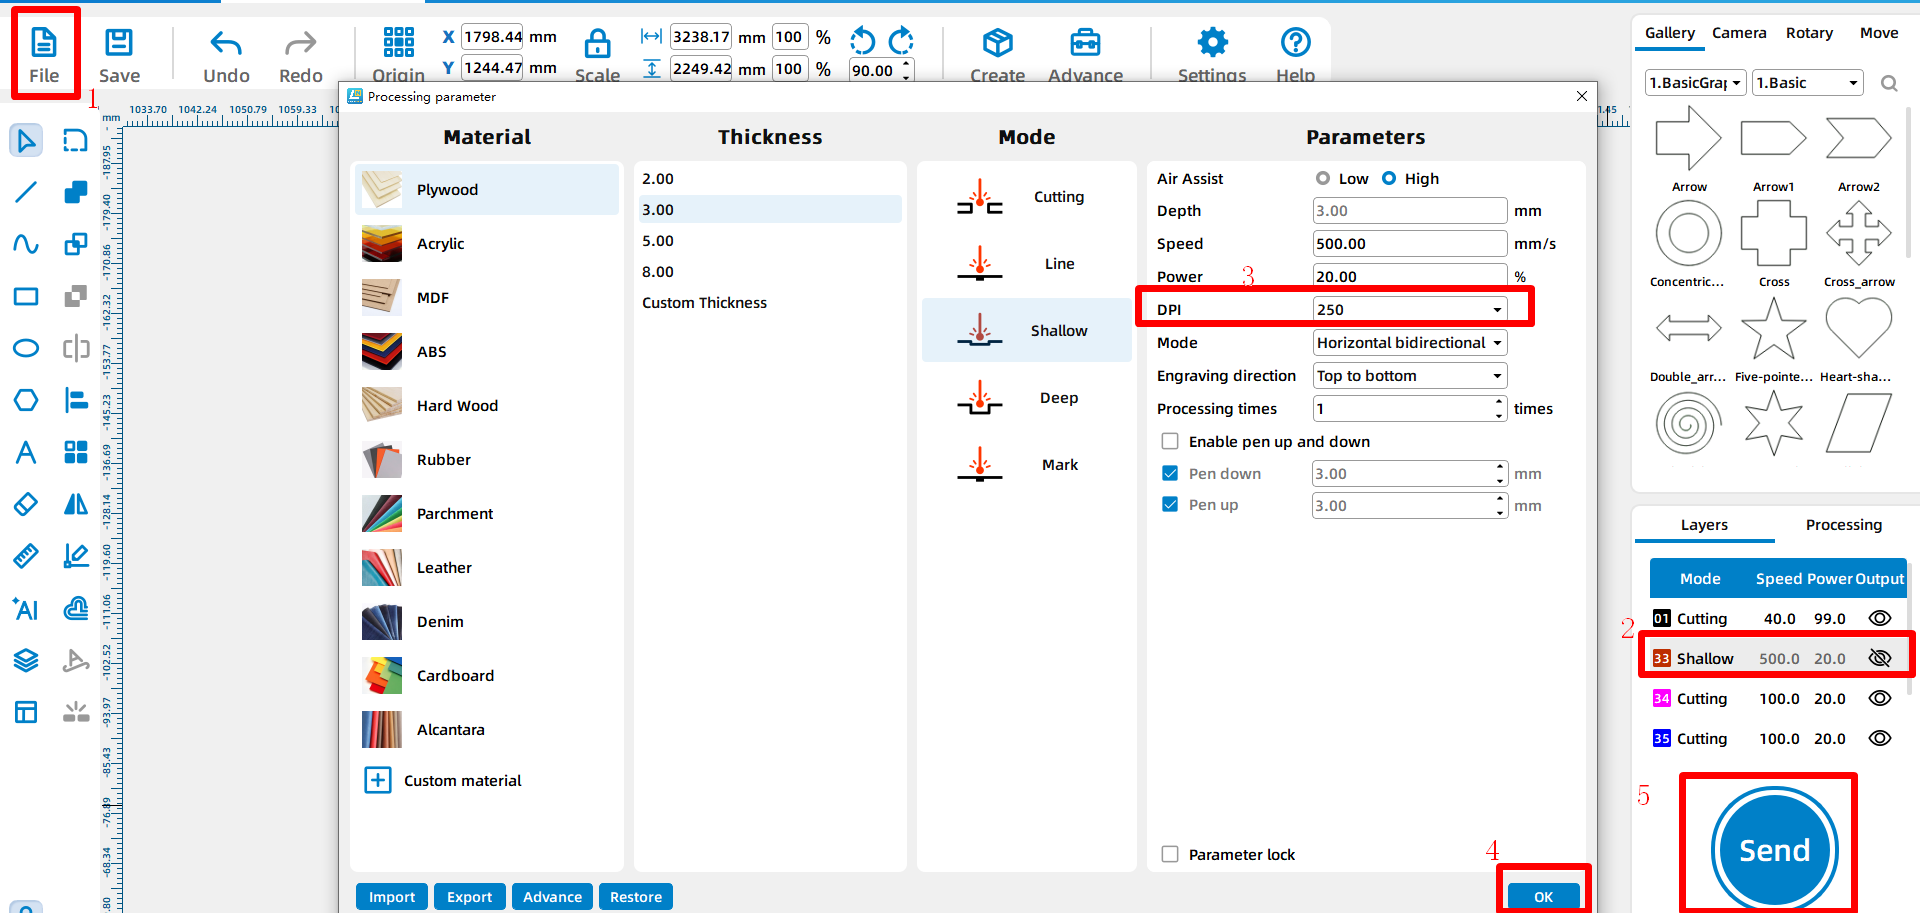
Step 2:On the right-hand panel, locate the “Layer” section. Double-click the layer you want to modify.
Step 3:In the layer settings popup, find the “DPI” field. Set the DPI according to your needs (e.g., 250–600).
Step 4:Click “Save” to apply the change.
Step 5:Click “Send” to transfer the job to your machine.
Learn more: Meet LaserMaker: The Best Laser Engraving Software – Thunder Laser
4.2 Setting DPI in LightBurn
Step 1: Open Your Project File. Load the design you want to engrave into LightBurn.
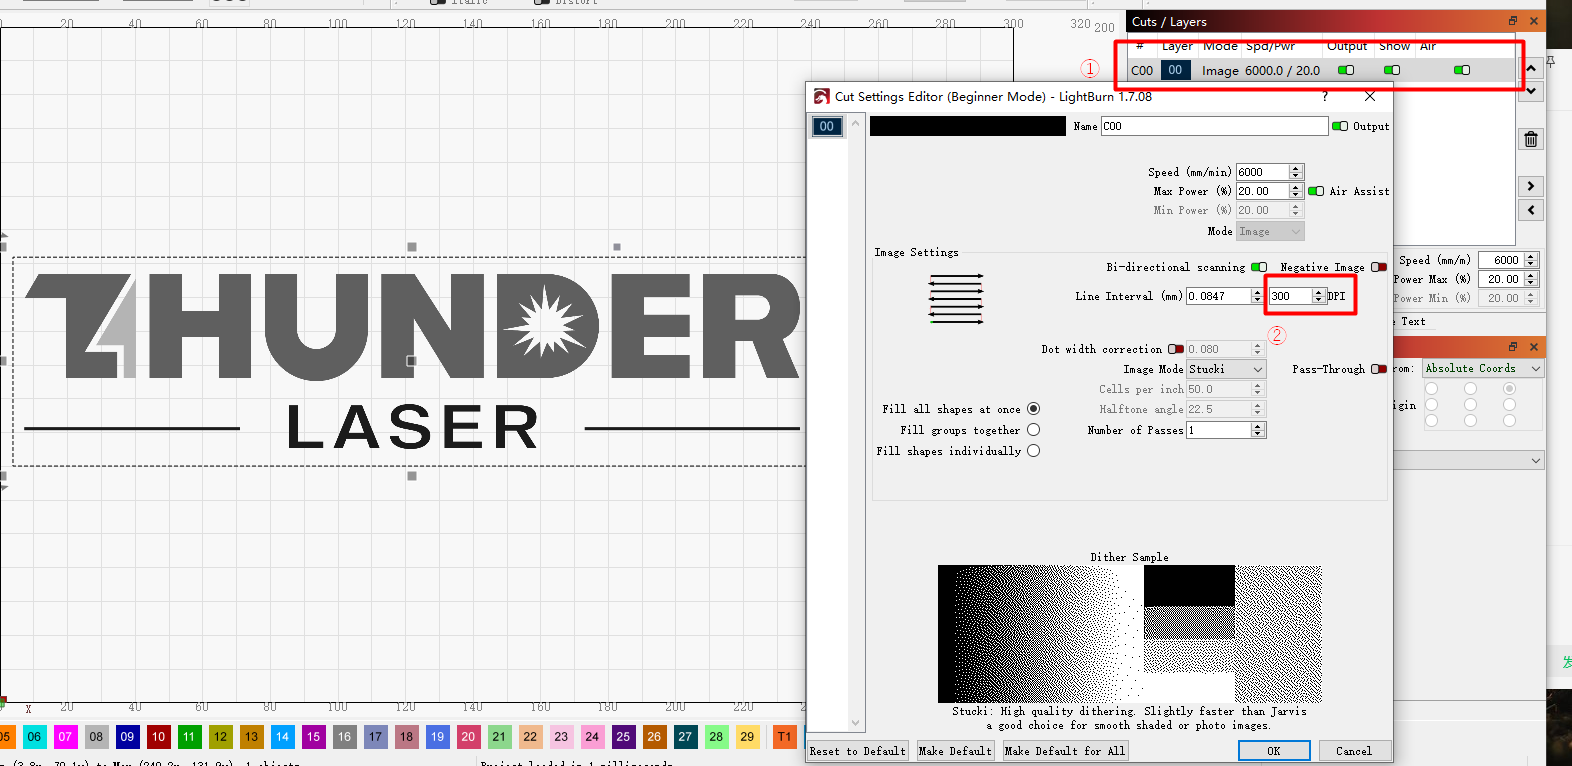
Step 2: Choose the layer that contains the engraving elements.
Step 3: Find the ‘Lines per Inch (LPI)’ or DPI Setting. Adjust this value to your desired DPI (e.g., 300 or 400).
Step 4: Confirm the settings and send the job to your laser machine.
Conclusion
DPI is a key setting that directly shapes the quality, speed, and depth of your engraving. Understanding laser engraving DPI helps you strike the right balance between detail and efficiency. Whether you’re engraving fine portraits, bold logos, or simple text, choosing the optimal DPI for each material and design will dramatically improve your results. And don’t forget: good DPI settings start in the software, but great results come from testing and tuning on the machine.
FAQs
1.What is the best DPI for laser engraving photos?
When engraving photos, the best DPI usually ranges between 250 and 400, depending on the material and the level of detail you want to preserve. A setting around 350 DPI is often considered a sweet spot—it captures enough grayscale detail without overwhelming the material with excessive burns.
2.Does higher DPI increase engraving depth?
DPI mainly affects resolution and detail, not depth. Engraving depth is determined more by power, speed, number of passes, and frequency than by how densely the laser pulses per inch. If you’re aiming for deeper engraving, it’s better to adjust power and pass count rather than just increasing DPI.
3.Can I change DPI for different layers in a single job?
Yes, you absolutely can—and often should. Most laser software, including LaserMaker, allows you to assign different settings to individual layers.
4.Why is there no DPI setting when cutting?
DPI applies only to engraving, where the laser scans line by line—similar to how an inkjet printer works. In contrast, cutting is a vector-based process, where the laser follows precise paths or outlines. In cutting mode, factors like power, speed, number of passes, and frequency (Hz) control the outcome—not the pulse density across a surface. So it’s completely normal not to see any DPI setting when configuring a layer for cutting.
.png "laser cutter Globle") International
International
 United States
 Brasil
 Canada
 Costa Rica
 Mexico
 Česká
Česká
 Romania
 Polska
 Ireland
 Italia
 Lietuva
 Россия
 Deutschland
 Britain
 Україна
 France
 Sverige
 Norway
 Denmark
 Ελλάδα
 Portugal
 한국
한국
 中国
中国
 中国香港
中国香港
 Israel
 中國臺灣
中國臺灣
 ジャパン
ジャパン India
India
 پاکستان
 پශ්රී ලංකා
 ประเทศไทย
 Australia
 New Zealand
 South Africa