How to Use Auto Focus on a Laser Cutting and Engraving Machine
 24-06-17
WHAT ARE YOU LOOKING FOR?
Search Across Products, Blog Posts, Support Content, And Resources.

How to Use Auto Focus on a Laser Cutting and Engraving Machine
24-06-17

Proper focus is one of the key factors behind clean laser cutting and detailed laser engraving. When the laser beam reaches the material at the correct focal distance, the beam spot is smaller and more concentrated, helping the machine deliver better cutting and engraving results.
Auto focus helps users quickly position the working table at the proper distance between the material and the focal lens. Instead of manually measuring the focus height every time, the machine can move the bed up or down to help reach the correct focusing position before cutting or engraving.
To achieve the best cutting result on a wood laser cutting machine or acrylic laser cutter, the laser beam should be focused where it contacts the material. In general, a smaller and more concentrated beam spot supports cleaner cuts, sharper engraving details, and more consistent processing performance.
Auto focus is designed to save setup time and improve focusing accuracy before cutting and engraving. By moving the working table to the proper height, it helps users prepare the machine more efficiently and reduce the chance of starting a job with the wrong focal distance.
A good focus setup can improve cutting quality, engraving detail, and workflow efficiency. However, auto focus should only be used when the material and setup conditions are suitable.
The auto focus function uses the machine’s focusing routine to adjust the working table height. The goal is to place the material at the proper distance from the focal lens before the laser job begins. This is especially useful when switching between materials with different thicknesses.
On compatible Thunder Laser machines, auto focus can be initiated from the machine control panel or from LightBurn. Before using it, the laser head, bed height, and material position should be checked carefully to prevent focusing errors or potential head crashes.
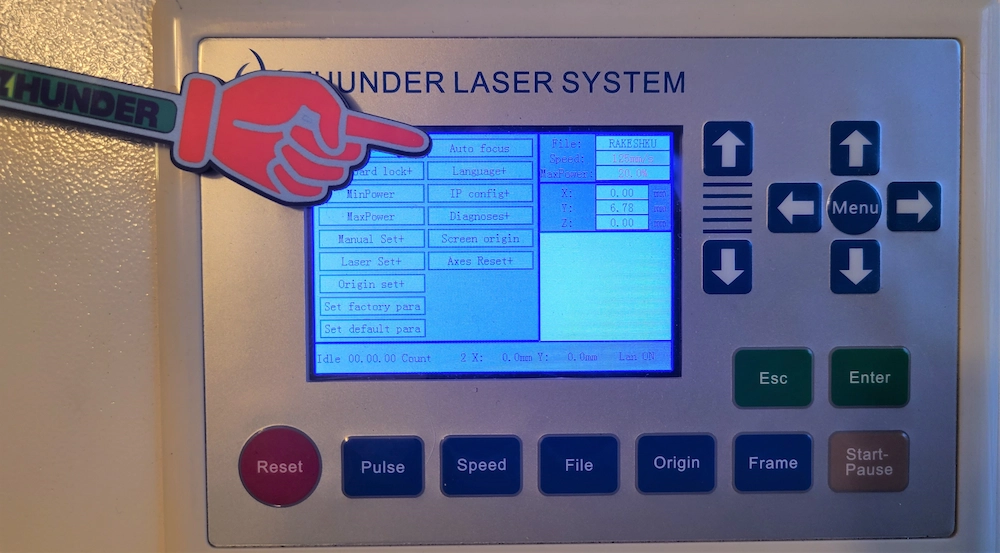
One way to start the auto focus routine is to use the button under the machine MENU. This allows users to initiate focusing directly from the machine control panel.
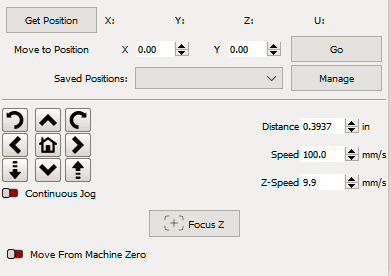
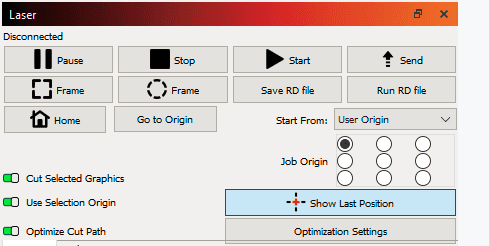
Auto focus can also be started through LightBurn. In the MOVE tab, use the Focus Z button to initiate the focusing routine. This is a convenient option when preparing and controlling the job from the software.
Before starting auto focus, check the laser head position, machine home position, and material placement. These steps help the sensor routine work correctly and reduce the risk of a crash.
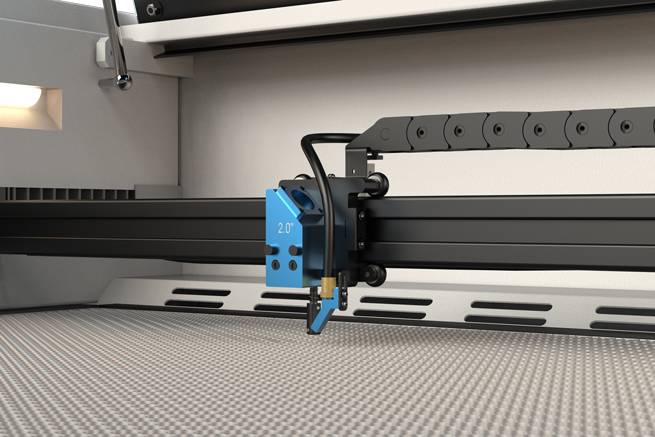
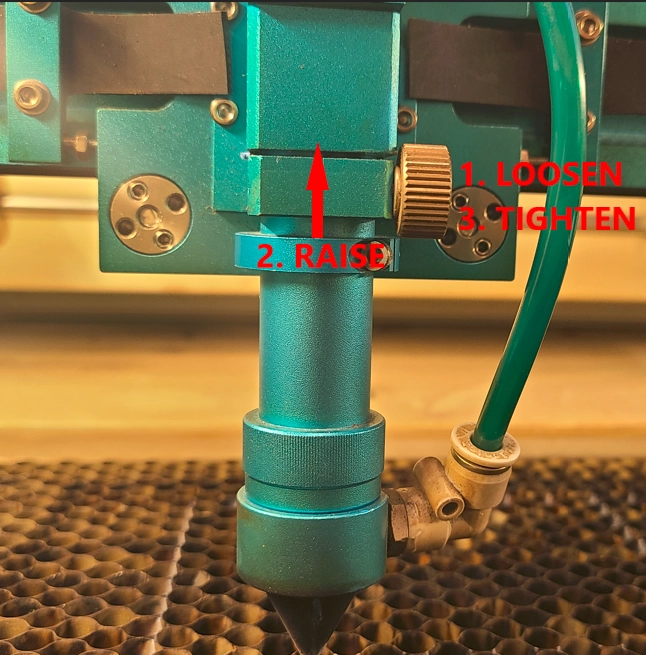
Return the laser head to the upright and locked position. There should be no gap between the stop ring and the lens holder assembly before auto focus begins.
Use the HOME button in the LightBurn Laser window to send the laser head to the top-left area of the machine. The laser head does not need to be directly above the material for the auto focus routine.
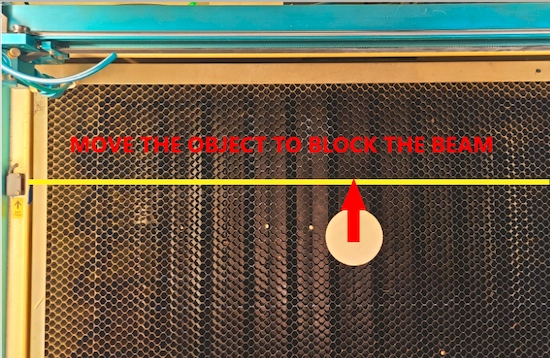
Place the material so that it blocks the light path from the left sensor to the right sensor. If the material is not positioned correctly, the auto focus routine may not detect it as expected.
Auto focus is useful, but it has important limits. Understanding these constraints can help users avoid failed focusing routines and reduce the risk of contact between the laser head and the workpiece.
Auto focus is not suitable for every job. In some setups, manual focus is safer and more accurate because the sensors may not detect the material or workpiece shape correctly.
For rotary jobs, transparent objects, uneven materials, or non-standard lens head setups, manual focus can be the more reliable option.
The following videos provide additional visual references for auto focus operation and setup. Use them together with the checklist above to confirm the correct workflow before starting a cutting or engraving job.
Auto focus can make setup faster and more consistent, especially for flat materials that meet the required size and thickness conditions. However, it should always be used with proper machine supervision. Check the laser head position, confirm the material blocks the sensor path, and make sure the bed height is safe before starting the routine.
When the material or accessory setup does not match the auto focus requirements, switch to manual focus. A careful manual focus process is often the safer choice for rotary engraving, uneven workpieces, transparent materials, and non-standard head configurations.
Need Help Choosing the Right Laser Workflow?
Thunder Laser can help you choose a machine, lens setup, and focusing workflow that fit your materials, applications, and daily production needs.
Contact UsTalk To Our Experts Now!
Please leave your contact information so that we can serve you better.
LASER AUTO FOCUS FAQS
TAKE THE NEXT STEP WITH THUNDER LASER

 Stable & Consistent MachinesUnlimited ApplicationRobust After-sales SupportFactory Direct Supply