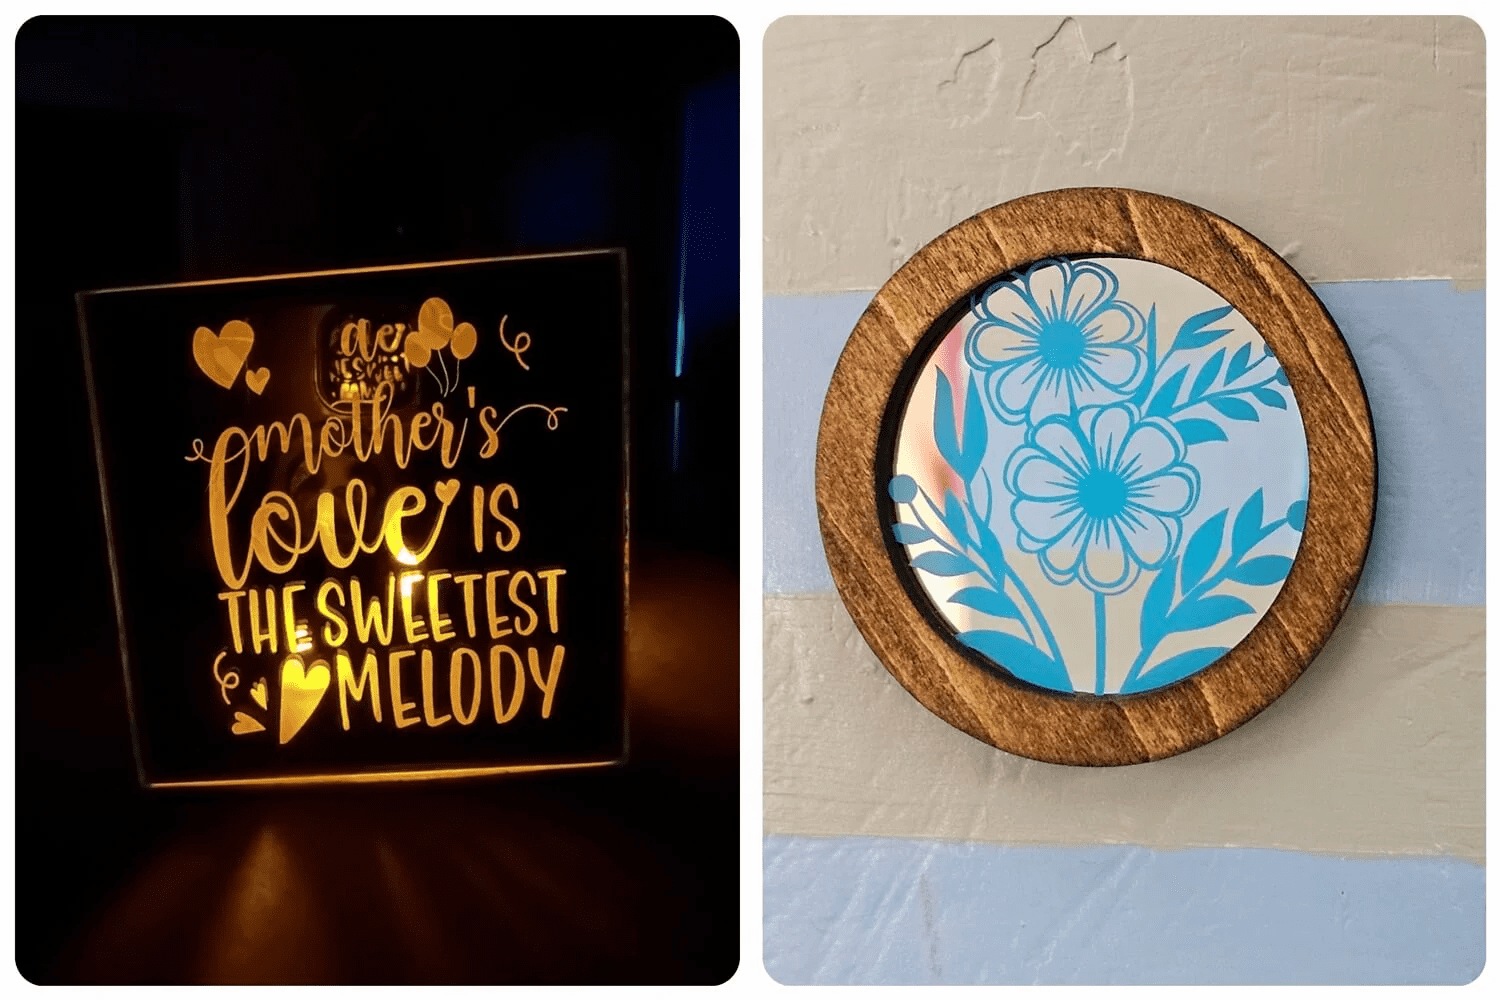
Laser engraving involves directing a concentrated laser beam onto a material's surface to remove layers and create a predetermined design. When applied to mirrors, the laser typically targets the reflective coating on the back, vaporizing specific areas to reveal the transparent glass beneath. This process results in a design that is visible from the front, offering a striking contrast between the reflective and engraved sections.
It's crucial to note that engraving directly on the mirror's front surface can be hazardous, especially with diode lasers, as the reflective nature of the mirror can redirect the laser beam, potentially damaging the equipment or causing injury. Therefore, the standard practice is to engrave the mirror from the back, ensuring both safety and optimal design clarity.
Advantages of Laser-Engraved Mirrors
Precision and Detail
Laser engraving offers unparalleled precision, allowing for the reproduction of intricate designs and fine details that might be challenging with traditional etching methods. This high level of accuracy makes it ideal for creating complex patterns, detailed images, and crisp text.
Durability
Engraving on the back of mirrors, known as reverse engraving, protects the design from external wear and tear, ensuring longevity. Additionally, such engravings are more resistant to fingerprints and smudges, maintaining their aesthetic appeal over time.
Versatility
Laser-engraved mirrors are versatile in application, suitable for personalized gifts, decorative home accents, corporate branding, and commemorative items. Their customizable nature allows for a wide range of creative expressions tailored to individual preferences.
Selecting the Appropriate Mirror for Engraving
The choice of mirror significantly influences the engraving outcome. Consider the following factors:
Thickness: Thinner mirrors are generally preferred for engraving as they require less laser power and reduce the risk of heat damage. Thicker mirrors may necessitate multiple passes, increasing processing time and potential thermal stress.
Coating Type: Mirrors come with various backing materials, such as paint, plastic, or specialized coatings. Understanding the composition of this reflective layer is crucial, as it affects how the laser interacts with the mirror and the quality of the engraving.
Base Material: The mirror's base, typically glass, should be free from imperfections like bubbles or scratches, which can compromise the engraving quality. A smooth, flawless surface ensures a clean and precise design.
laser engraving mirrors
Preparing for Laser Engraving
Safety Precautions
Prioritizing safety is essential when laser engraving mirrors:
Ventilation: Engraving can produce smoke and potentially toxic fumes, especially from certain coatings. Ensure adequate ventilation or use an exhaust system to maintain air quality.
Protective Equipment: Wear appropriate safety gear, including laser safety glasses to protect your eyes and gloves to handle materials safely.
Secure Positioning: Firmly secure the mirror to prevent movement during engraving, which could lead to misalignment or accidents.
Mirror Preparation
Cleaning: Thoroughly clean the mirror's surface to remove dust, oils, or residues that could interfere with the engraving process. Use a lint-free cloth and appropriate glass cleaner.
Masking: Apply masking tape to areas not intended for engraving to protect them from accidental laser exposure. This step is particularly useful when working with complex designs requiring precise delineation.
Engraving Process
Design Preparation: Using graphic design software, create or import the desired image or text. Since the engraving occurs on the mirror's back, remember to horizontally flip or mirror the design to ensure correct orientation when viewed from the front.
Laser Settings: Adjust the laser engraver's settings based on the mirror's characteristics and desired engraving depth. Key parameters include power, speed, and resolution.
Power: Higher power settings remove more material but increase the risk of damaging the mirror. Start with a moderate setting and adjust as needed.
Speed: Faster speeds result in shallower engravings, while slower speeds allow for deeper cuts.
Resolution (DPI): Higher dots per inch yield finer details but may require longer processing times.
Conducting test engravings on a sample piece can help determine optimal settings.
Focusing: Properly focus the laser to ensure precision. Some machines offer autofocus features to simplify this step.
Engraving: Once settings are configured, initiate the engraving process. Monitor the operation to ensure consistent quality and address any issues promptly.
Post-Engraving Finishing
After engraving:
Cleaning: Remove any residual debris from the engraved areas using a soft brush or cloth. Ensure the surface is clean before proceeding to additional finishing steps.
We use cookies to understand how our audience uses our site.
THUNDER LASER websites use cookies to deliver and improve the website experience, See our cookie policy for further details on how we use cookies and how to change your cookie settings Cookie policy.


 25-04-01


 Stable & Consistent Machines


