How to Use a Fiber Laser Marker
 23-06-15
WHAT ARE YOU LOOKING FOR?
Search Across Products, Blog Posts, Support Content, And Resources.

How to Use a Fiber Laser Marker
23-06-15

A fiber laser marker is designed for fast, precise, and permanent marking on a wide range of materials. It is commonly used in automotive parts, electronics, jewelry, tools, product identification, and industrial traceability applications. With the right setup, it can create clear barcodes, logos, serial numbers, and detailed patterns with excellent repeatability.
This guide explains how to use a fiber laser marking machine effectively, from preparation and software setup to the marking process, finishing, maintenance, and practical operating tips. It also introduces common 20W, 30W, 50W, and 100W options to help beginners and production users understand which power level may fit different marking needs.
Fiber laser marking machines are available in several common power levels, including 20W, 30W, 50W, and 100W. The best choice depends on the material, desired marking depth, production speed, and whether the application requires surface marking or deeper engraving.
For beginners, a 20W or 30W fiber laser marking machine is often a practical starting point. These models can handle many common marking projects while keeping the setup more approachable.
Using a fiber laser marker correctly is essential for achieving clean, accurate, and repeatable results. The process begins with a safe workspace and continues through machine setup, file preparation, parameter adjustment, marking, inspection, and maintenance.
Preparation creates the foundation for safe and accurate laser marking. Before operation, clean the working area thoroughly. Dust, debris, and obstructions can interfere with machine movement, affect marking quality, and contaminate the material surface.
Place the fiber laser marker on a stable surface to reduce vibration during operation. Even small movements can lead to inaccurate or distorted marks, especially when working with fine text, logos, or serial numbers.
Once the work area is ready, secure the material before marking. Magnets can help hold flat metal sheets, clamps can keep panels in place, and custom jigs or fixtures can stabilize irregular surfaces. A stable material position helps keep the marking area aligned with the laser beam.
After preparing the workspace, connect the laser marker to a stable and appropriate power source according to the manufacturer’s instructions. A reliable power supply helps prevent interruptions during marking.
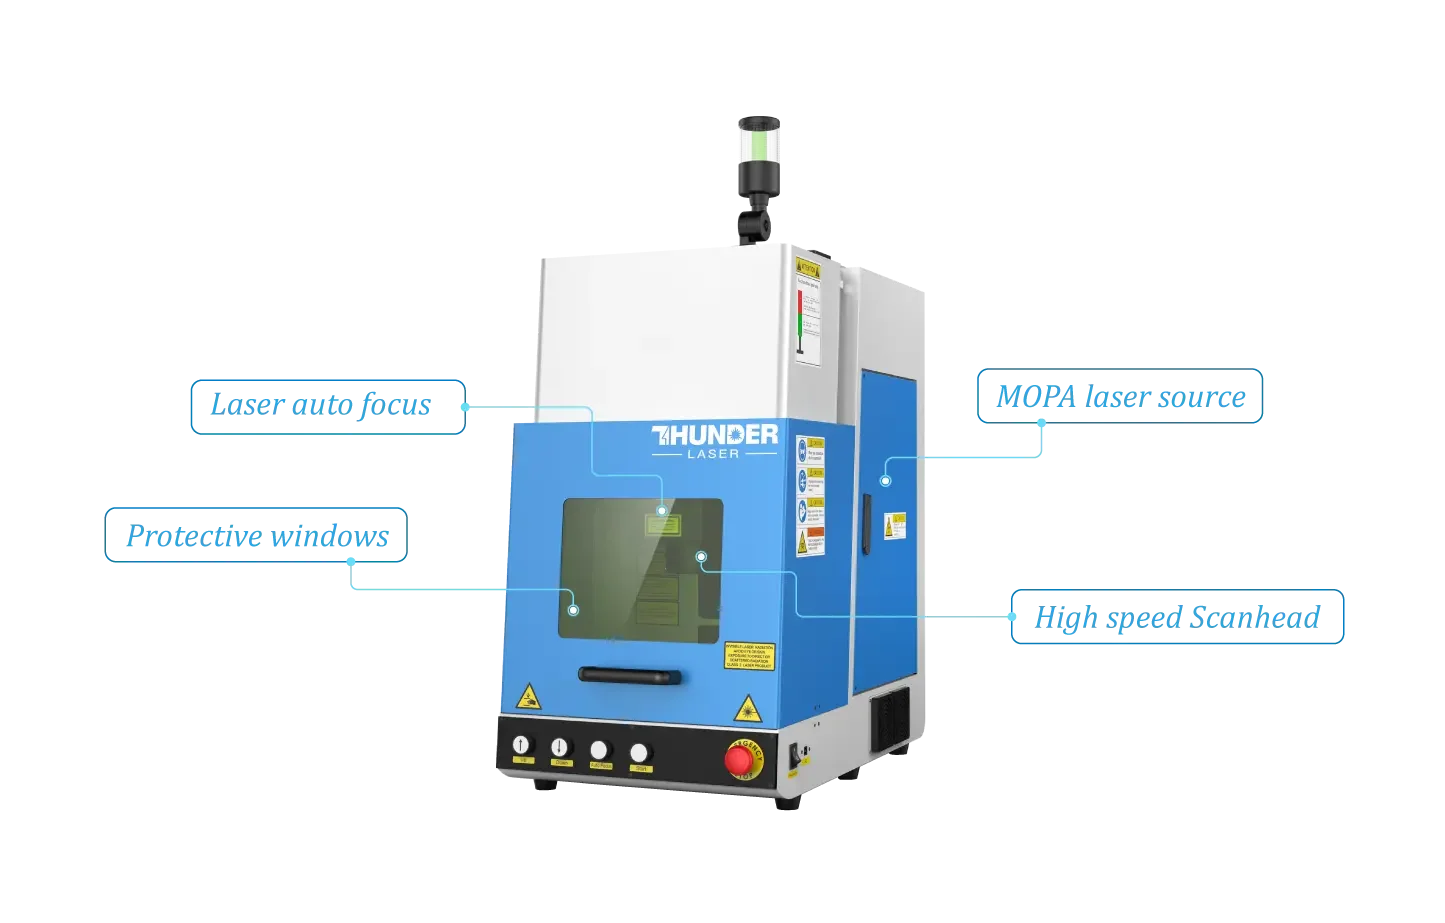
Next, install the required software and drivers on the connected computer. The software is used to import designs, add text or barcodes, adjust marking parameters, and control the marking process. Thunder Laser suggests EZCad 2 and EZCad 3 software for its fiber laser marking machines.
Configure the settings based on the material and desired marking depth. This may include adjusting the focal length, laser position, power, speed, and other parameters. Correct focusing and alignment help ensure that the laser beam reaches the intended marking area accurately.
Once the fiber laser marker is properly set up, import the design, text, logo, or barcode into the marking software. Common software programs such as EZCad or LightBurn can work with standard image formats, including BMP, JPG, GIF, TGA, PNG, and TIF.
After importing the file, position and scale the design so it matches the desired marking area on the material. Then adjust laser power, marking speed, frequency, and other parameters according to the material type. Because different materials absorb laser energy differently, testing and parameter adjustment are important for achieving the desired result.
Always follow laser safety guidelines during operation. Wear appropriate safety glasses and avoid direct exposure to laser radiation. When unsure about a setting or process, consult the machine manual or seek expert guidance before continuing.
After marking is complete, inspect the result for quality, accuracy, contrast, and depth. Check whether the text, barcode, or graphic is clear and legible under suitable lighting. Also look for inconsistencies, errors, or surface imperfections.
If there is debris or residue on the surface, clean it carefully with suitable methods. Non-abrasive, non-damaging cleaning tools are recommended to avoid altering the mark. Depending on the material, lint-free cloths, alcohol wipes, or specialized cleaning solutions may be appropriate.
Maintenance is essential for long-term performance and consistent marking quality. Key maintenance tasks include cleaning the lens and machine components, replacing consumable parts when needed, and keeping the software updated.
Dust and debris can accumulate on the machine and affect laser accuracy. Use cleaning tools and methods recommended by the manufacturer, and avoid abrasive materials or harsh chemicals that could damage optical or machine surfaces.
Consumable parts should be replaced according to the manufacturer’s recommendations. Protective filters, for example, may degrade over time. Software updates can also improve functionality, stability, and workflow efficiency. Regular maintenance helps extend machine life and supports consistent marking results.
The basic steps above can help you operate a fiber laser marking machine correctly. Better results, however, often come from experience, careful testing, and consistent workflow habits. The following tips can help improve safety, marking quality, and repeatability.
Fiber laser markers offer precision, durability, and versatility across many industries. Whether you are engraving metal, coding parts, marking electronics, or customizing products, correct setup and consistent operation are key to long-term success.
By preparing the workspace, setting up the machine properly, testing parameters, inspecting results, and maintaining the system regularly, you can improve marking quality and make your fiber laser marker more reliable for everyday production.
Need Help Choosing or Using a Fiber Laser Marker?
Thunder Laser can help you compare marking solutions, understand material requirements, and choose a workflow that fits your application.
Contact UsTalk To Our Experts Now!
Please leave your contact information so that we can serve you better.
FIBER LASER MARKER FAQS
TAKE THE NEXT STEP WITH THUNDER LASER

 Stable & Consistent MachinesUnlimited ApplicationRobust After-sales SupportFactory Direct Supply