How to Copy Objects Quickly with RDWorks
 24-07-24
WHAT ARE YOU LOOKING FOR?
Search Across Products, Blog Posts, Support Content, And Resources.

How to Copy Objects Quickly with RDWorks
24-07-24

When working on laser cutting or engraving projects, copying the same object multiple times is a common task. Whether you are making product batches, arranging repeated patterns, or preparing several identical parts on one sheet, RDWorks provides a simple way to duplicate objects quickly and accurately.
In this guide, we’ll show how to copy objects quickly in RDWorks using the Copy Matrix tool. This feature helps you create multiple copies in rows and columns while controlling the quantity and spacing between each object.
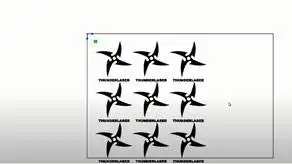
Learn how to duplicate objects quickly in RDWorks using the Copy Matrix tool.
Copying objects manually one by one can take time and may lead to uneven spacing. RDWorks makes this process easier by allowing users to duplicate selected objects into a structured matrix. This is especially helpful when you need repeated parts for laser cutting, engraving, marking, or production layouts.
With the Copy Matrix tool, you can control how many copies are created along the X axis and Y axis. You can also adjust the horizontal and vertical spacing between copies, helping you create a cleaner and more efficient layout.
Tip: Before copying objects, make sure the original design is correctly sized and ready for production. Any mistake in the original object will be repeated across all copies.
Follow these steps to duplicate objects quickly in RDWorks. The process is simple and suitable for both beginners and users who want to improve production efficiency.
Launch RDWorks and open the file you want to duplicate. You can import a new design or open an existing project file. Make sure the design appears correctly in the workspace before moving to the next step.
Click the image, shape, or vector object that you want to duplicate. The object must be selected before using the Copy Matrix function. If your design includes multiple parts, group or select all required elements carefully so the copy includes the full design.
In the RDWorks toolbar, click “Draw,” then choose “Copy Matrix” from the drop-down menu. This tool allows you to create a grid of duplicated objects based on the quantity and spacing values you enter.
In the Copy Matrix dialog box, enter the number of copies you want along the X axis and Y axis. The X axis controls the horizontal direction, while the Y axis controls the vertical direction. This is useful for arranging objects into rows and columns.
Next, set the spacing between each copy. X Space controls the horizontal distance between objects, and Y Space controls the vertical distance. Leave enough space between parts to prevent overlap and to ensure a safe cutting or engraving layout.
After setting the quantity and spacing, click “OK.” RDWorks will automatically generate the copies according to your settings. Check the layout carefully before sending the file to the laser machine.
The Copy Matrix tool is simple, but a few layout habits can help you avoid common mistakes and improve production results.
The Copy Matrix function is useful in many laser production workflows. It can help users produce repeated items faster while maintaining consistent spacing and arrangement.
Copying objects quickly in RDWorks is an easy way to improve your laser cutting workflow. By using the Copy Matrix tool, you can duplicate selected designs into rows and columns, control the number of copies, and adjust spacing for a cleaner production layout.
For best results, prepare the original design carefully, choose suitable X and Y quantities, set proper spacing, and review the layout before output. These simple steps can save time, improve precision, and make batch laser projects easier to manage.
Want a More Efficient Laser Cutting Workflow?
Contact Thunder Laser to find the right laser machine and software workflow for cutting, engraving, batch production, and creative projects.
Contact UsTalk To Our Experts Now!
Please leave your contact information so that we can serve you better.
RDWORKS COPY OBJECTS FAQS
TAKE THE NEXT STEP WITH THUNDER LASER

 Stable & Consistent MachinesUnlimited ApplicationRobust After-sales SupportFactory Direct Supply