Laser machines have reached power levels of more than 10,000 watts, making laser cutting highly efficient for many production needs. However, even with powerful equipment, cutting results can sometimes be unsatisfactory. Common issues include rough cutting surfaces, visible streaks, slag, and burrs.
When poor cutting results appear, it is important to check the basic machine condition first. Many cutting quality problems are caused by optical contamination, unstable cooling, gas issues, or incorrect cutting parameters.
1. Basic Checks Before Troubleshooting Laser Cutting Problems
Before adjusting detailed cutting parameters, inspect the following areas:
Check the laser head lenses: Make sure every lens in the laser head is clean and free from contamination.
Check the water tank temperature: The water temperature should not be too high or too low. Also check whether there are water droplets on the laser surface.
Check the cutting gas: Make sure the gas purity is suitable, the gas path is smooth, and there is no air leakage.
If the basic machine condition is normal but the cutting surface is still poor, continue troubleshooting based on the specific cutting defect.
2. Cutting Streaks on the Cutting Surface
2.1 Causes of Streaks on the Cutting Surface
Streaks on the cutting surface are often related to nozzle selection, air pressure, or unstable cutting speed. The following factors should be checked first:
Nozzle mismatch: The selected nozzle may be too large for the cutting task.
Incorrect air pressure: Excessive air pressure may cause overburning and leave visible streaks.
Uneven cutting speed: If the cutting speed is not set correctly or remains unstable, spots and streaks may appear on the cut edge.
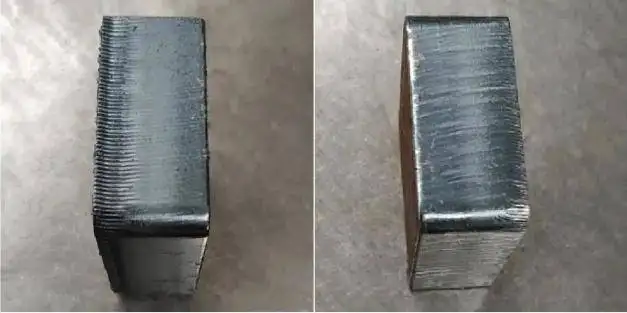
2.2 How to Solve Streaks on the Cutting Surface
Streaks on the cutting surface
Choose the proper nozzle: Select the nozzle according to the cutting machine instruction manual. A suitable nozzle helps stabilize the cutting result.
Reduce the cutting air pressure: Lowering the air pressure can help reduce overburning and improve the cutting surface.
Adjust the cutting speed and power: Match the cutting speed and power properly so the cut edge becomes smoother and more consistent.
3. Hard Slag at the Bottom of the Cutting Surface
3.1 Causes of Slag on the Cutting Surface
Hard slag at the bottom of the cutting surface is usually caused by the opposite type of parameter problem from surface streaks. Focus position, nozzle size, air pressure, and material quality can all affect slag formation.
Small nozzle size: If the cutting focal point is large while the nozzle is too small, slag may form on the cutting surface.
Unstable or unsuitable air pressure: Air pressure that is too high or too low can affect the cutting speed and cutting quality.
Poor plate quality: If the steel plate quality is poor and a small nozzle is used, slag may be difficult to remove during cutting.
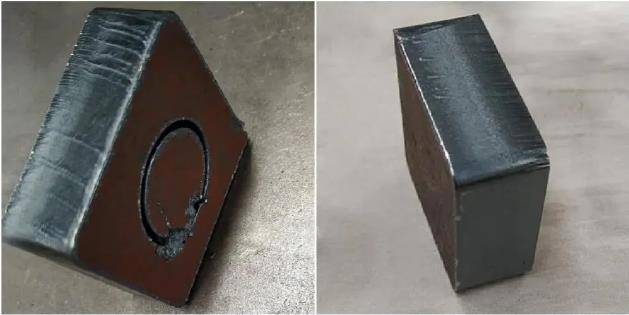
3.2 How to Solve Slag on the Cutting Surface
Slag blocks on the cutting surface
Replace the nozzle: Use a larger nozzle when needed, and adjust the focus according to the laser machine instruction manual.
Find the optimum air pressure: Increase or decrease the working air pressure gradually until the cutting result improves.
Use a good-quality plate: Better material quality can make it easier to achieve a cleaner cut and reduce slag formation.
4. Burrs on the Bottom Edge
Burrs on the bottom edge after laser cutting
4.1 Causes of Burrs on the Bottom Edge
Burrs at the bottom of the cut are commonly related to nozzle diameter, defocus settings, and insufficient air pressure. When these factors are not matched correctly, excess material may remain on the edge.
Small nozzle diameter: A nozzle that is too small may not meet the processing requirements.
Incorrect negative defocus: The negative defocus is not properly matched and should be adjusted to a suitable position.
Low air pressure: If the cutting air pressure is too low, it may be difficult to remove excess burrs from the cutting surface.
4.2 How to Solve Burrs on the Bottom Edge
Use a larger-diameter nozzle: A larger nozzle can increase airflow and help improve cutting quality.
Increase the negative defocus: Adjusting the negative defocus can help the laser cut through the material more effectively.
Increase the air pressure: Higher air pressure may help remove burrs from the cutting surface when the setting is too low.
5. Final Tips for Better Laser Cutting Quality
Laser cutting quality depends on a combination of machine condition, nozzle selection, air pressure, focus position, cutting speed, power, gas purity, and material quality. When a defect appears, adjust one factor at a time and compare the result. This makes it easier to identify the real cause and avoid unnecessary parameter changes.
If the cutting surface is still not smooth after these adjustments, review the machine instruction manual and confirm that the selected settings match the material, thickness, and cutting requirements.
Need Help Improving Your Laser Cutting Results?
Contact Thunder Laser to learn more about laser machines, cutting quality, and practical troubleshooting support.
Q1: Why are there streaks on my laser cutting surface?
Streaks are often caused by nozzle mismatch, excessive air pressure, or uneven cutting speed. Check the nozzle size, reduce the air pressure if needed, and make sure the speed and power are properly matched.
Q2: How can I reduce slag at the bottom of a laser-cut edge?
Try using a larger nozzle, adjusting the focus according to the machine manual, and finding the correct air pressure. Material quality can also affect slag formation.
Q3: What causes burrs on the bottom edge after laser cutting?
Bottom burrs may appear when the nozzle diameter is too small, the negative defocus is not suitable, or the cutting air pressure is too low.
Q4: Should I adjust air pressure first when cutting quality is poor?
Air pressure is one important factor, but you should also check the lenses, water temperature, gas path, nozzle, focus, speed, and power. Adjust one factor at a time so you can identify the real cause.
Q5: Why should I check the lens and gas path before changing cutting parameters?
Dirty lenses, unstable cooling, poor gas purity, or air leakage can affect cutting quality even when the cutting parameters seem correct. Basic machine checks help avoid unnecessary parameter changes.
We use cookies to understand how our audience uses our site.
THUNDER LASER websites use cookies to deliver and improve the website experience, See our cookie policy for further details on how we use cookies and how to change your cookie settings Cookie policy.


 22-09-19


 Stable & Consistent Machines