


EzCAD Laser Software Installation Guide for Thunder Laser Marking Machines
 2024-07-01
WHAT ARE YOU LOOKING FOR?
Search Across Products, Blog Posts, Support Content, And Resources.

EzCAD Laser Software Installation Guide for Thunder Laser Marking Machines
2024-07-01

This guide walks students, teachers, and makerspace users through installing EzCAD laser software on a Windows computer. It covers machine connection, Device Manager checks, driver installation, and final verification so the laser marking machine can communicate with the computer correctly.
This lesson is useful before starting laser marking activities with EzCAD. A successful setup helps avoid common driver issues and gives users a reliable starting point for engraving, marking, and software-based machine control.
| Item | Details |
|---|---|
| Topic | EzCAD laser software installation and driver setup |
| Operating System | Windows computer |
| Main Skills | USB connection, Device Manager navigation, driver update workflow, driver folder selection, and installation verification |
| Equipment | Laser marking machine, Windows PC, USB cable, and the provided USB drive with software and driver files |
| Classroom Fit | Digital fabrication labs, laser marking training, makerspace onboarding, equipment setup lessons, and beginner software workflow preparation |
Students or users will connect a laser marking machine to a Windows computer, locate the newly connected device in Device Manager, install the correct driver from the provided USB drive, and confirm that the device is ready to work with EzCAD software.
For teachers: Use this guide as a setup checklist before introducing laser marking software workflows.
For students: Follow the steps to understand how software, drivers, and hardware communication work together.
For makerspaces: Use it as an onboarding reference for Windows workstations connected to laser marking machines.
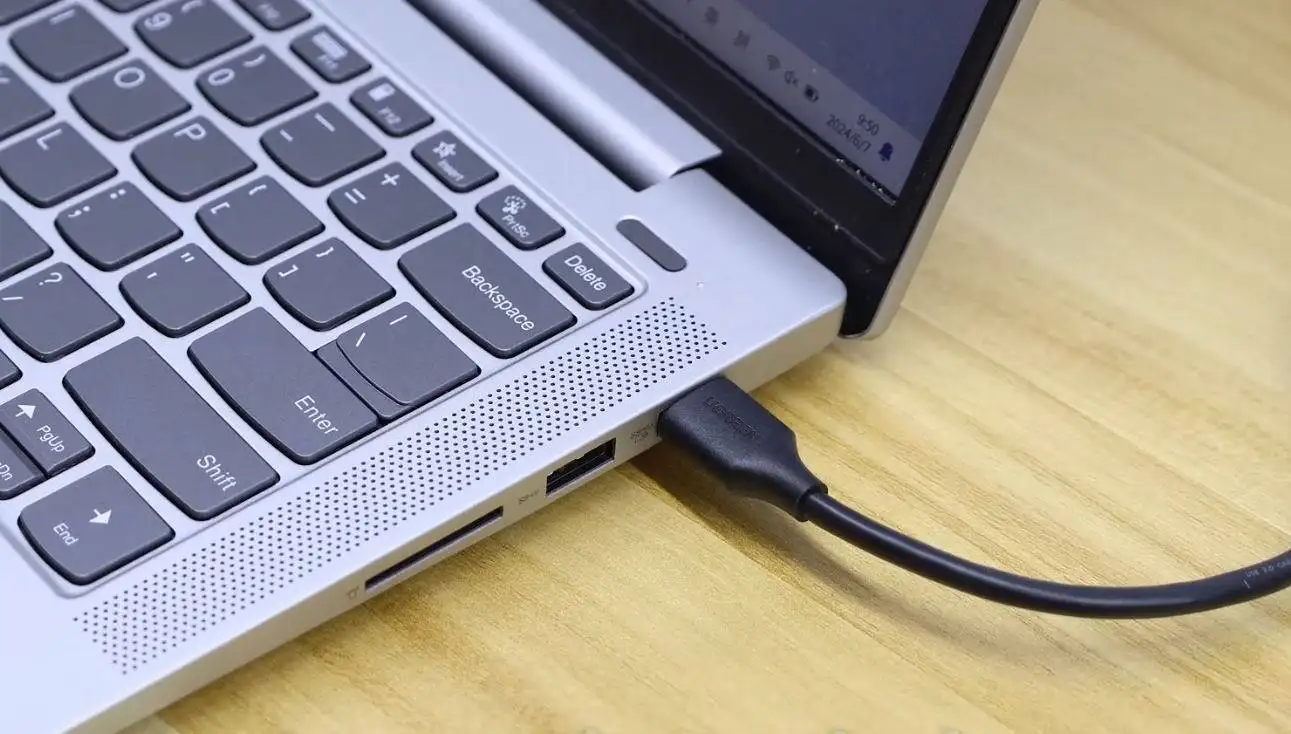
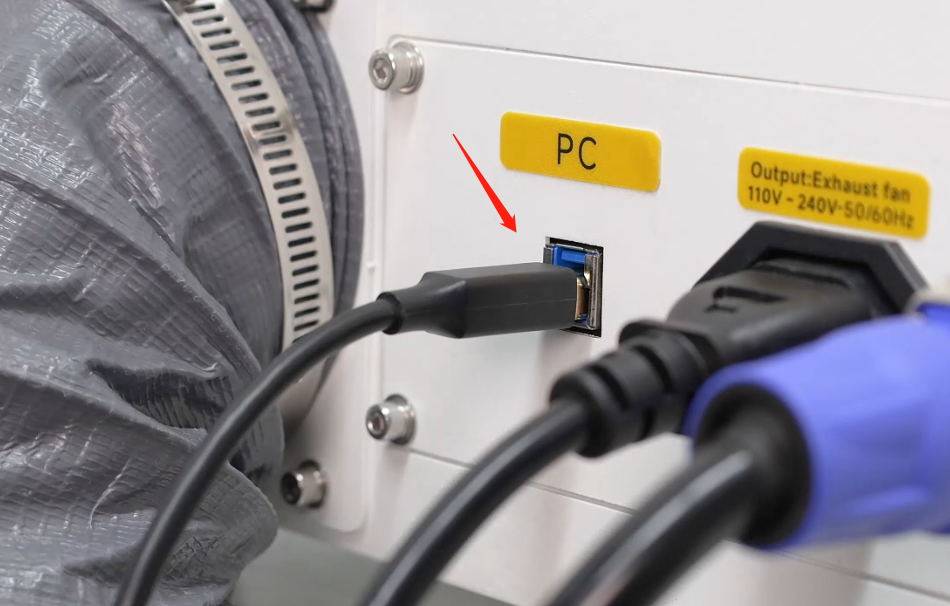
Connect a laser marking machine to a Windows PC using a USB cable.
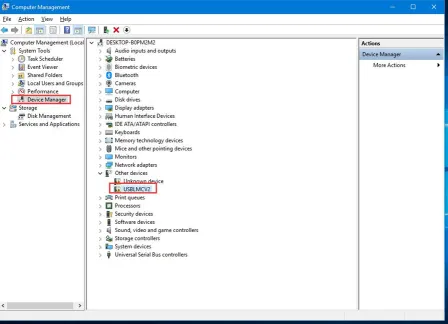
Open Device Manager and identify a newly connected device.
Recognize when a device needs a driver, such as when it appears with a yellow warning icon.
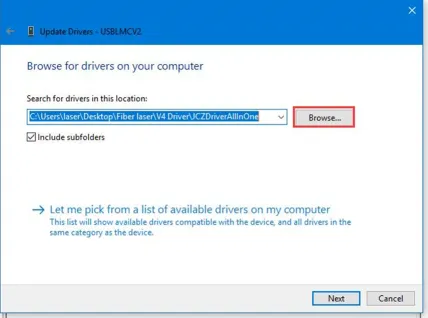
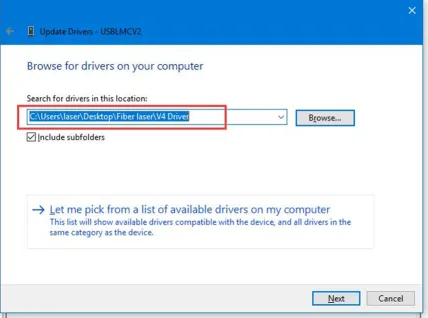
Use the Update Driver workflow to browse for the correct driver folder.
Confirm that the driver has been installed successfully before launching EzCAD.
Digital workflow thinking: Understand the relationship between software, drivers, hardware recognition, and machine control.
Troubleshooting thinking: Use Device Manager indicators to identify whether the Windows computer has recognized the laser marking machine correctly.
Technical process thinking: Follow a structured setup sequence and verify each step before moving to engraving or marking work.
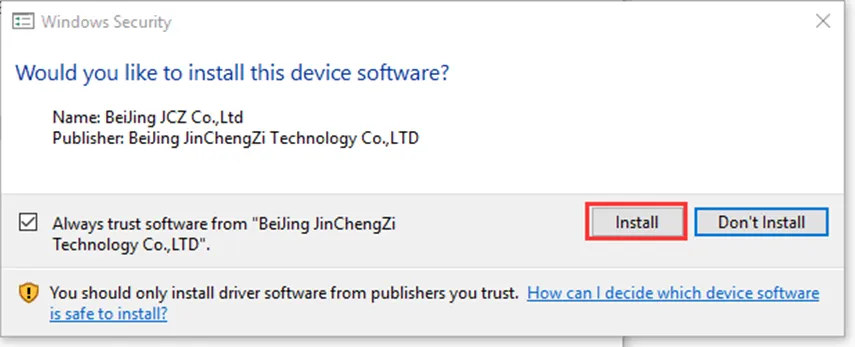
Only install drivers and software from trusted Thunder Laser-provided files or approved school resources. Students should follow teacher or lab supervisor instructions when connecting equipment, changing system settings, or preparing a laser marking machine for use.
Laser marking software needs a proper connection between the computer and the machine. Even when the USB cable is connected, Windows may not communicate with the laser marking machine until the correct driver is installed.
Device Manager helps users check whether the machine has been detected and whether a driver is missing. Once the driver is installed successfully, the laser marking machine can interface with EzCAD software.
Before beginning the installation, prepare the computer, machine, cable, and software files.
Computer: A Windows PC used for EzCAD operation.
Connection: A USB cable for connecting the laser marking machine to the computer.
Machine: A compatible laser marking machine that will be controlled through EzCAD.
Driver files: The provided USB drive that contains the correct software and driver folder.
Driver path: The source workflow points to USB Drive > AURORA 8/AURORA 8 UV/AURORA 8 PRO > Fiber software/UV software > Driver.
Use a USB cable to connect the laser marking machine to the Windows PC. Make sure the cable is securely connected so the computer can communicate with the device.
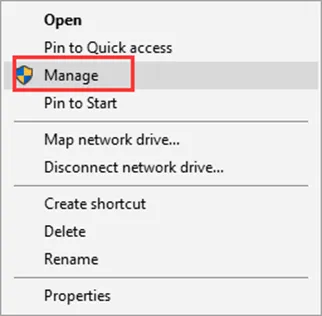
On the Windows computer, right-click the Start button and select Device Manager from the menu. Device Manager allows users to check connected hardware and install or update drivers.
In Device Manager, look for the newly connected laser marking device. It may appear under Other devices with a yellow warning icon. This usually means Windows has detected the device, but the driver has not been installed yet.
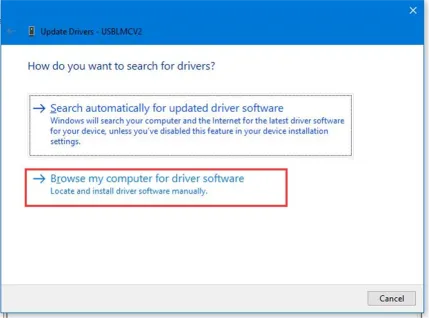
Right-click the new device and select Update driver. Then choose Browse my computer for drivers so Windows can install the driver from the provided USB drive.
Navigate to the correct folder on the USB drive. In the source workflow, the driver folder is located under USB Drive > AURORA 8/AURORA 8 UV/AURORA 8 PRO > Fiber software/UV software > Driver. Select the correct driver file and follow the on-screen prompts to complete the installation.
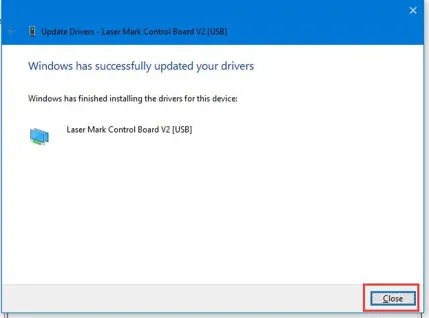
After the driver installation is complete, the device should appear in Device Manager without a yellow warning icon. This confirms that the driver has been installed successfully and that the machine is ready to communicate with EzCAD software.
After completing the steps above, EzCAD laser software can be launched to begin working with the laser marking machine. Users can then explore the software tools and settings to prepare for engraving or marking projects.
Teacher Tip: Before students begin marking projects, verify that the machine connection, driver installation, and software launch all work correctly on the classroom computer.
If the device does not appear in Device Manager, check the USB cable connection and try reconnecting the machine.
If the device appears with a yellow warning icon, install or update the driver from the correct driver folder.
If the driver folder cannot be found, check the provided USB drive and confirm the Aurora software folder path.
If the device still does not install correctly, ask a teacher, lab manager, or Thunder Laser support contact to verify the setup.
This setup guide is especially relevant for Thunder Laser marking workflows that use EzCAD and Aurora-related software files. For schools, makerspaces, and labs working with compact laser marking applications, a machine such as the Thunder Laser Aurora Series may require correct driver installation before software operation.
Teachers can use this page as a preparation checklist before running laser marking lessons. Confirm the Windows computer, USB connection, driver folder, and software launch before students begin hands-on marking work.
Talk To Our Experts Now!
Please leave your contact information so that we can serve you better.
NEED HELP FINDING THE RIGHT SOLUTION?
Talk to our team for machine recommendations, application advice, and support based on your needs.

 Stable & Consistent MachinesUnlimited ApplicationRobust After-sales SupportFactory Direct Supply


