


Phone Stand Laser Cutting Project with LaserMaker
 24-06-27
WHAT ARE YOU LOOKING FOR?
Search Across Products, Blog Posts, Support Content, And Resources.

Phone Stand Laser Cutting Project with LaserMaker
24-06-27

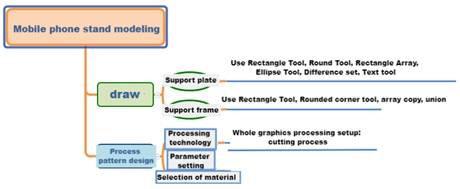
In this STEAM engineering project, students design and make a laser-cut phone stand using LaserMaker. The lesson connects product design, measurement, rounded rectangle drawing, rectangular arrays, union and difference operations, mortise-and-tenon structure, laser cutting, and hands-on assembly.
This project helps students understand how flat laser-cut parts can become a useful everyday object. Students explore support angle, balance, slot fit, material thickness, and structural stability while designing a practical phone stand.
| Item | Details |
|---|---|
| Project | Laser-cut phone stand |
| Software | LaserMaker |
| Main Skills | Rectangle Tool, Rounded Corner Tool, Oval Tool, Text Tool, Rectangular Array, Union Tool, Difference Set Tool, cutting setup, and assembly |
| Suggested Materials | Basswood plywood board or acrylic board |
| Classroom Fit | Engineering challenges, product design, maker education, structural testing, and classroom laser cutting |
Students will design a simple phone stand made from a support surface and support feet. They will calculate part sizes, create mortise-and-tenon slots, set cutting parameters, and test whether the finished stand can hold a phone securely.
For teachers: Use this lesson to connect measurement, structure, balance, slot-fit design, product function, and laser cutting workflow.
For students: Use the project to design a useful phone or tablet support while learning how flat parts can be assembled into a stable object.
For makerspaces: Use it as a practical engineering challenge before moving on to larger stands, holders, organizers, or flat-pack products.
Use the Rectangle Tool and Rounded Corner Tool to create the main support surface and support feet.
Use the Oval Tool and Difference Set Tool to modify the shape of the support surface.
Use Rectangular Array to create matching mortise slots and support-foot parts.
Use the Union Tool to combine support-foot shapes into one connected structure.
Set cutting parameters based on material choice, thickness, and project requirements.
Design thinking: Observe common phone stand shapes and improve the support surface, feet, and decorative design for real use.
Computational thinking: Calculate how phone size, slot size, spacing, and support angle affect the design.
Engineering thinking: Consider tenon fit, support length, center of gravity, stability, and how three contact points can define a stable plane.
Students should create school-appropriate text and graphics, protect personal information, and make original improvements instead of simply copying another design.
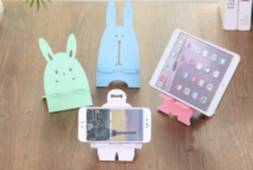
Phones and tablets are easy to carry, but holding them for a long time can be uncomfortable. A phone stand supports the device at a better viewing angle, helps free the user’s hands, and can make watching videos, reading recipes, studying, or working at a desk more convenient.
In this lesson, students study the shape and structure of a phone stand, then use LaserMaker to draw and make a simple version from flat sheet material.
Before drawing in LaserMaker, students should analyze the phone stand as a real product. It needs to support the phone, stay stable on a desk, and use parts that can be cut and assembled accurately.
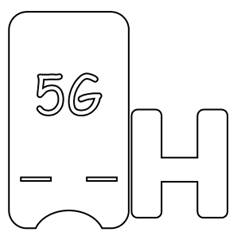
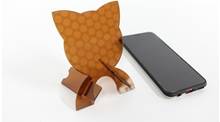
Product shape: The stand includes a support surface and support feet. The support surface may be rectangular or combined with other decorative shapes.
Modeling method: Graphic tools and Difference Set operations are used to shape the support surface, while rectangle-based slot designs help create the tenon structure.
Part size: The support surface and support feet should be sized according to the phone size or the intended universal stand size.
Splicing method: The project uses penetrating straight tenons so the support surface and support feet can be inserted together.
Material selection: The source lesson suggests basswood plywood board or acrylic board.
Process effect: The main process is laser cutting. Students may add color or decoration after cutting if it supports the design goal.
Students should start by measuring a phone or tablet and deciding the size of the support surface and support feet. They should also plan the mortise-and-tenon structure before drawing the digital design.
| Data Recording / Unit: mm | |
|---|---|
| Support surface | Length: Width: |
| Support leg | Length: Width: |
| Mortise and tenon structure | Tenon size: Mortise size: Number of mortise and tenon joints: |
After measuring, students should sketch the stand surface, support feet, slot positions, decoration, and assembly direction.
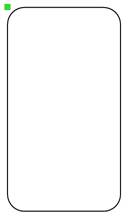
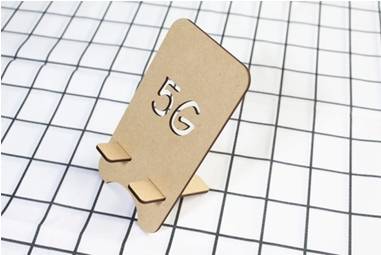
Use the Rectangle Tool to draw the main support surface. In the source workflow, the rectangle is 100 mm wide and 180 mm high. Students can adjust the size based on their own phone or tablet.
Next, use the Rounded Corner Tool to round the four corners of the rectangle. This improves the appearance and makes the support surface more comfortable to handle.
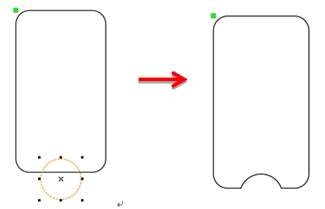
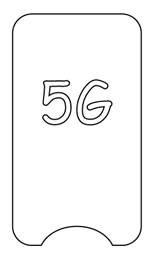
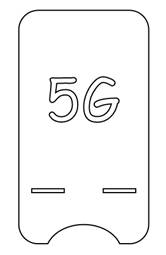
Use the Oval Tool to draw a 45 mm circle at the bottom of the rounded rectangle. Align it with the center of the support surface, then use the Difference Set Tool to cut out a semicircle shape.
Use the Text Tool to add a short design element, label, or decorative text. The source sample uses “5G,” but students may choose their own school-appropriate text or graphic idea.
Use the Rectangle Tool to draw the mortise slots on the support surface. In the source workflow, each slot is 25 mm wide and 3 mm high. Use Rectangular Array to create two slots with 30 mm horizontal spacing, then place and center them under the text.
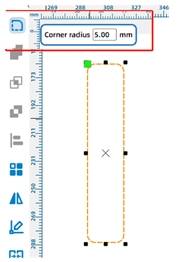
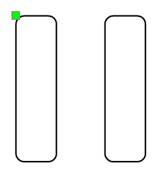
Use the Rectangle Tool to draw a support-foot rectangle. In the source workflow, the rectangle is 25 mm wide and 90 mm high. Use the Rounded Corner Tool with a radius value of 5 to round the corners.
Select the rounded rectangle and use Rectangular Array to copy it. In the source workflow, the horizontal number is 2, the vertical number is 1, and the horizontal distance is 30 mm so the spacing matches the slots on the support surface.
Use the Rectangle Tool to draw a connecting rectangle between the two rounded support feet. In the source workflow, the connecting rectangle is 80 mm wide and 20 mm high. Align it to the center, then use the Union Tool to merge all three shapes into one support-foot structure.

After these steps, the main support surface and support-foot structure are ready for cutting setup.
Select the phone stand objects and open the black cutting process layer. In the source workflow, the material is set to Osong wood, the process is set to cutting, and the processing thickness is set to 3 mm.
This project only uses the cutting process. If test results need improvement, students can return to the Processing Parameters dialog box and adjust the parameter values.

Test whether the support surface length works for the selected phone or tablet.
Adjust the support-foot length and width to compare how they affect stability.
Modify the position and size of the slots to find a better support angle and fit.
Check whether the tenons are suitable for vertical and horizontal phone placement.
After the final settings are confirmed, students can cut the phone stand parts and assemble the support surface with the support feet. The finished stand should hold a phone securely and remain stable on the desktop.
Knowledge Card: A straight tenon is a mortise-and-tenon joint commonly used in woodworking. In this project, the support feet insert through the support surface to create a visible through-tenon connection.
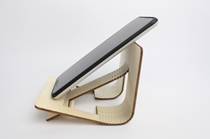
After completing the phone stand, students can design a bracket for a different use scenario. For example, a kitchen stand can hold a recipe card or tablet while someone is cooking. Students can use LaserMaker to create different styles, angles, and support structures.
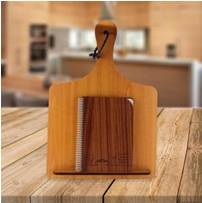
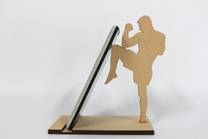
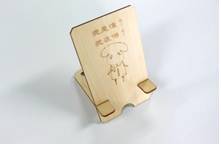
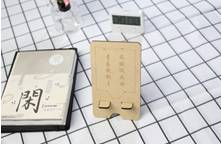
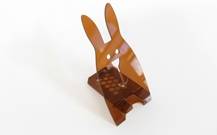
The following examples can be used for classroom discussion and design inspiration. Encourage students to compare support angle, slot position, part shape, decoration, stability, and finished usability.
This project is suitable for classroom laser cutters that support small-format cutting of sheet materials. For schools, makerspaces, and beginner STEAM labs, projects like phone stands, tablet holders, recipe stands, desk organizers, and flat-pack structures can be completed with a classroom laser cutter such as the Thunder Laser Bolt Series.
Teachers can choose the machine and material setup based on classroom space, project size, material thickness, slot fit, and learning goals. The same mortise-and-tenon workflow can also be adapted for other CO2 laser machines when students move on to larger holders or more advanced engineering challenges.
Talk To Our Experts Now!
Please leave your contact information so that we can serve you better.
TAKE THE NEXT STEP WITH THUNDER LASER

 Stable & Consistent MachinesUnlimited ApplicationRobust After-sales SupportFactory Direct Supply


