Tired of tangled cables and cluttered desks? Let’s fix that with something you can proudly display. This Acrylic 2-in-1 Headset & Controller Stand is sleek, sturdy, and easy to make—perfect for gamers and creators who love clean setups. With just a few laser-cut pieces, you can create a stylish organizer that keeps your essentials right where they belong.
Verify the lens is clean or there's no problem in the laser.
Make sure the exhaust fan is working well.
Ensure the air assist is on.
Step 1: Place the Acrylic Sheet on the Work Table
Start by peeling off the protective film from the top surface of the acrylic sheet—the side that faces the laser. This prevents burn marks or smoke stains from forming on the visible surface during cutting. You can leave the bottom film on to protect the underside while it rests on the workbed. Once ready, place the acrylic flat on the laser cutter’s bed and secure it with pins or magnets.
Tips:
There are three common types of pins: T-shaped, L-shaped, and F-shaped. A special use for F-shaped pins is clamping up the plywood to prevent burn marks. When using pins or magnets, pay attention to their height. If they’re too tall, the machine’s sensor or laser head could collide with them and cause damage.
3 common types of pins
F-shaped pin usage
Sensor hits a too high pin
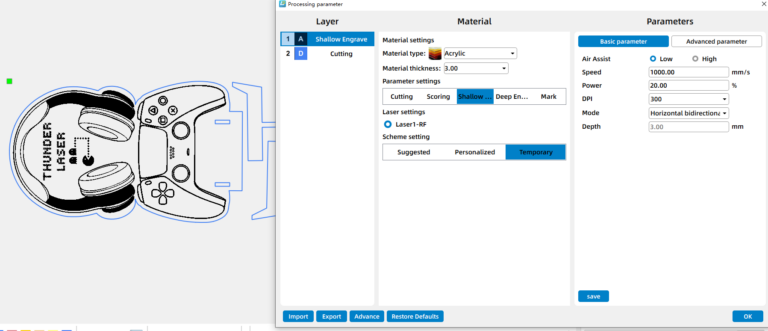
Step 2: Import the File and Check the Settings
Open your preferred laser software (I use LaserMaker) and import the design file. Adjust the size and layout as needed, making sure the designs are evenly spaced to make the most of your acrylic sheet.
For the laser cutting layers, pay extra attention to the minimum power setting. If the min power is too low, it will cause the cutting corners will not cut through; if the min power is too high, the laser cutting will be bad at the corners.
Step 3: Focus Your Laser Machine
Accurate focusing is critical for achieving smooth, clean cuts on acrylic. The Thunder Bolt offers two focusing methods:
·Auto Focus: With one click, the laser head automatically adjusts to the optimal focal distance. This is fast and convenient for flat materials like acrylic sheets.
·Manual Focus: For more control or when working with uneven materials, use the focus stick. Lower or raise the laser head until the focus stick stands perfectly vertical against the acrylic surface—this indicates the correct distance.
Tip: If your material is slightly warped or not perfectly flat, manual focus is recommended for more precise results.
Auto focus
Manual focus
Step 4: Frame the Design and Start Laser Cutting
Before starting the job, run the frame function(also called border) in your software. The laser head will trace the outline of the design with a visible guide light. This helps confirm that the design fits within your acrylic sheet and avoids wasting material. Once everything is adjusted, simply press ‘Start’ to begin laser cutting the acrylic with the Thunder Bolt.
Step 5: Monitor the Laser Cutting Process
Monitor the job as it runs—watch for excessive smoke, movement of the acrylic sheet, or any warning alarms. Never leave the laser unattended while it’s operating. While observing, remember that the laser beam is extremely powerful. Even with the protective lid closed, avoid staring directly at the marking spot for too long. A quick glance to check progress is fine, but prolonged gazing should be avoided for safety reasons.
Step 6: Assemble the Stand
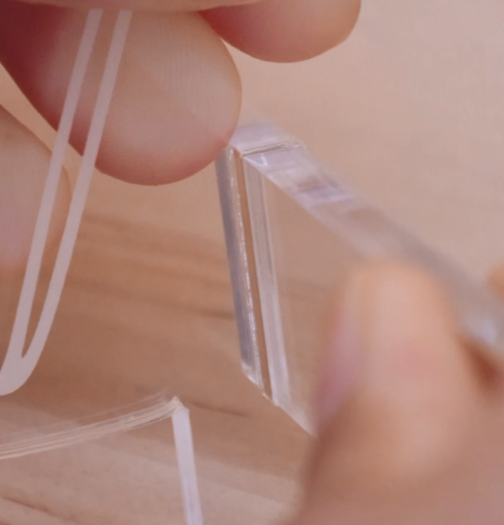
Once all pieces are cut, carefully remove them from the laser bed. If you haven’t peeled off the protective film on the back of your acrylic yet, do it now for a clean, polished look. Then, align the tabs and slots as designed and fit the pieces together to form your 2-in-1 headset and controller stand. No glue is needed—the interlocking design holds everything firmly in place.
Step 7: Complete the laser cutting
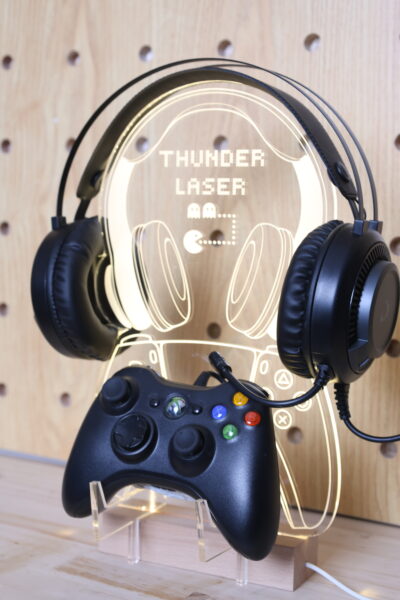
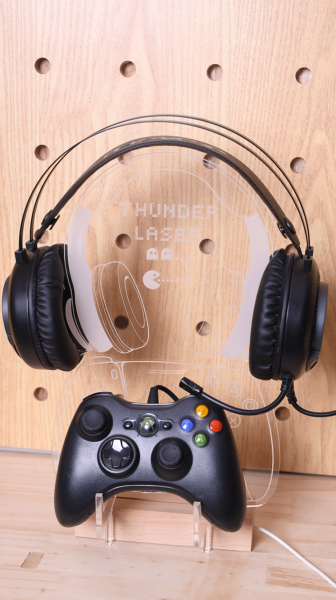
Now your headset and controller have a stylish, functional home. Place it on your desk, gaming setup, or entertainment area and enjoy the clean, organized look of your personalized stand.
Come and Try!
That’s it—you’ve just made your own acrylic 2-in-1 stand! Simple, modern, and practical. Whether you’re crafting for your own desk or planning to sell custom designs, this project is a great start. Fire up your laser, grab some acrylic, and make one today—you’ll love how neat your setup looks!


.png "laser cutter Globle") International
International
 United States
 Brasil
 Canada
 Costa Rica
 Mexico
 Česká
Česká
 Romania
 Polska
 Ireland
 Italia
 Lietuva
 Россия
 Deutschland
 Britain
 Україна
 France
 Sverige
 Norway
 Denmark
 Ελλάδα
 Portugal
 한국
한국
 中国
中国
 中国香港
中国香港
 Israel
 中國臺灣
中國臺灣
 ジャパン
ジャパン India
India
 پاکستان
 پශ්රී ලංකා
 ประเทศไทย
 Australia
 New Zealand
 South Africa