Laser Marking – Customized Leather Labels

9月 15, 2025

Introduction

Want to turn an ordinary hat into a unique and special one?
Leather labels add a premium touch to hats, bags, and clothing. With a laser machine, you can mark custom logos, names, or patterns on leather and then attach the labels to your hat for a personalized, professional finish. This project is simple, creative, and perfect for both DIY enthusiasts and small businesses.

Machine Used

Aurora Lite

Material Needed

3mm Leather

Settings

Laser Marking 1
  1. Speed:1,500mm/s
  2. Power:20%
  3. Frequency: 50kHz
  4. DPI:508
Laser Marking 2
  1. Speed:1,000mm/s
  2. Power:50%
  3. Frequency: 50kHz
  4. Passes: 1

Before your work begins

Step 1: Place the Leather

Choose a piece of genuine or PU leather. Wipe the surface clean to remove dust or oils, as these can affect marking quality. Place the leather flat on the laser bed and secure it with pins or magnets if needed.

Put the leather on the work bed

Step 2: Import Your File and Check the Laser Marking Settings

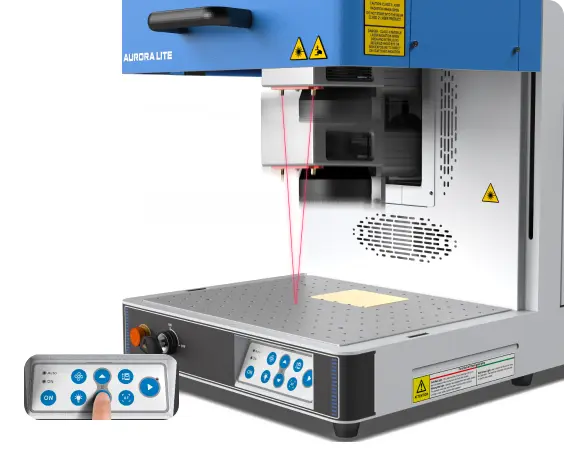
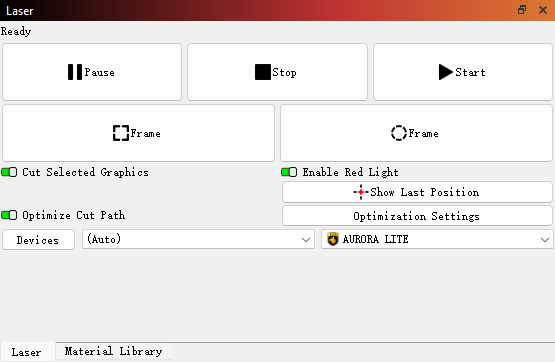
Open your logo, text, or design file in your preferred laser software. Scale it to match the size of your label. Position it within your material area and preview with the frame function. Always double-check your design dimensions in the software to ensure they match the actual marking area. Use the “preview” or “frame” option to avoid accidental misplacement.

parameters for laser marking a leather label for hats

Step 3: Focus Your Machine

Focus is the key to success. Once focus is ignored, the results may not be satisfying. Before you start, make sure you have finished focusing. With the Aurora Lite, you have two ways to achieve perfect focus. The first method uses the red-dot pointer to assist—simply adjust the laser head until the two red dots overlap, and you’re good to go. The second method, which is often more precise, is manual focusing with a focus stick. Adjust the height of the laser head until the focus stick just touches the surface of the material in a perfectly vertical position. Whenever possible, use manual focus for better accuracy.

Red light focus
focus ruler focus

Auto focus

Manual focus

Step 4: Frame the Design and Start Laser Marking

When we click the “Frame” , we can see red light show the outline of marking area. It’s safe, and the frame will be on the surface of the leather labels. Once it isn’t, move your leather labels or design until they are at the same position. Once everything is adjusted, simply hit ‘Start’ to begin laser marking with the Aurora Lite.

see how you can operate the thunder laser aurora lite with lightbun

Step 5: Monitor the Laser Marking Process

Keeping an eye on the machine allows you to spot unusual conditions—such as error alarms, smoke build-up, or unexpected pauses—before they become problems.
While observing, remember that the laser beam is extremely powerful. Even with the protective lid closed, avoid staring directly at the marking spot for too long. A quick glance to check progress is fine, but prolonged gazing should be avoided for safety reasons.

Laser engraving the leather label for hats

Step 6: Complete the Laser Marking

After marking and cutting, gently wipe the labels with a dry or slightly damp cloth to remove residue. Avoid harsh chemicals that could damage the leather finish. Now comes the finishing touch—attaching your label to a hat. You can sew the label on with matching or contrasting thread for a classic look, or use strong fabric glue for a quicker option. Make sure the label is positioned evenly on the front, side, or brim of the hat before securing it.

Attach the Leather Label to Your Hat or Anything You Want

Come and Try!

I’ve got my custom leather label stitched onto a hat—what about yours? A small detail like this can make your hat truly one-of-a-kind. Grab a piece of leather, fire up your laser, and see how your logo or design transforms into something wearable. Try it today and show off your personalized style!

Laser marked leather labels
Thrive with THUNDER LASER Now

    ————————
    Download popup form

    America

    Europe

    Aisa

    Oceanica

    Africa